Roblox Studio: Learn Roblox Game Development
A-Z Guide to Roblox Studio for kids teaching them how to download and get started with Roblox Studio setup
In our next BrightChamps Guides series, you will learn the fundaments of Roblox Studios – from downloading and installation to making your first game on Roblox.
Before that, lets quickly have a look at the basics of game development and programming
A programming language is a language that we used to communicate with the computer with a proper set of grammatical rules for instructing a computing device to perform some specific tasks.
Everything that makes our work easier around us has been programmed to perform specific tasks, so coding has become an essential part of every lifelike washing machine, fan, TV, computer, AC, cellphone, and much more.
Roblox is an online 3D game platform that is very popular and these are open for the public to play in a multiplayer setting, ranging from simulations to battle royales, just like other games that are on the market also you can create your own with Roblox game using the platform known as Roblox Studio.
You can also create your creative things and at every age, people can play and create a Roblox game.
With its versatile properties jumping into Roblox game-making has been easier
What Does Coding Mean?
Coding is nothing but the process of using a programming language to get a computer to behave how you want it to behave. It will do the same actions which we have given in the particular order of instructions.
There are two types of coding or programming.
What is Text-Based Coding?
Professional coders employ text-based coding, which is done by typing on a keyboard while following the syntax (rules and regulations or grammar) of a programming language.
It involves writing lines of code and can be introduced to people after they have learned how to use block-based coding. It is very essential while typing instructions in a programming language to follow the syntax of the particular coding language. The syntax is nothing but the grammar and spelling rules of a particular programming language.
Programming in Roblox is done in a programming language called Lua. Codes are stored and run as scripts that can be placed anywhere in the game. Meaning if you put the script in a certain section of the game when that section is loaded, Roblox runs the code.
What is Roblox?
Roblox is a prominent online 3D game platform that allows users to play in a multiplayer setting, with games ranging from simulations to battle royales. As with other games on the market, you may also design your own Roblox game using the Roblox Studio platform.
You can also make your own creative works, and people of all ages can play and create Roblox games. With its versatile properties, Roblox has made getting into game-making easier than ever before.
It was created by the ROBLOX Corporation and is not a single game, but rather an online library of games that can be played and developed by other users. Roblox is compatible with PC, Android, iOS, and Xbox One/Series X.
What is Roblox Coding?
Roblox coding is the process of creating interactive online 3D games with the Roblox Studio platform. As briefly mentioned above, Roblox employs Lua scripting language.
Lua is a widely-used programming language in game development since it is simple to learn and use while creating 3D games. It may also be used to make professional games, construct adventure maps, racecourses, and runner games, among other things.
Is Roblox for Free?
Yes, creating a Roblox account is completely free. In addition, Roblox also has a lot of free animations and games. However, not everything on the platform is free, meaning there are a lot of in-platform purchases. These purchases can be made with Robux, Roblox’s virtual currency.
Robux may be used to buy animation and accessories, among other things, in Roblox Studio. Robux can be earned through Microsoft Rewards or purchased. You can also get “free” Robux by entering contests and giveaways on a variety of websites, but it is a very high risk since not all websites can be trusted.
How to Create a Roblox Account
Follow the steps below to create a Roblox account
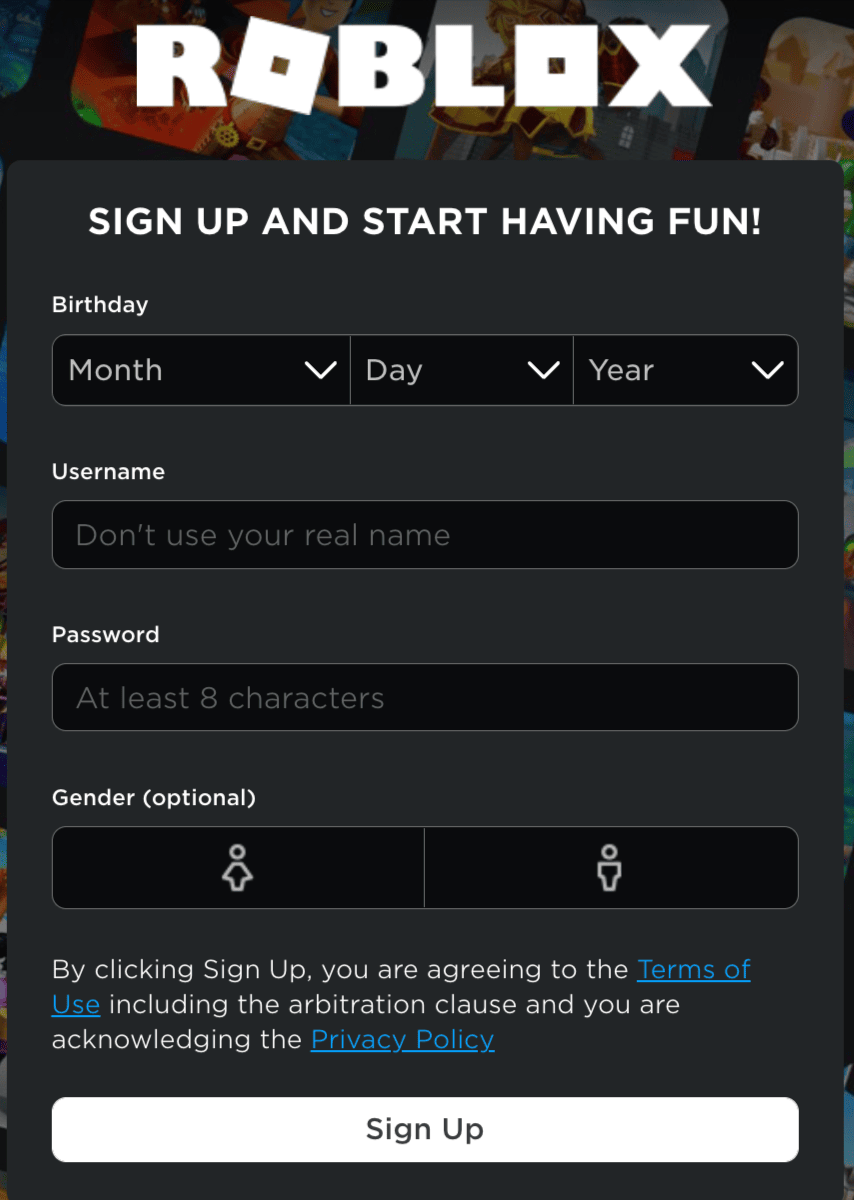
- Visit the official Roblox website and start your account creation process by clicking on Sign Up.
- Fill in all of the required information. Below, I’ve listed some of the most crucial and necessary details to include when creating a Roblox account
- Birthday: When creating an account, it is critical to provide your correct birth date because Roblox has security and privacy settings based on the user’s age.
- Username: It should not be your real name. Create a unique username.
- Password: Maintain a password that is difficult to guess. Keep it to yourself, unless you want to share it with your parents or guardian.
- After filling in the Gender (which is optional), click on Sign Up. When you click Sign Up, you will be presented with a Verification dialog box. Solve the challenge by clicking on Verify.
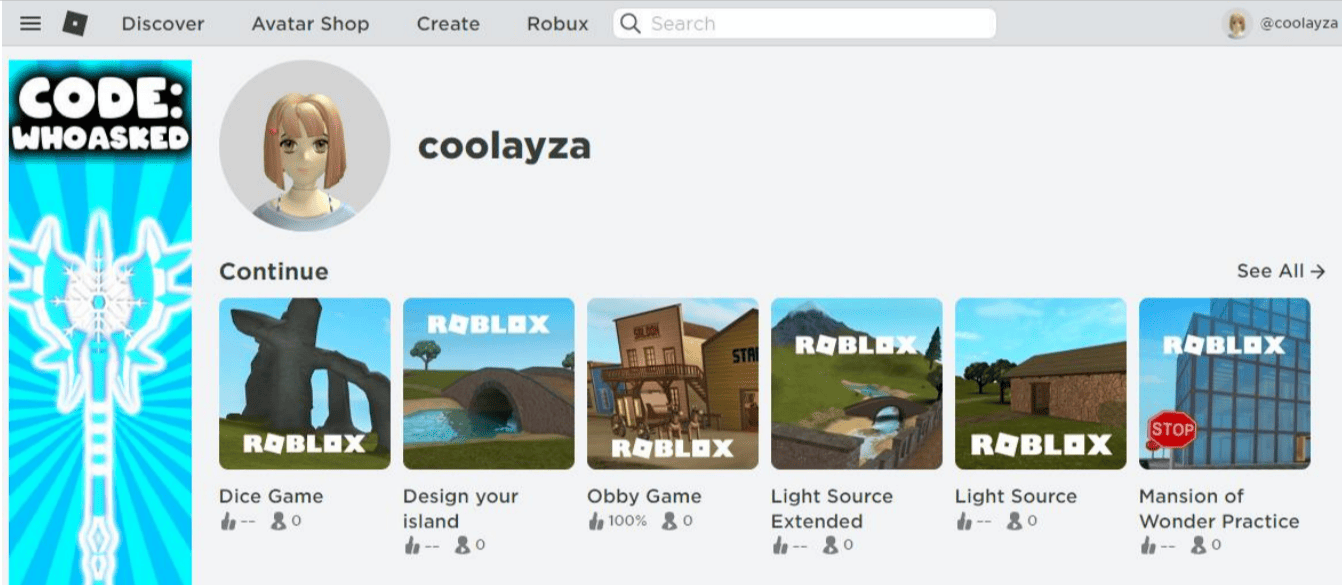
- That’s it! Your Roblox account has been created! You will now be directed to Roblox Home.
- Once you’ve created your account, enter and verify your email address in case you need to reset your password at any time.
What is Roblox Studio
Roblox Studio is a game engine created by Roblox that includes all of the tools necessary to code and create games. Simply described, it is a Roblox feature or platform that allows users to develop games.
This studio is completely equipped with an animation editor, several tools, and code functions. As previously stated, Roblox Studio supports the Lua programming language for game development. Roblox Studio is currently only available for Windows (7 or above) and macOS (10.11 or higher).
How to Download Roblox Studio
Follow the steps below to download and install Roblox studio
Step 1: Go to the Roblox Website.
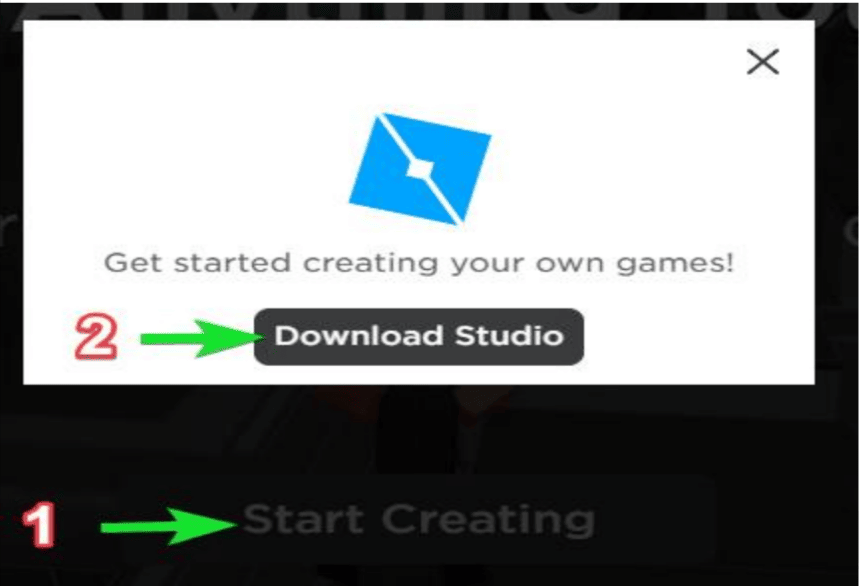
Step 2: Click on the Create option at the top of Roblox homepage and then click on ‘Start Creating’.
Step 3: Now click on the Download Studio button as shown in the image below.
Step 4: The .exe file will get downloaded on Computer/PC/Laptop.
Step 5: After the download is complete, double click on the downloaded file, Roblox Studio will begin installing, as shown in the image below.
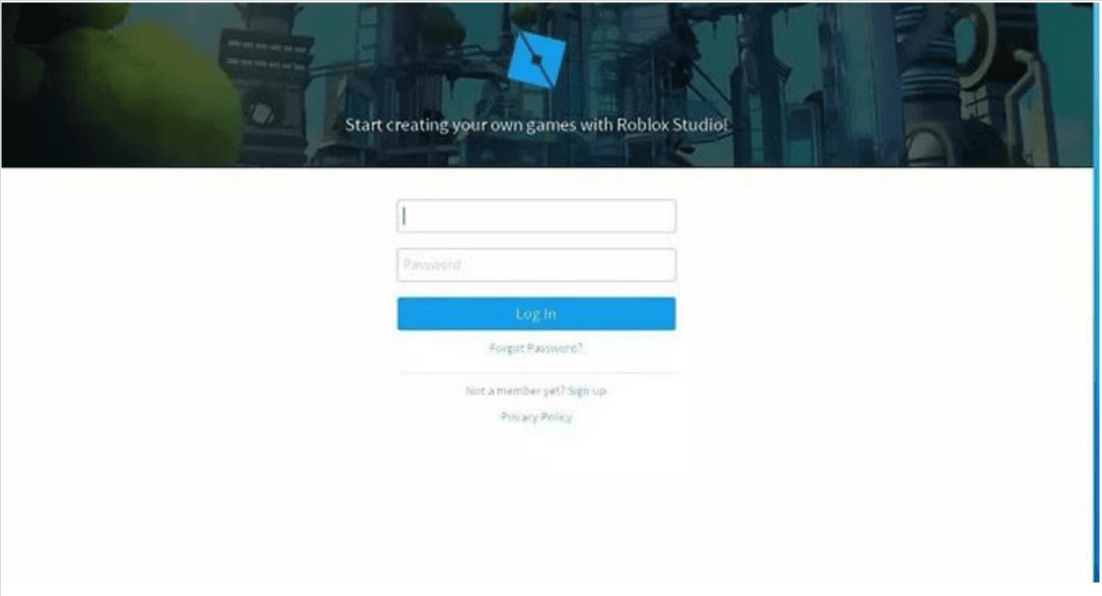
Step 6: Once the installation is complete, enter your Roblox username and password.
Your screen should now look like the one below, and you’re ready to start making games on Roblox Studio.
Roblox Studio Features
Roblox Studio includes a lot of features, but here are a few of the more significant ones:
- It has a large online library where you can find 3D models, textures, and images, among other things.
- It employs the LUA programming language which is very easy for beginners and also for game logic scripts.
- It is a well-documented API.
- You can instantly publish games to Roblox so everyone can play them.
Introduction to Roblox Studio Interface
General Interface
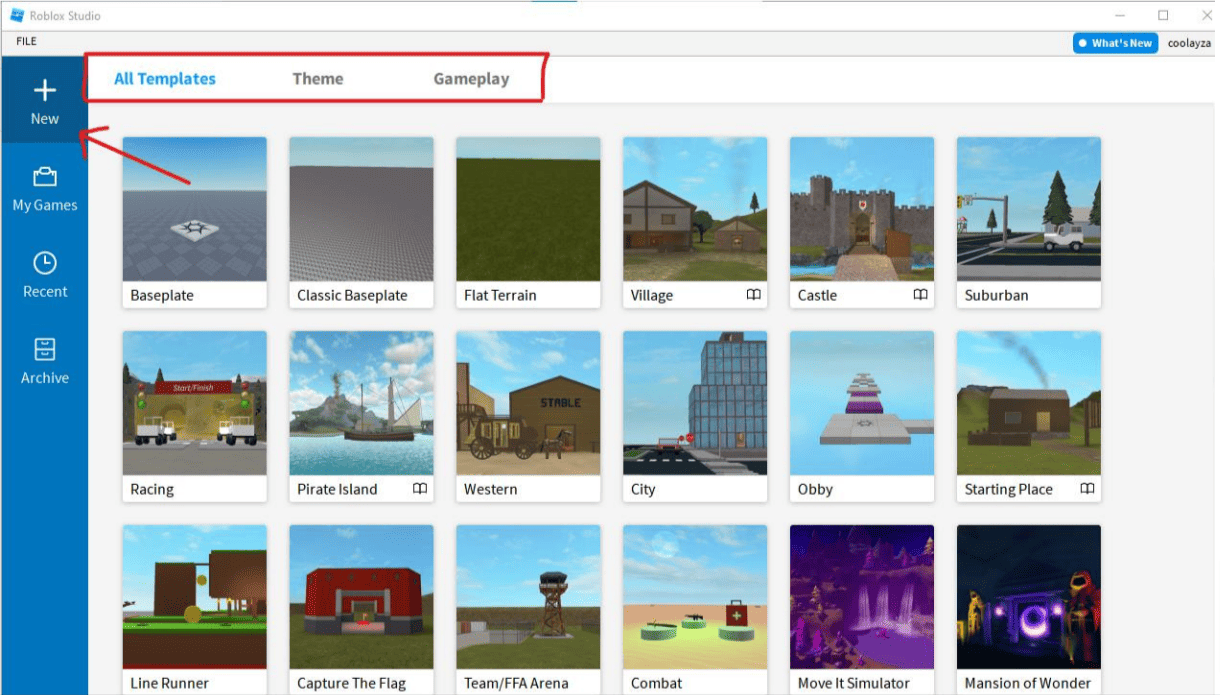
- As soon as we log in, you can see the Roblox Studio interface as shown in the image below. We can see the options for All Templates, Themes, and Gameplay if we click on ‘New.’ In the ‘All Templates’ menu, we can see all of the templates.
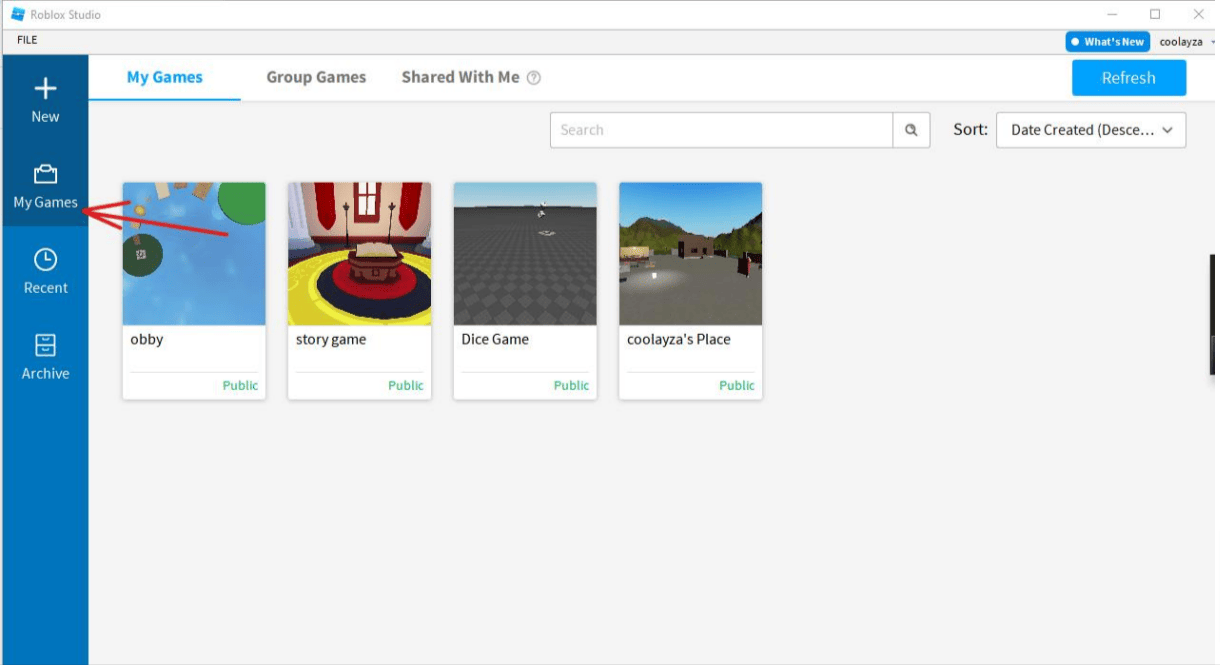
- Click on ‘My Games’ to see the games you have created. There are three alternatives available here; My Games, Group Games, and Shared With Me.
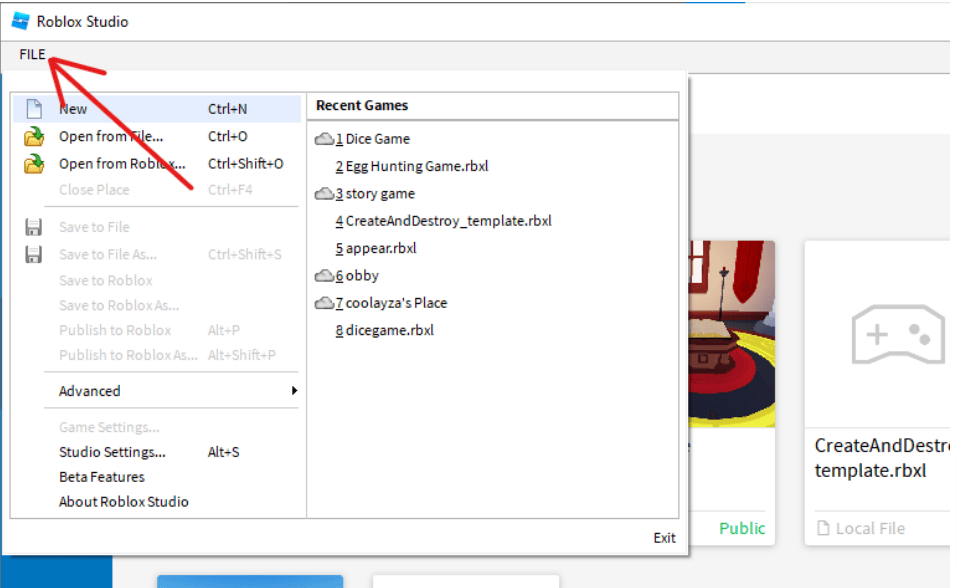
- When we click on File, we are presented with a variety of options, including New, Open from files or Roblox, Settings, and so on.
- When we select a template to build a new Roblox 3D game from the New menu, the interface will appear as shown in the image below. The same interface will appear when we choose to make changes or upgrade a game.
- Once this new interface is open, we can move about by pressing w, s, a, d, or the arrow keys. We can also use the mouse to look around, and the space key on the keyboard is used to jump.
- Home tab: It’s the first tab, above the playback icons, on the top of the screen. It is useful in the panel’s object selection and manipulation tools.
- Clipboard: We can access options like cut, copy, and duplicate from here.
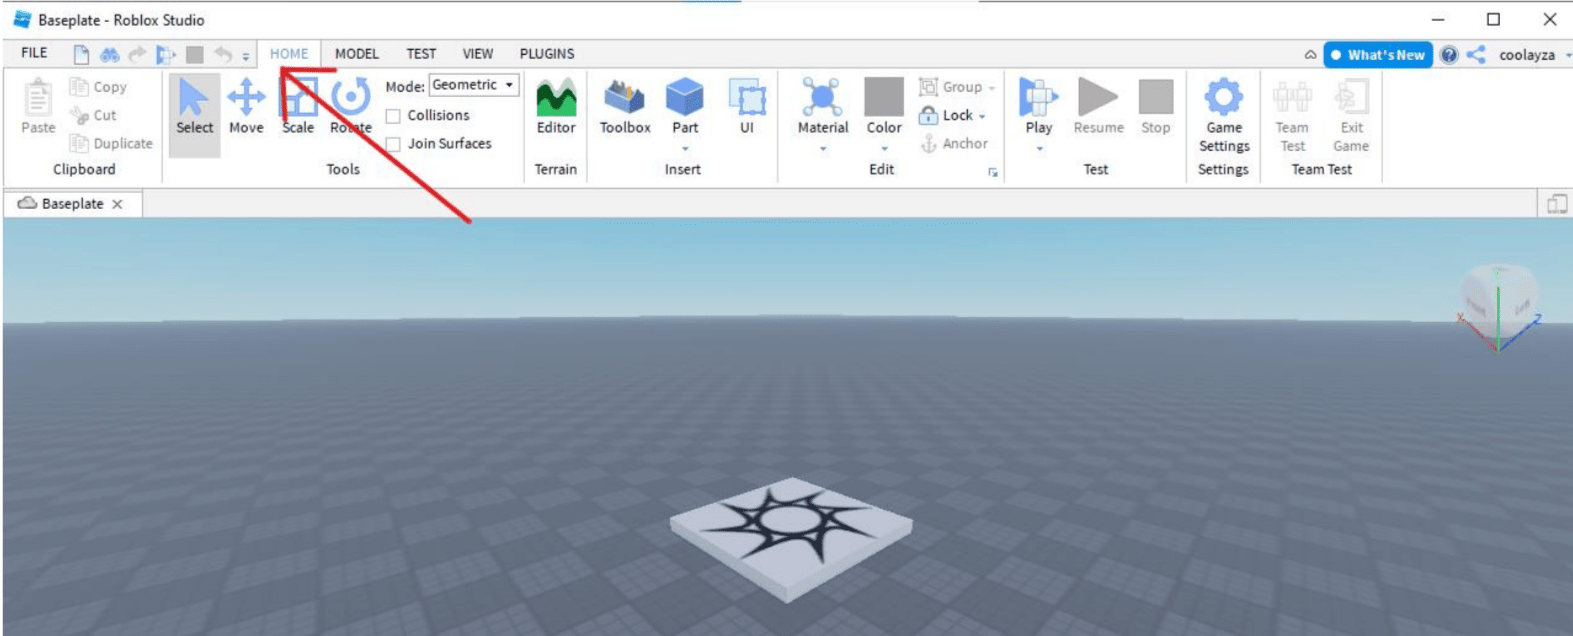
Home Tab
Now will go over major sections within the Home tab; Tools, Terrain, Insert, Edit, Game Settings, and Test.
Let us look at the usage of each tool in depth.
1. Tools Section
- Click on the ‘Select’ tool in the toolbar at the top of the screen to select any object, then click on the object in your game that you wish to select. A blue border will surround an object that has been selected. We can also move an object by clicking and dragging it after we select it.
Note: If the Select, Move, Scale, or Rotate tools aren’t visible, go to the top of the screen and click the “Home” or “Model” tab.
- To delete an object, simply select it and press Delete on the keyboard.
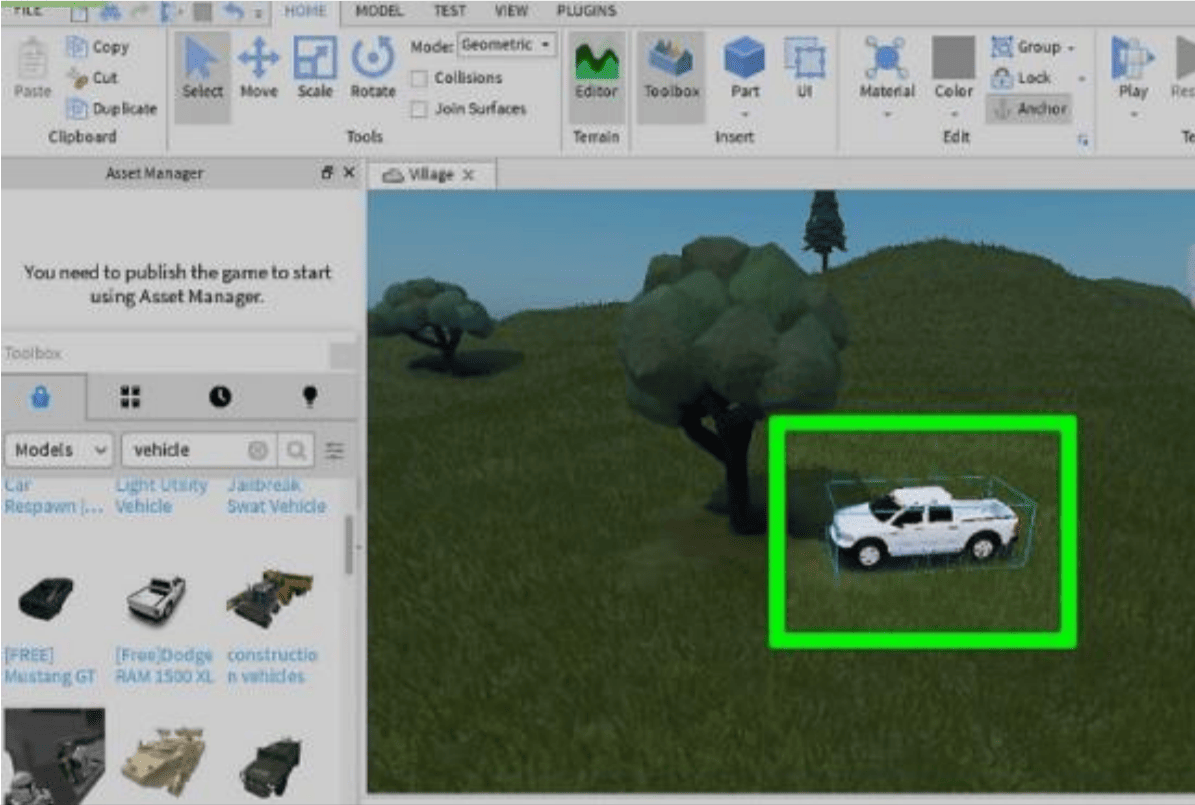
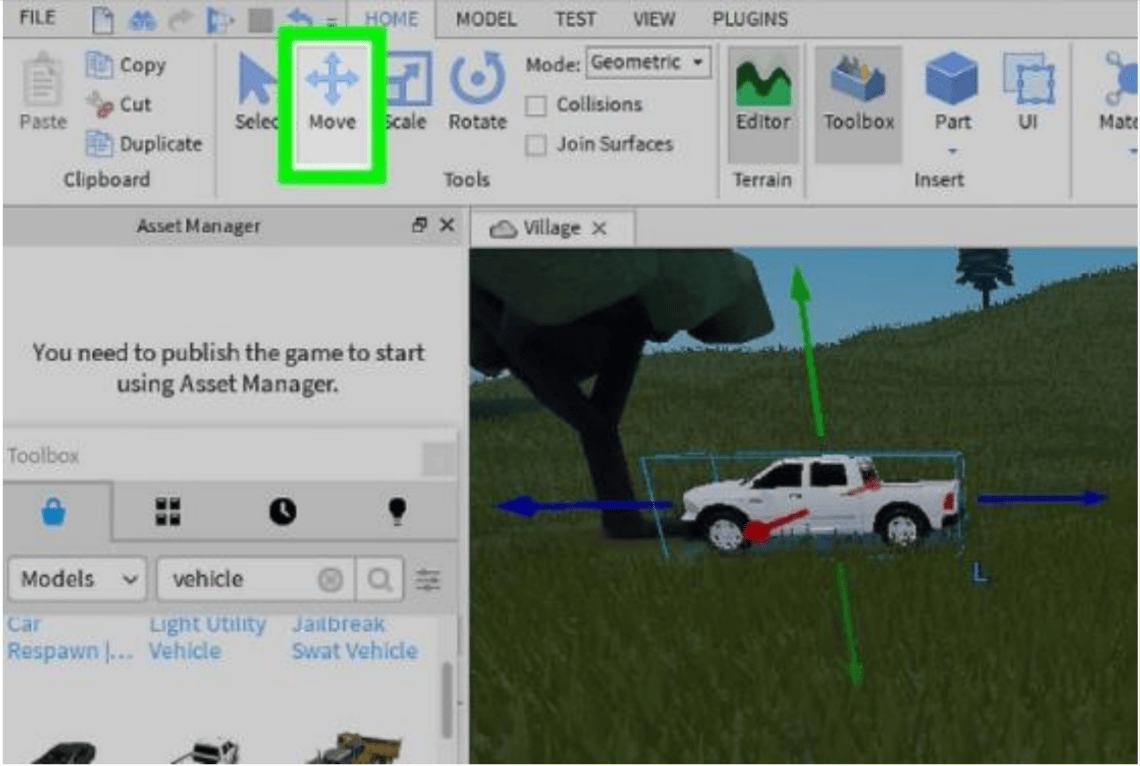
- To move an object, simply click the ‘Move’ tool in the panel and then click on the object you wish to move. Click and drag the red, green, and blue arrows to move them around.
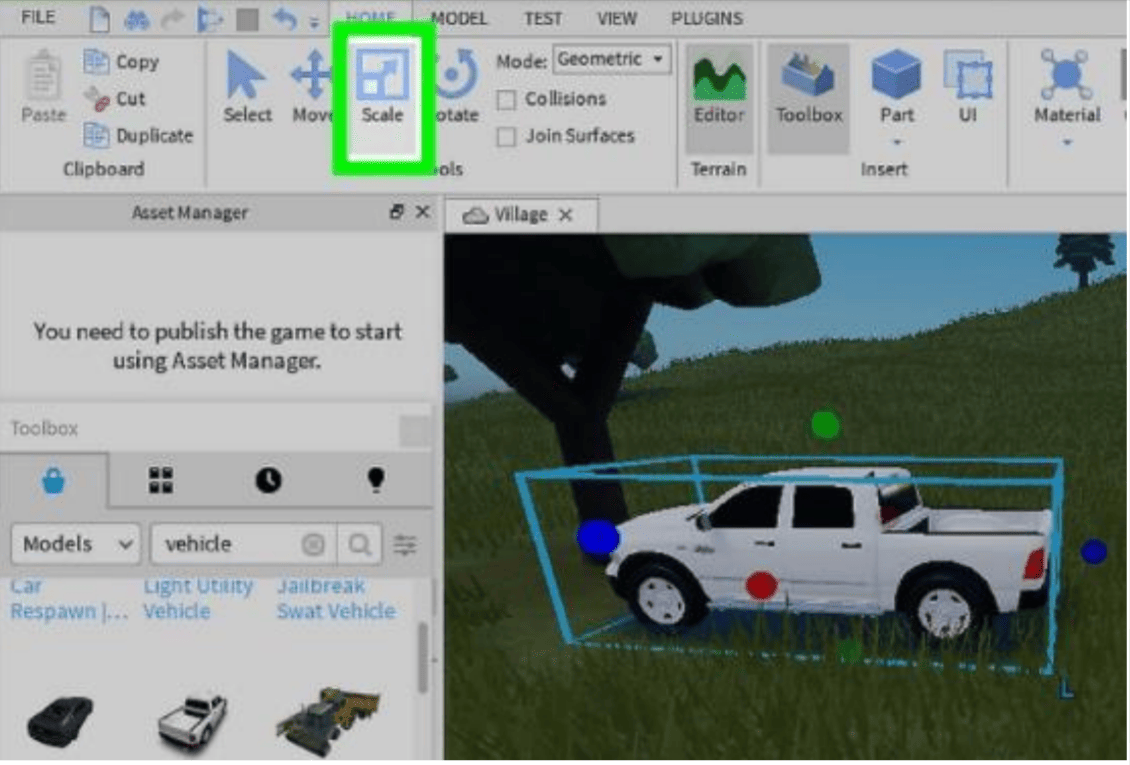
- We can adjust the size of an object by using the ‘Scale’ tool. To make an object larger or smaller, select it and click and drag one of the red, green, or ball icons on the side.
- The Rotate tool can be used to rotate the desired object. To rotate an object, select it and click and drag the red, green, or blue rings.
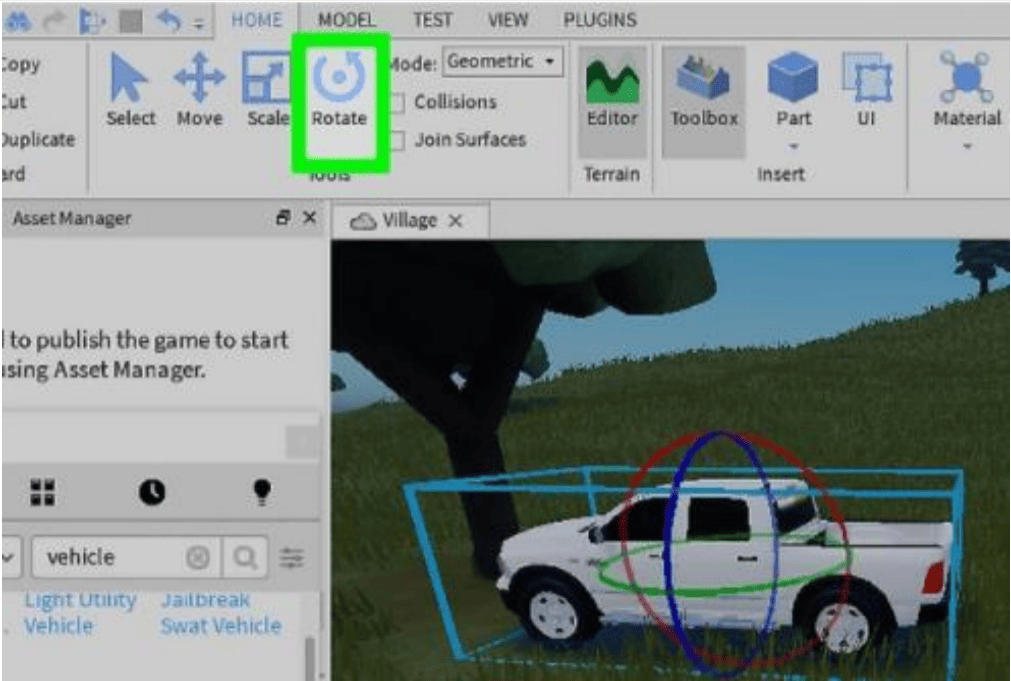
- Collision is used to collide with the player, and Joining is used to connect with the provided surface. Geometric and physical modes are available.
2. Terrain Section
- Open the Terrain editor by clicking on the Editor section that has ‘Terrain’ in it. In our design area, we can see a blue box that represents the area where the terrain will be generated.
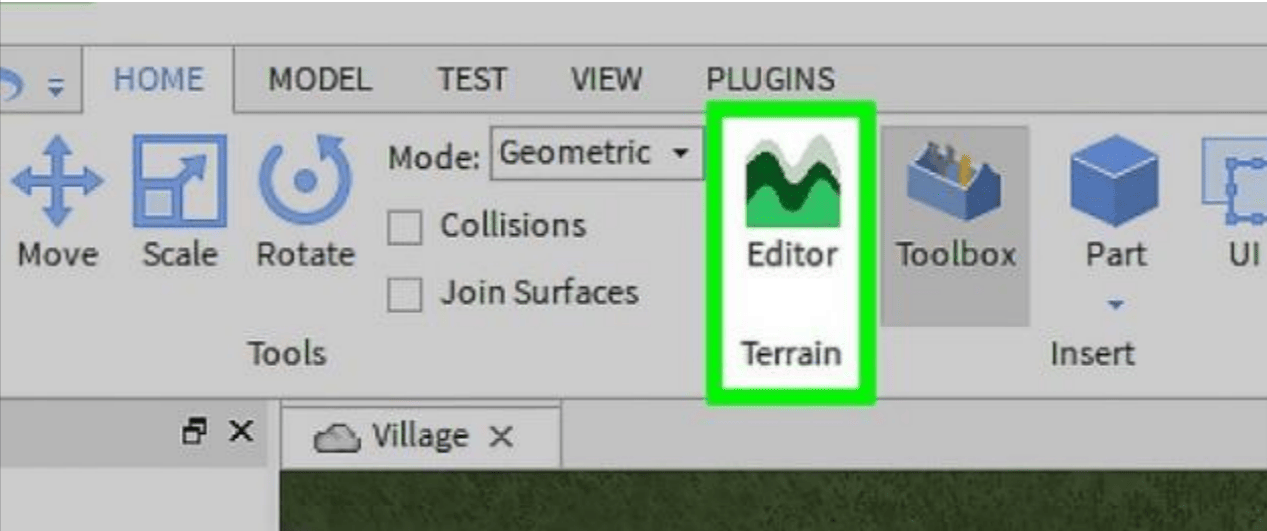
- Choose your desired terrain features, and they will be generated at random. To pick features, go to the left side of the Terrain Editor window and scroll down to the bottom. Select the checkboxes for the features you want to generate. Water, grasslands, dunes, mountains, arctic, and canyons are some of the features.
- Adjust the size of the biomes we wish to create with the slider bar.
- Toggle the cave generation on or off by clicking the toggle switch.
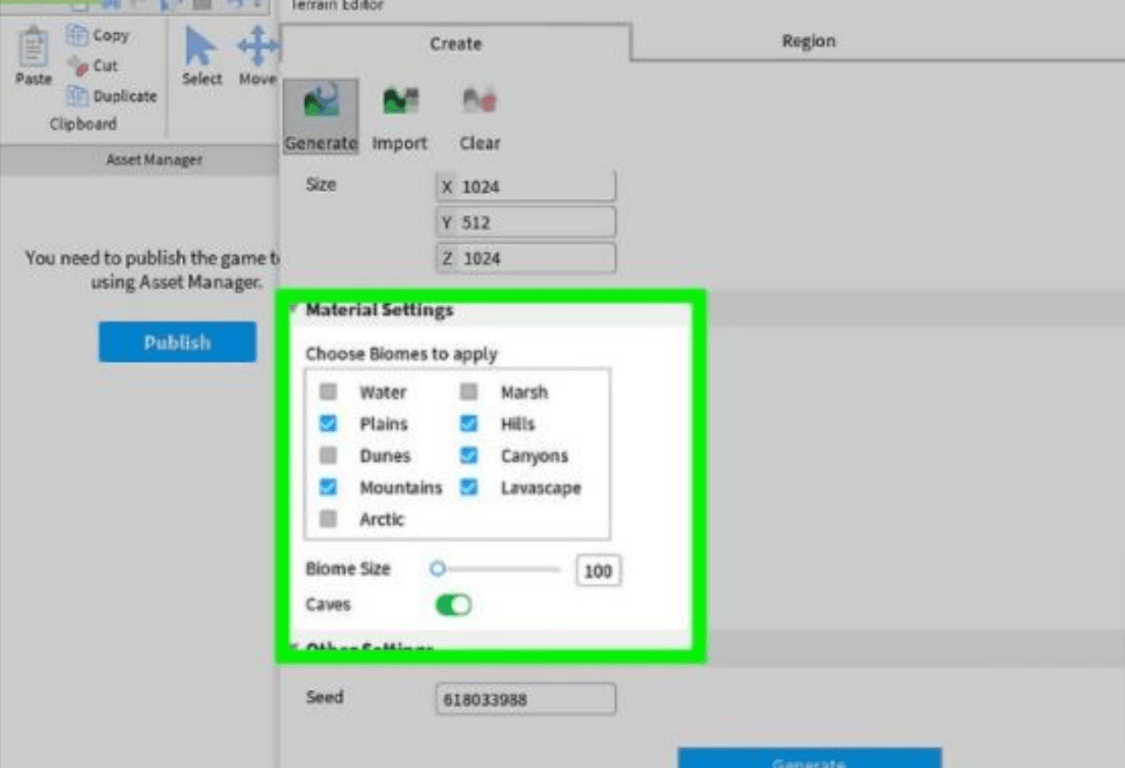
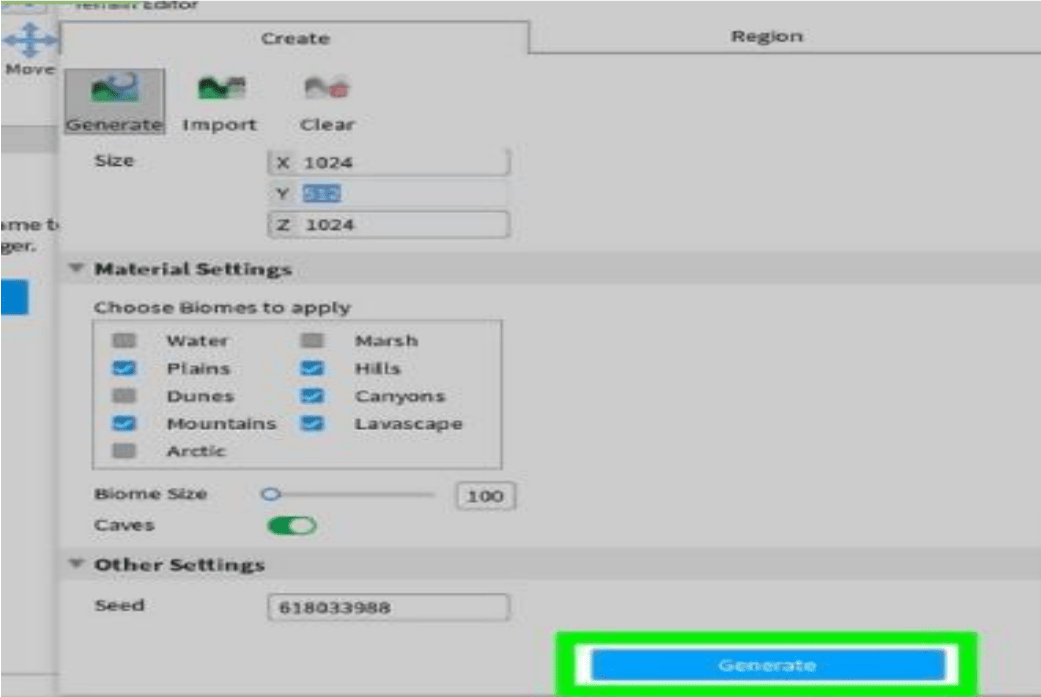
- Once you’ve made all of your choices, click the Generate button and wait a few minutes for the landscape to be generated.
- Select the Edit option from the drop-down menu. This is where you can make changes to the terrain tool.
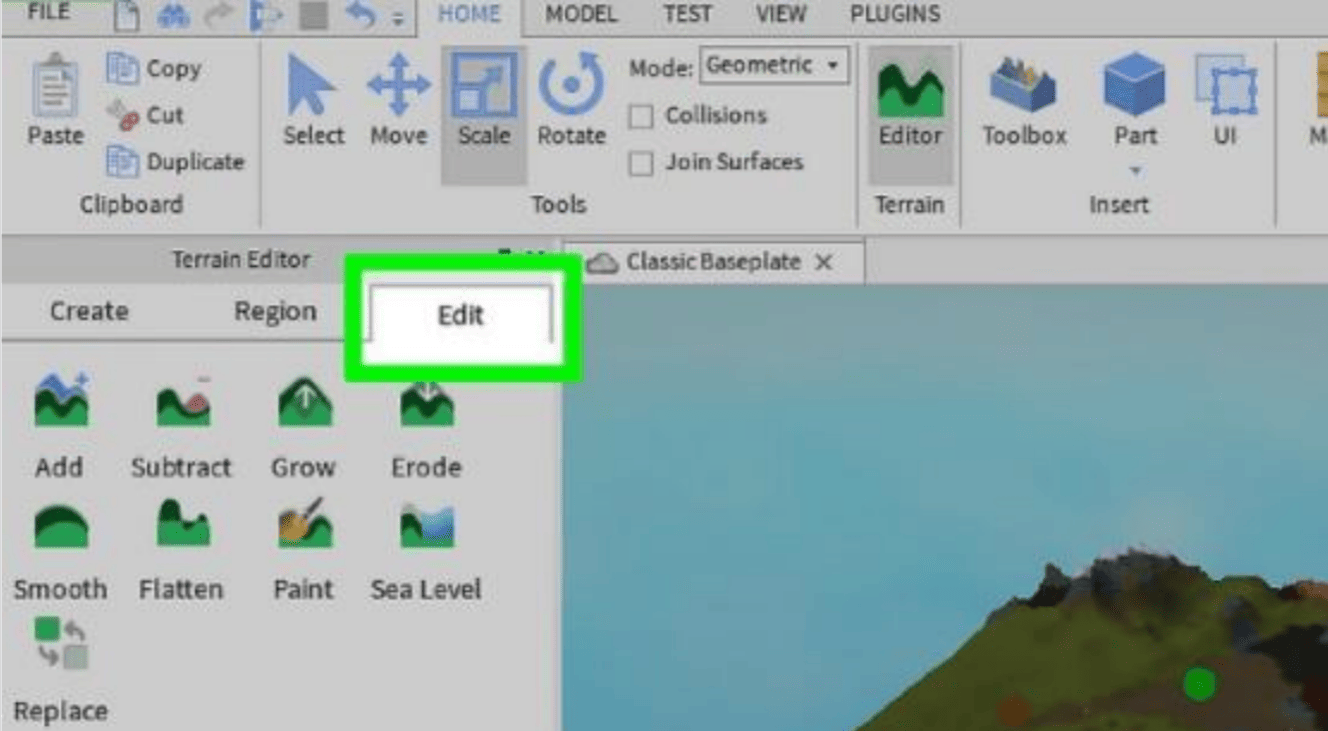
- You can choose from nine different tools depending on your needs. The list is as follows:
- Add: It is used to add new chunks of terrain to the exact size and shape of the brush.
- Subtract: It’s used to remove sections of the landscape by precisely controlling the brush’s size and shape.
- Grow: This is used to increase the elevation when the brush is clicked.
- Erode: This is used to lower the elevation of the section where the brush is clicked.
- Smooth: This is used to make the area where the brush is clicked smoother.
- Flat: Use this to flatten the surface of the area you’re brushing over.
- Paint: This is used to alter the terrain’s appearance. Select this tool, then scroll down to the Terrain Editor panel’s bottom and click on the terrain type you want to paint.
- Replace: This command is used to swap out one terrain type for another. Select the kind you wish to modify as the source material, then below ‘Target material,’ select the material you want to change it to.
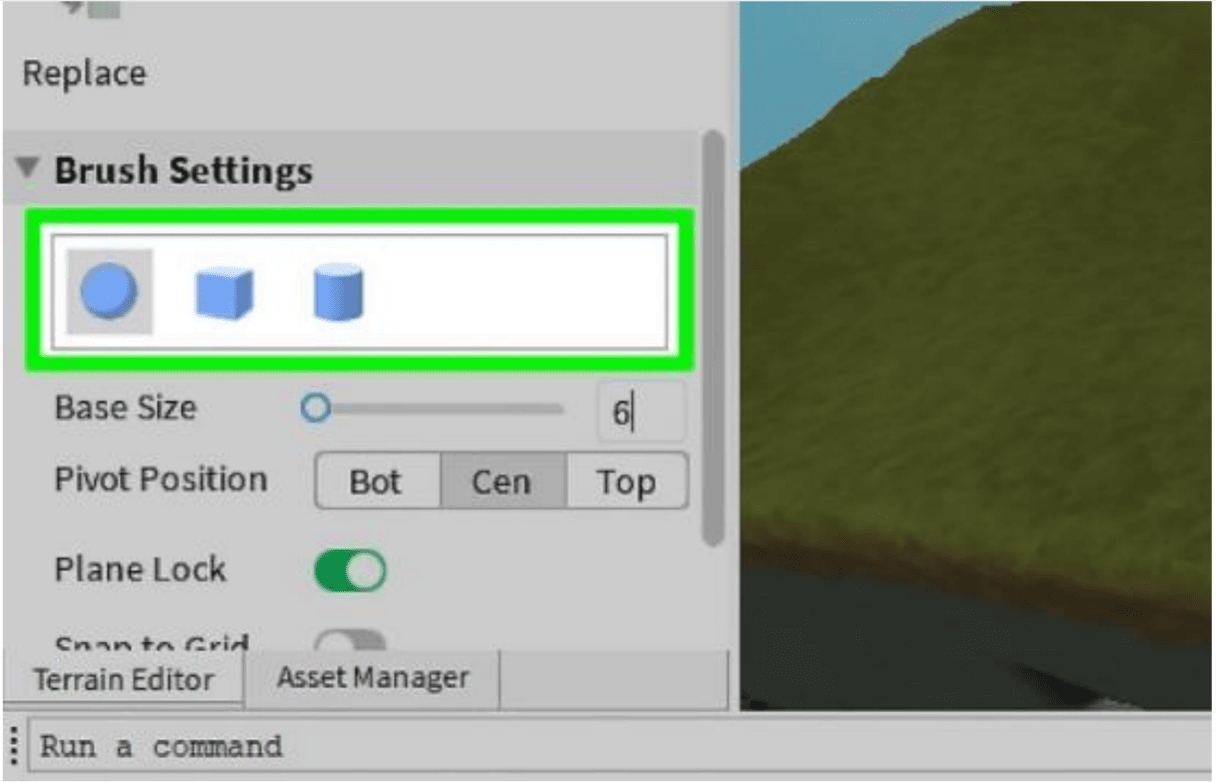
- Choose the brush shape you want to use. We have the option of selecting a sphere, cube, or cylinder.
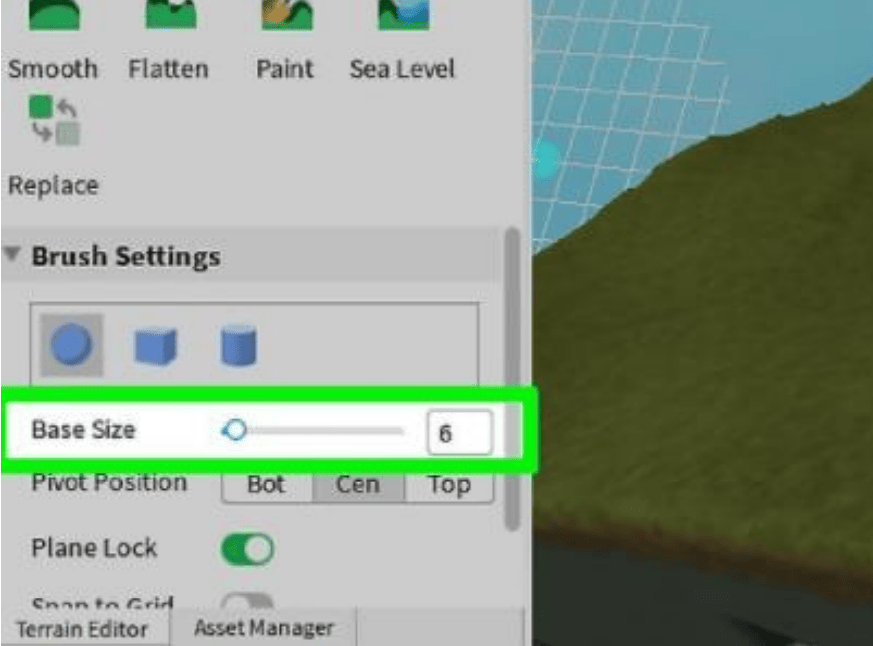
- The ‘Base size’ slider is now used to modify the brush size according to your needs. To alter the brush size to any number between one and sixty-four. You can also change the brush’s strength, which runs from 0.1 to 1, with 1 being the most powerful.
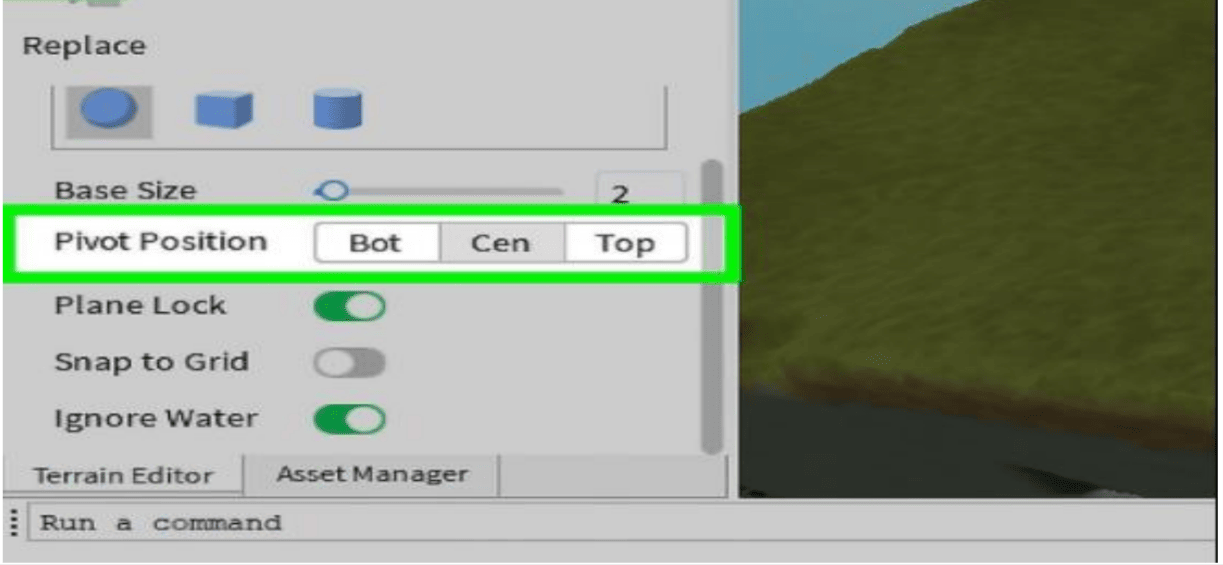
- Click one of the three buttons next to ‘Pivot position’ to try to alter the location of the selected brush. The following are the three options:
- Bot: This positions the bottom of the brush on the top of the terrain surface.
- Cen: This positions the center of the brush on top of the terrain surface.
- Top: This positions the top of the brush on top of the terrain surface.
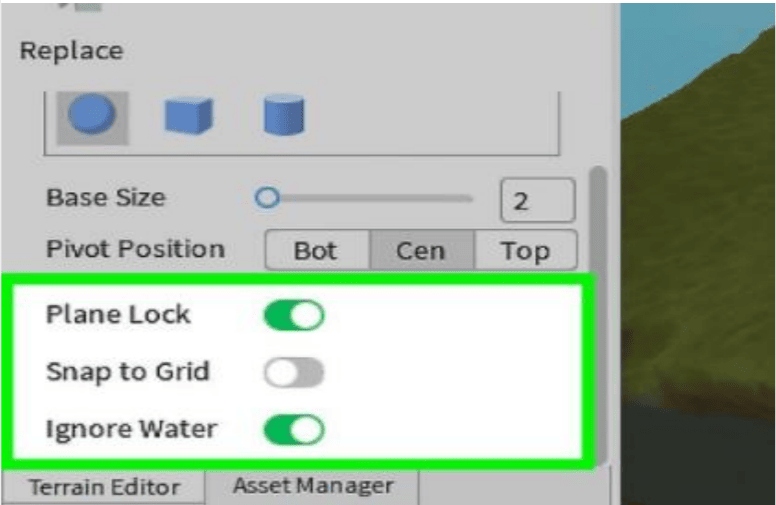
- To change the brush settings, we can use one of three toggle switches:
- Plane lock: It shows a grid of the plain, the brush is locked, and you can only move with the plain you’ve chosen.
- Snap to the grid: These only paint grid points.
- Ignore water: it ignores water.
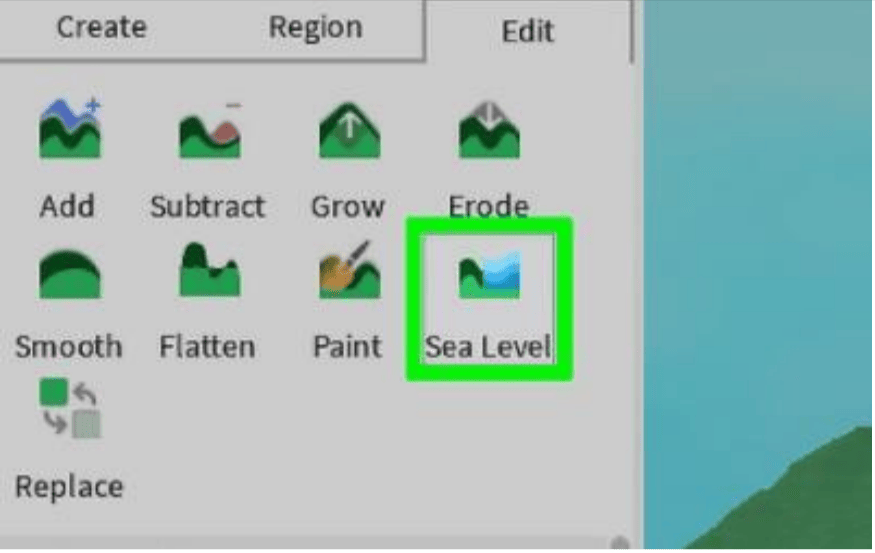
- Sea Level: You can use the Sea Level tool to generate a constant water level in any area.
3. Insert Section
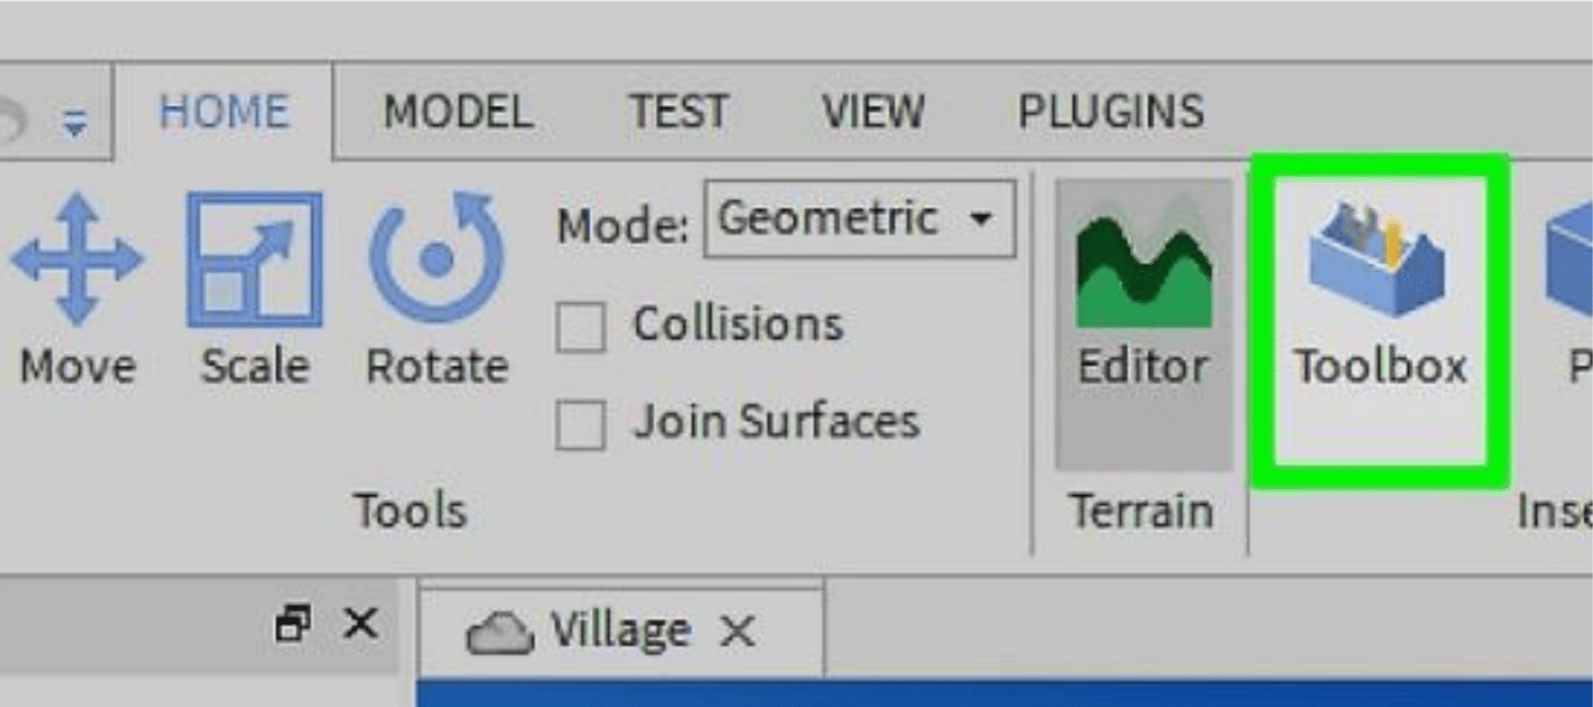
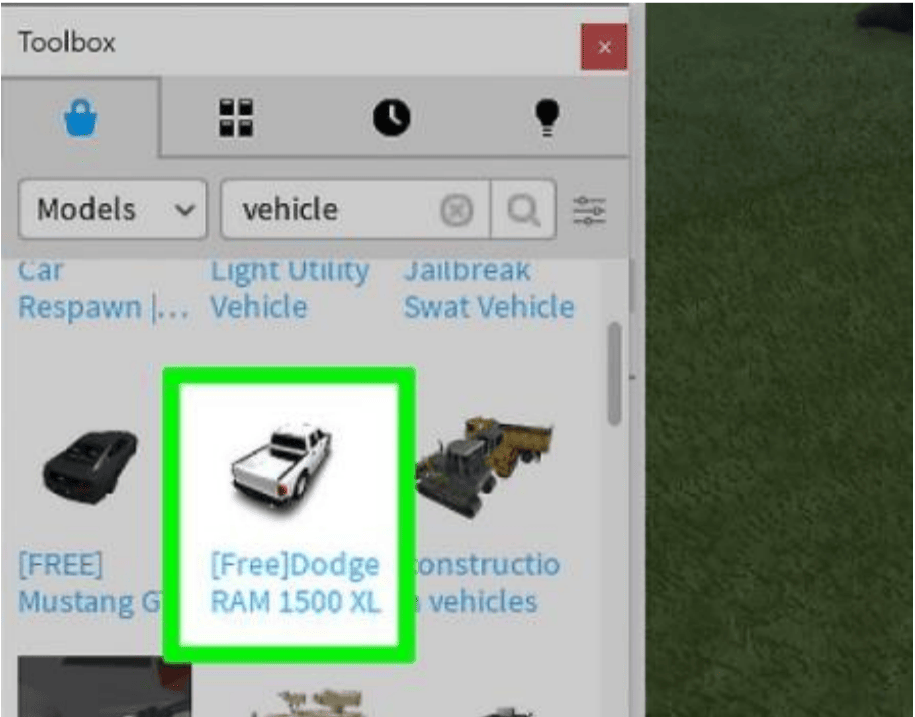
- The Toolbox panel may be open by default, but if not, click on it and it will appear on the left side of the screen.
- From the Toolbox, we can search for anything. Search for your desired item by entering the name on the search bar.
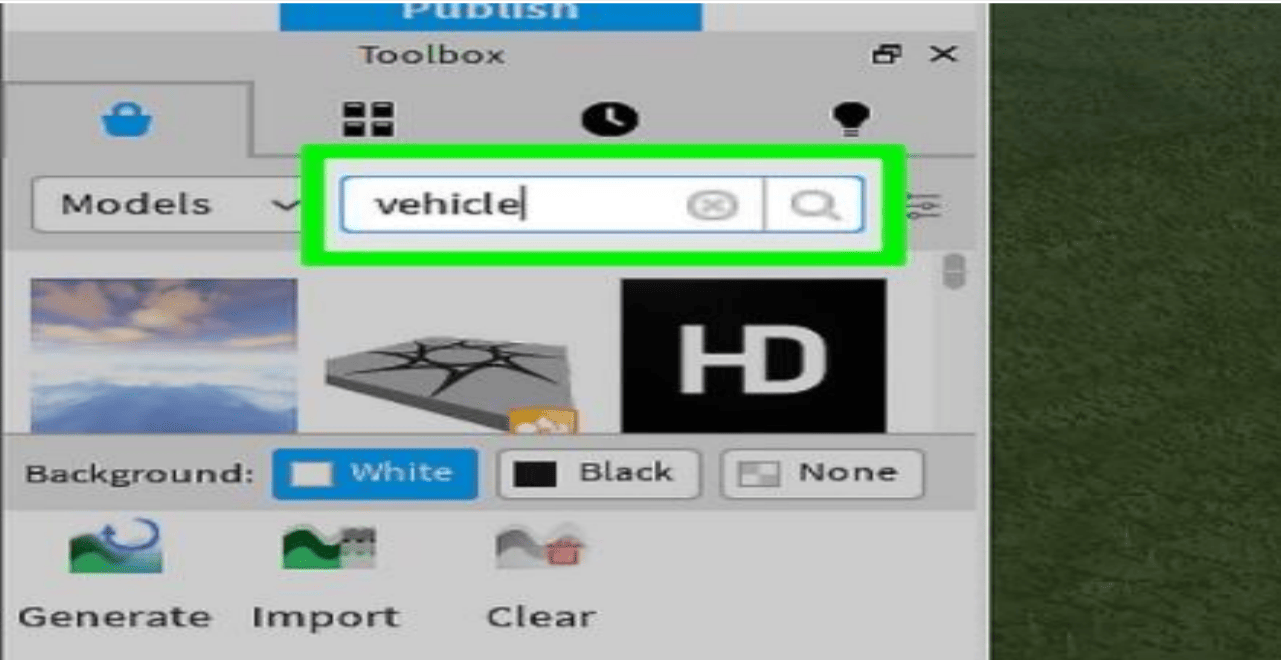
Note: We may select the type of object we wish to search for using the drop-down option. Models, meshes, pictures, audio, video, and plug-ins are all included. Choose the option that best suits your needs.
- To add an object to your game, select it from your search results and click and drag it into it.
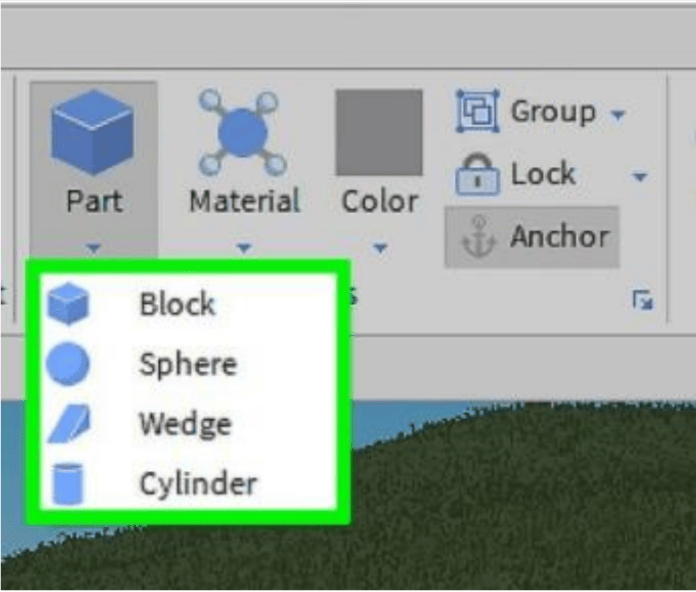
- The Part icon looks like a cube, and it opens a drop-down menu where you can choose one of four forms to use to make items in the game. There are four parts to it. The following are the details:
- Block: It creates a new rectangular object.
- Sphere: It creates a new object in the shape of a ball.
- Wedge: It creates a new block with an incline.
- Cylinder: It creates a round, pole-shaped object.
- The UI is used to change the options shown in the image below.

4. Edit Section
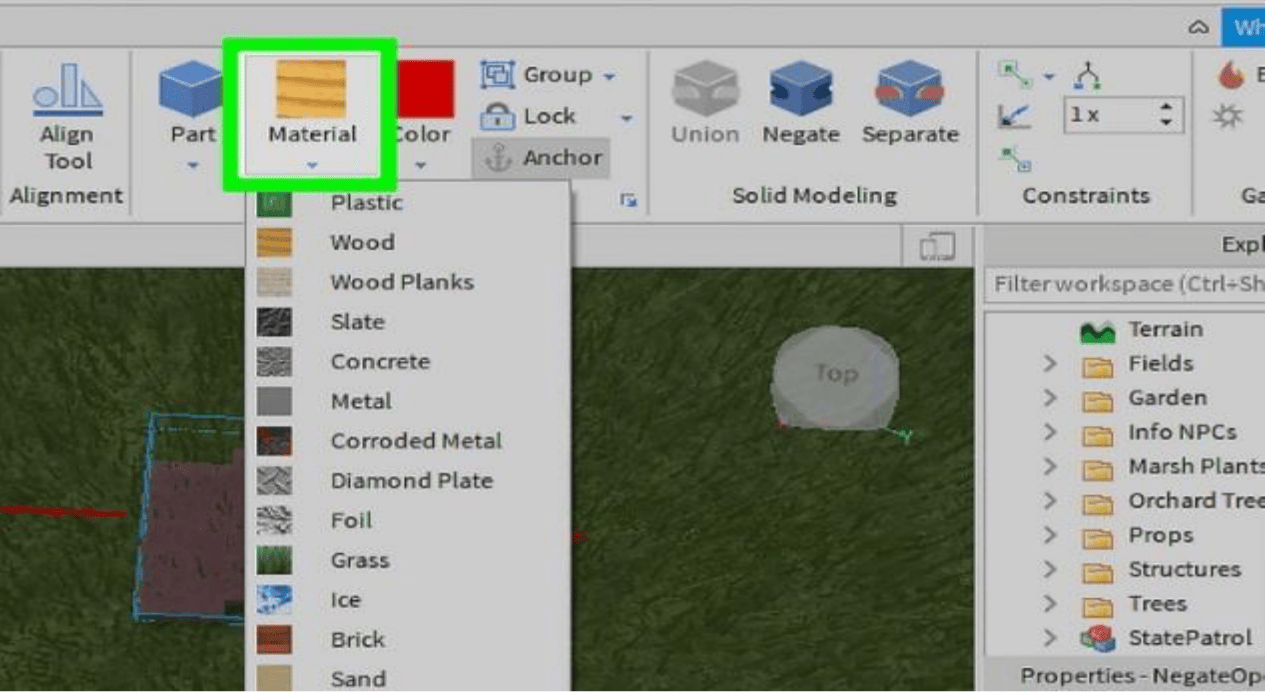
- A specific part’s material can be altered using Material. Glass, wood, concrete, metal, stone, granite, brick, and other materials are among the options.
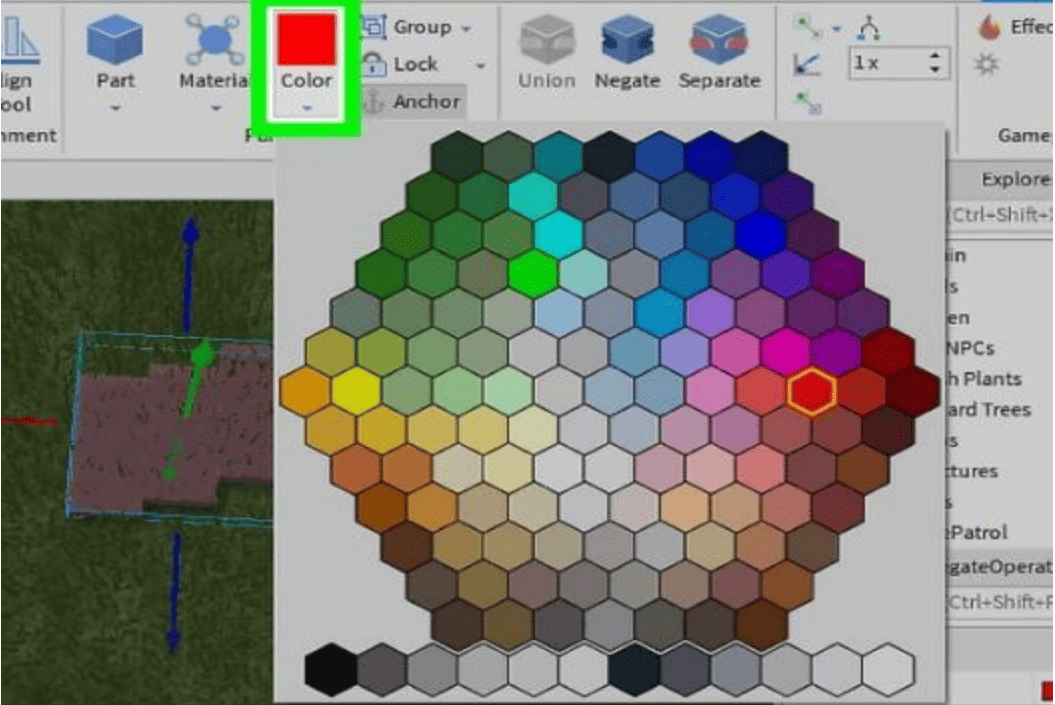
- Click one of the colored swatches of your choice to change the color of a particular part.
- The Group option is used to group the two sections.
- The Lock option is used to lock the part, preventing it from changing any of its attributes.
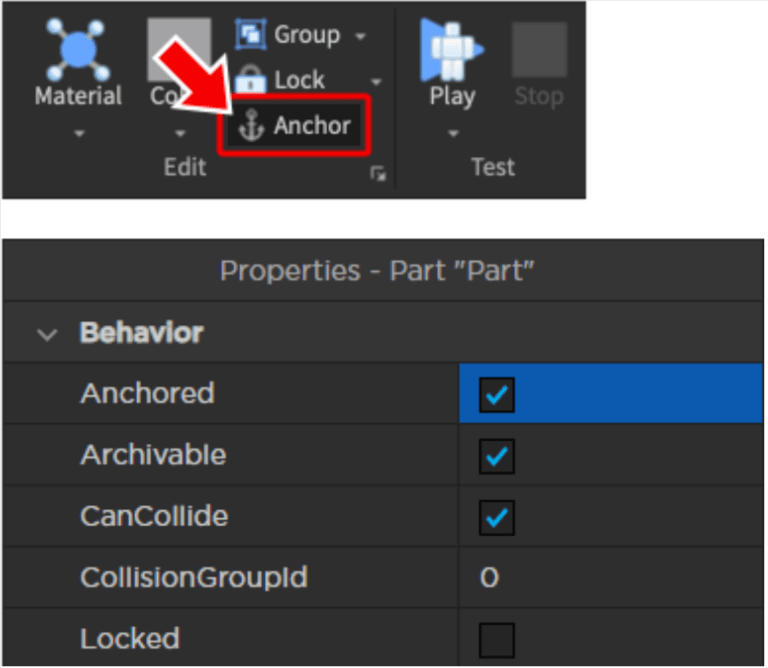
- When the object is in the air, the Anchor option is used to keep it from falling.
5. Test Section
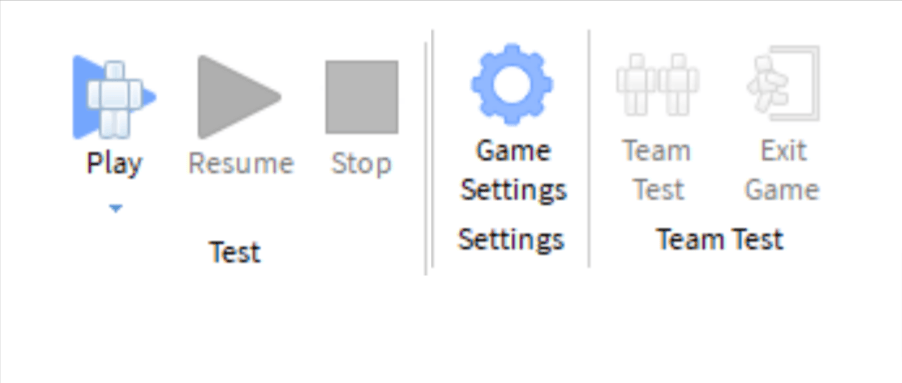
It provides options for Play, Resume, and Stop to test the game.
6. Game setting
It is used to change the permission and publish it and so on. We can test by the team and by clicking on the exit game we can come out of the game too.
Model Tab
- Select the Model tab at the top of the page (it’s the second tab). In the Roblox studio, this displays all of the modeling tool panels at the top of the page.
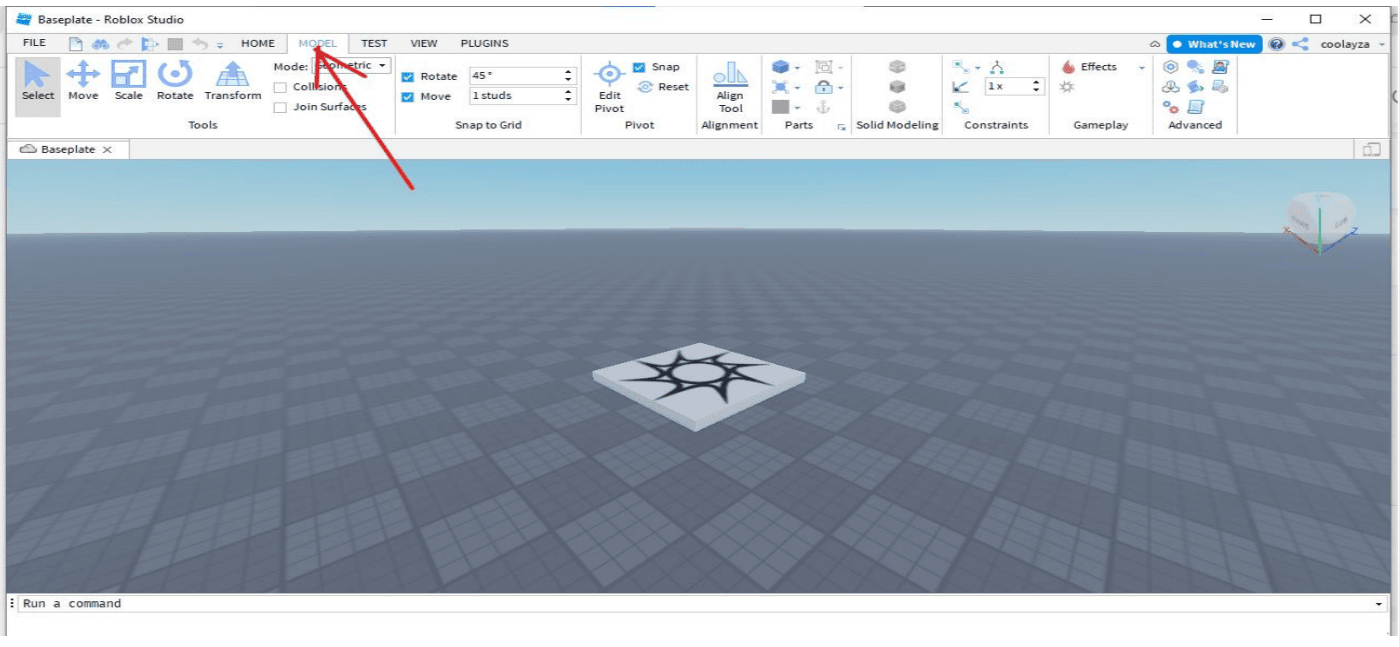
- We already learned about the Tools tab in the Home tab. Transform, is a new option in this case, and it’s used to manipulate the item accurately.

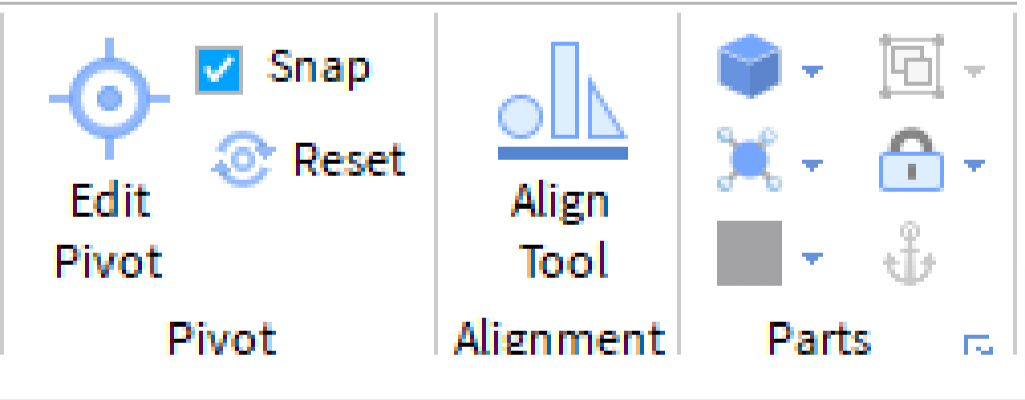
- There are two options in the Snap to Grid menu: Rotate and Move.
- Alignment has an align tool that is used to align the parts and models you’ve chosen.
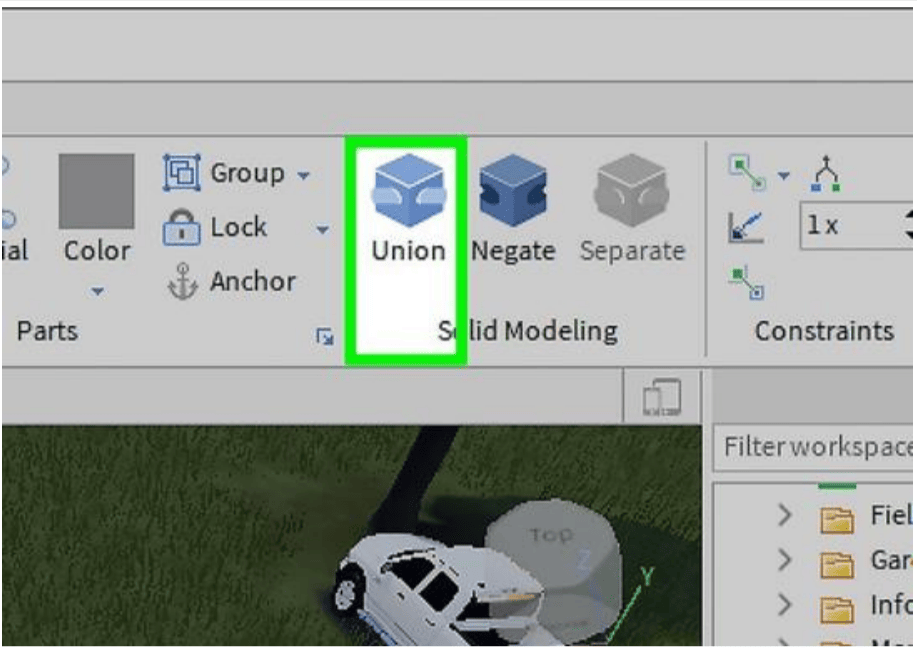
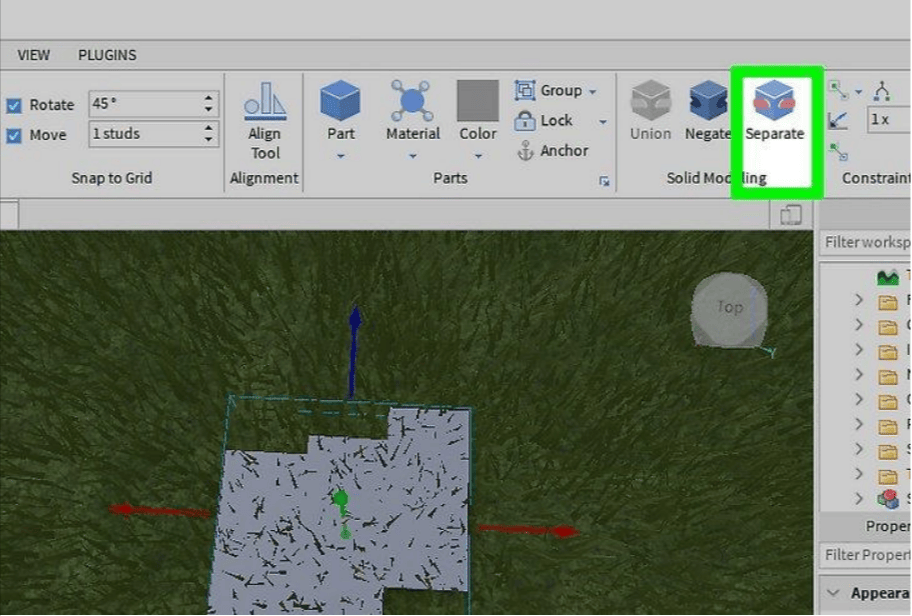
- Union, Negate, and Separate are all part of Solid Modeling.
- When two or more components are touching, the Union tool is used to link them together so that they become one part. To link two sections together, follow the procedures below:
- Hold Shift and click the parts you want to unite.
- Click on the Union button in the panel.
- If you want to separate pieces that have been joined together, use the Separate tool.
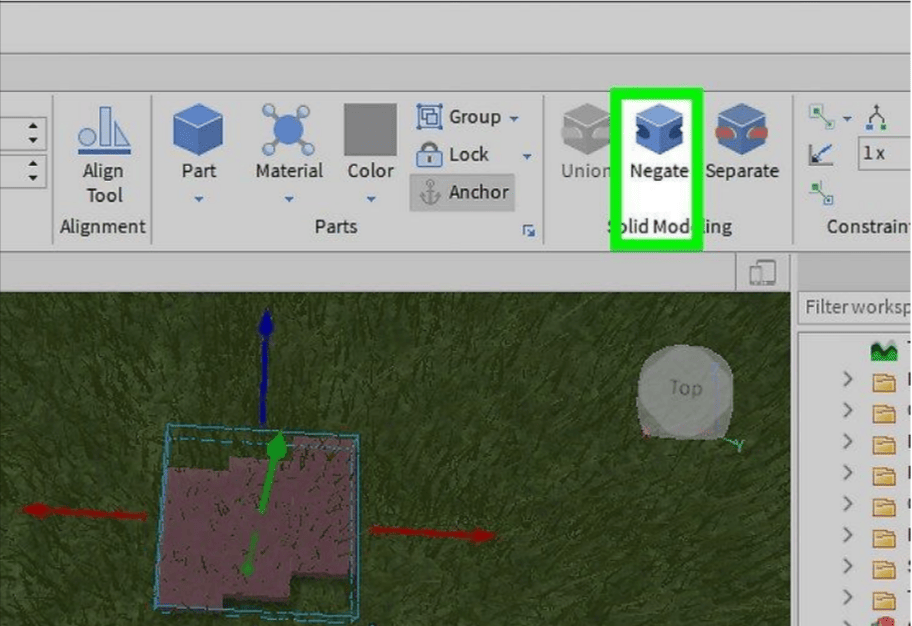
- The Negate option is used to remove the chosen portion. It can also be used to chop out pieces of another element that cross. To use the Negate tool to cut out a portion of a part, follow these steps:
Place the portion in such a way that it intersects with another. Select the intersecting section by clicking on it. When you click the Negate button, the portion will turn red. Click on both pieces while holding down the Shift key on the keyboard, then click on Union.
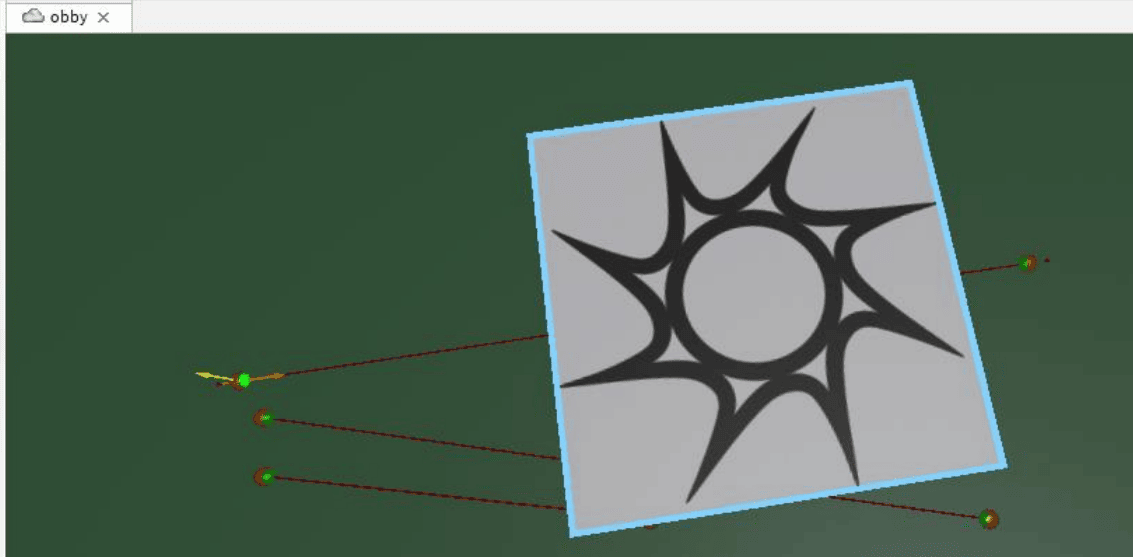
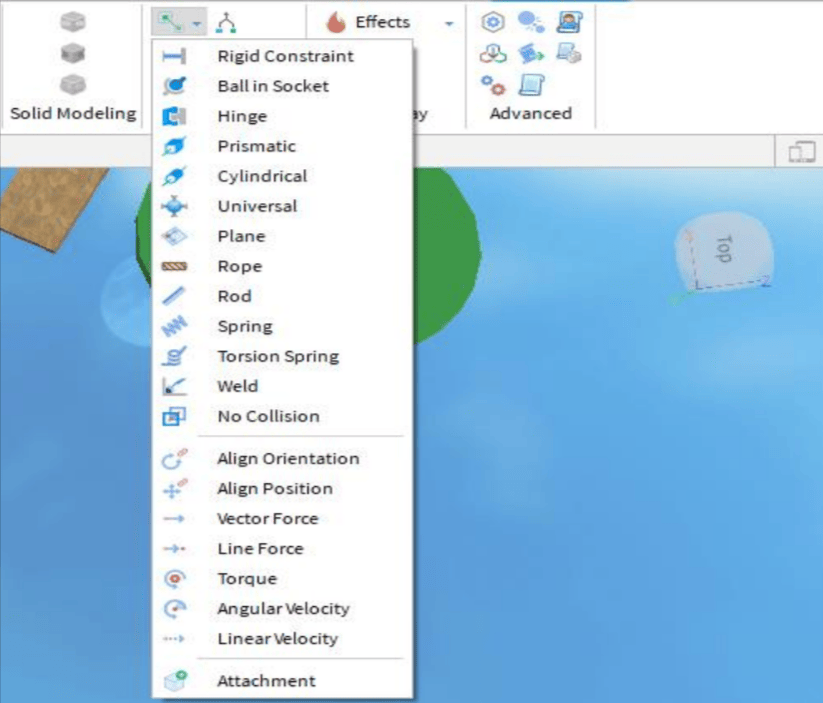
- The Constraints option shows welds, constraints details, draw on top, and scale. There are numerous options in the Constraints drop-down menu, as shown in the image below. And the scale is used to increase or decrease the size of the constraints.
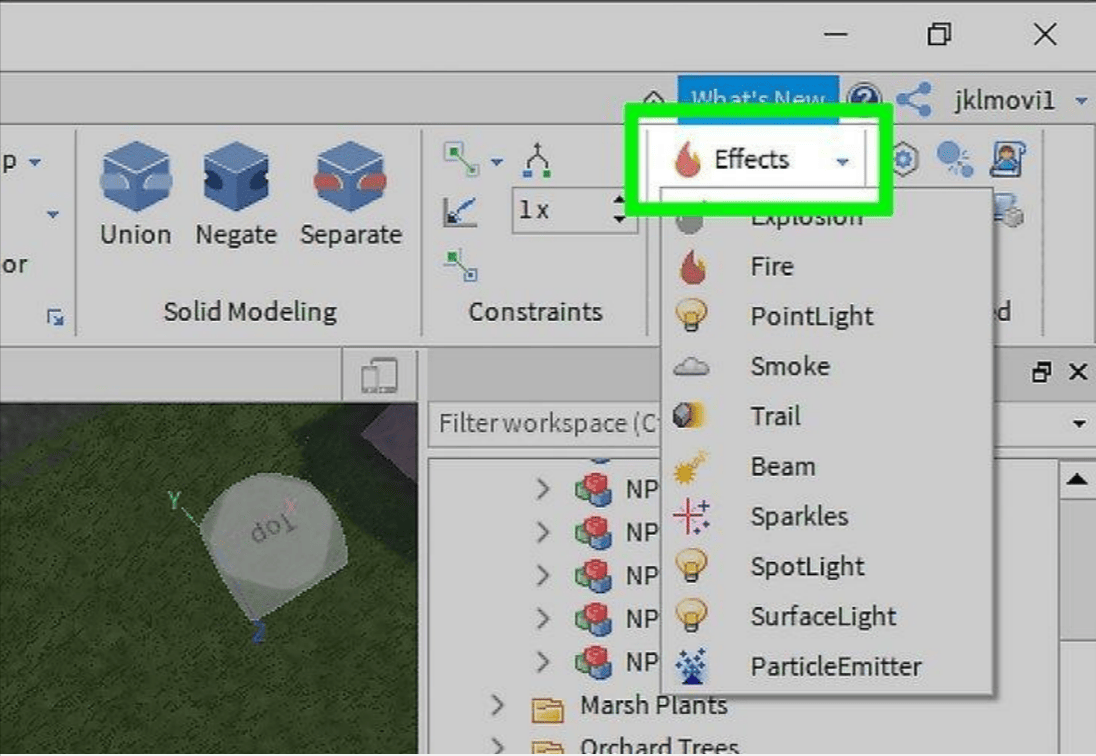
- The Gameplay has Effect and Span in the section.
- Effects allow us to do things like set fire, smoke, emit sparkles, or turn it to light. To add an effect to an item, select it and then click Effect. From the drop-down menu that appears, select the effect you wish to apply.
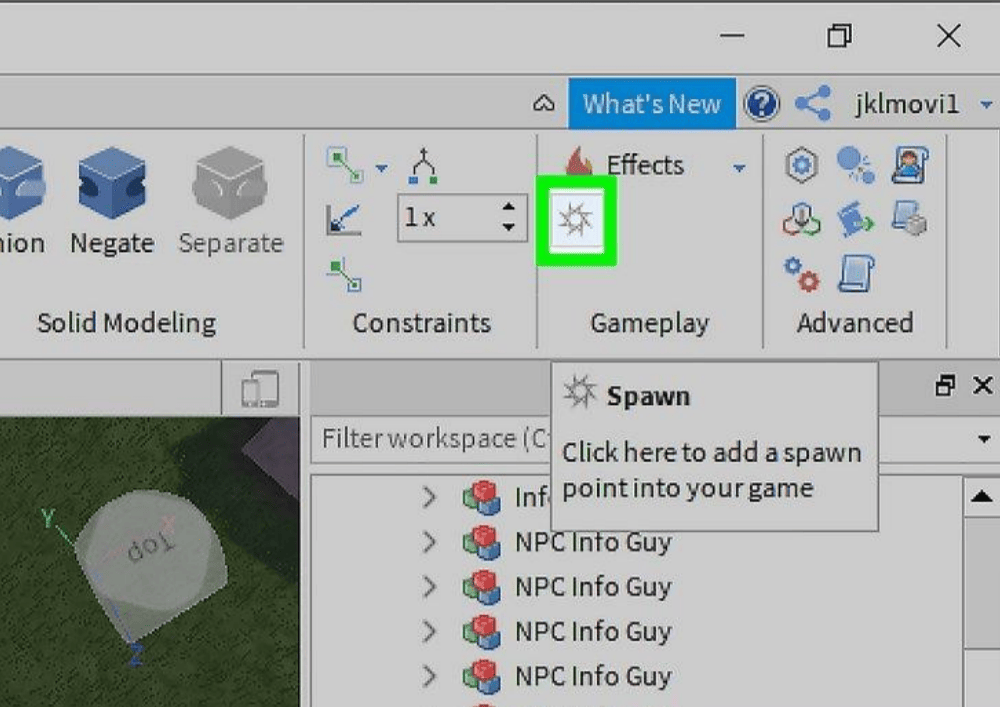
- Click Spawn Location in the top menu to add spawn places or checkpoints. The spawn position is where the player begins. Checkpoints are spawn places with several spawn locations.
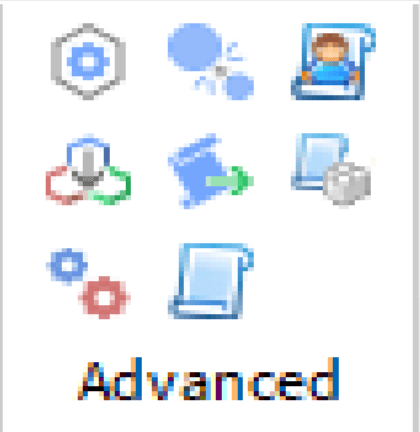
- The Advanced tab has options like Insert object, collision groups, local script, model, execute script, module script, service, and script.
Test Tab
This displays all the testing tool panels at the top of the page in the Roblox studio.
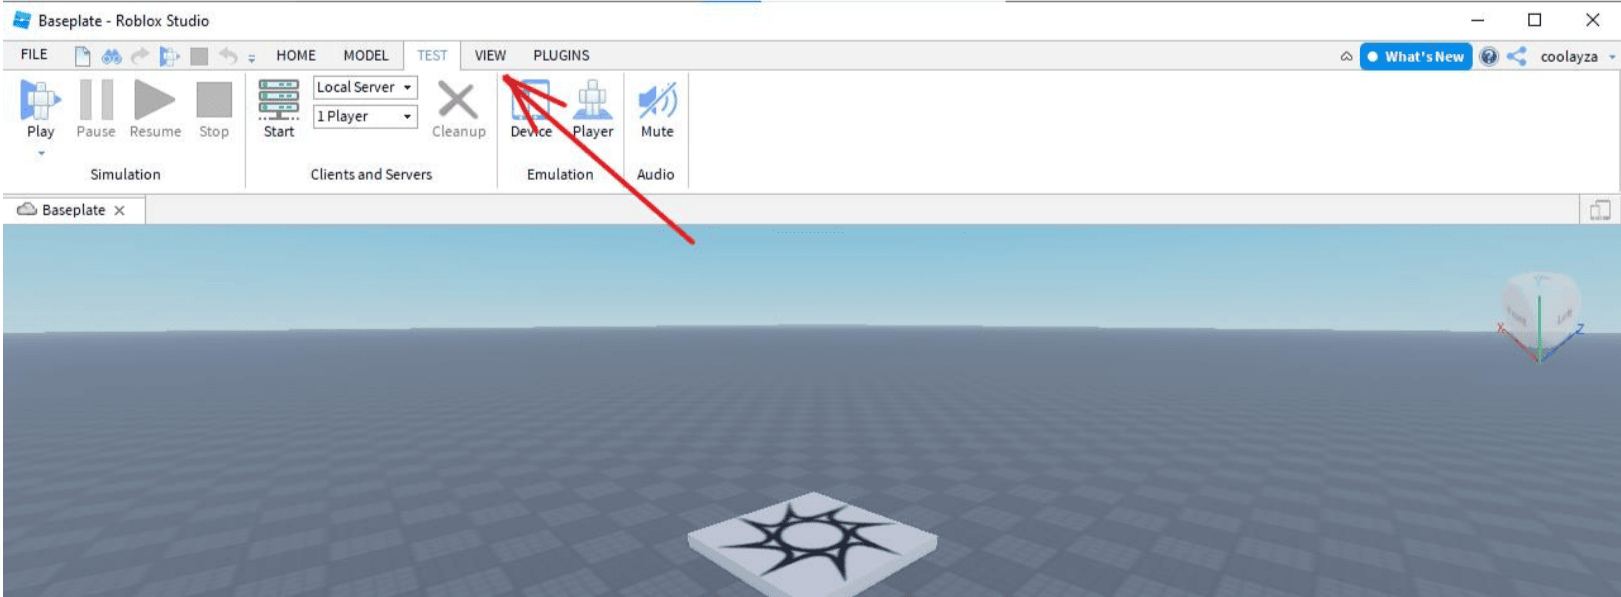
- It has the simulation tab that contains Play, Pause, Resume and Stop to test our game by playing.

- The Clients and Servers tab is used for starting and cleaning up the server or the player data and is also used for setting the server and player.
- The Emulation tool has two options that are device and player. We can replace the device with a mobile phone or a tablet. Toggle the player emulation using this player.
- The Audio tool is used to mute or unmute the sound.
View Tab
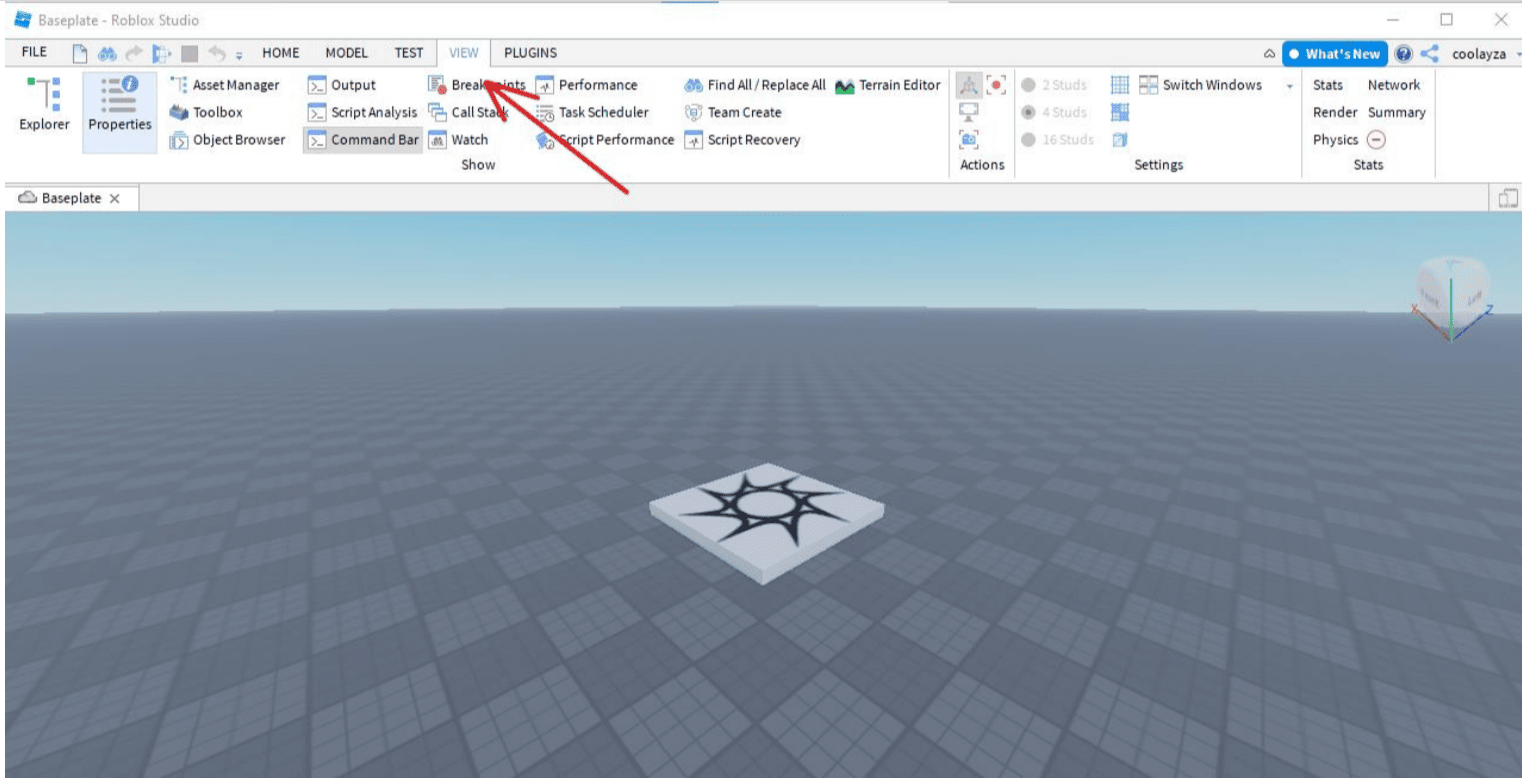
It shows the tools for selecting and adding scripts/coding to our Roblox game’s objects. Scripts are used to make objects interactive, animate objects, grant or take away health points, kill players, and a variety of other things.
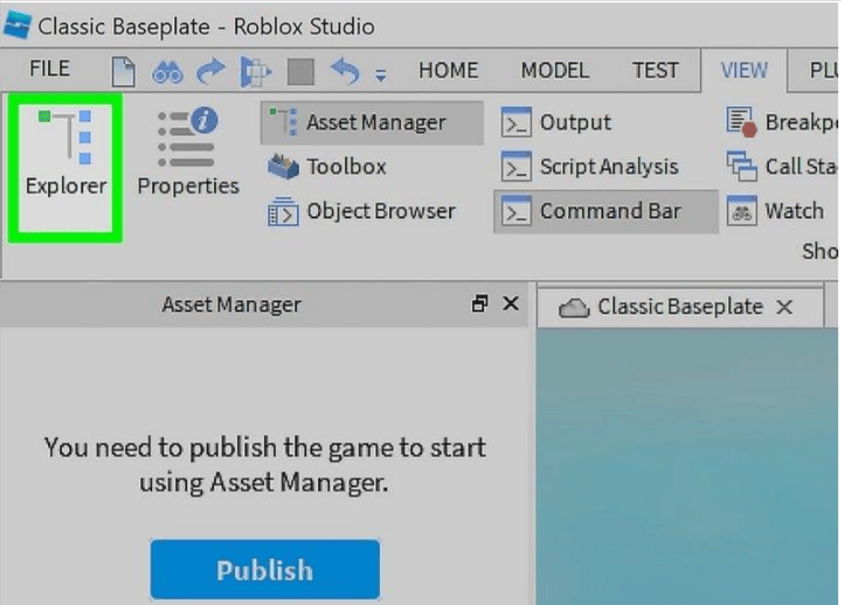
- The Explorer panel appears on the right of the screen when you click the Explorer tab. It has a list of all the objects and parts in our game. It navigates to the object in the Explorer panel to which you wish to add a script.
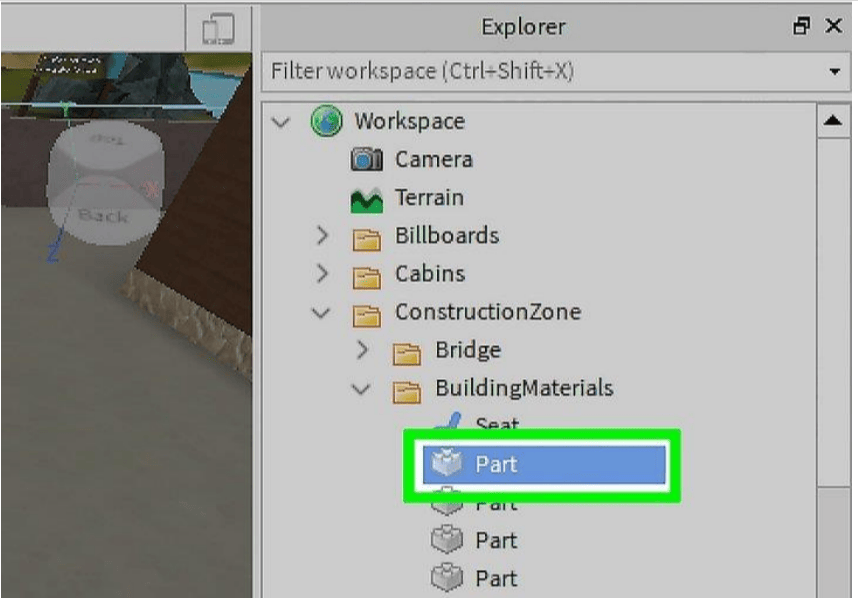
- The Workspace is the parent object of all objects in the game. All of the game pieces or objects in the game world are stored in the Workspace. To see each of the kid objects, click on the arrow icon.
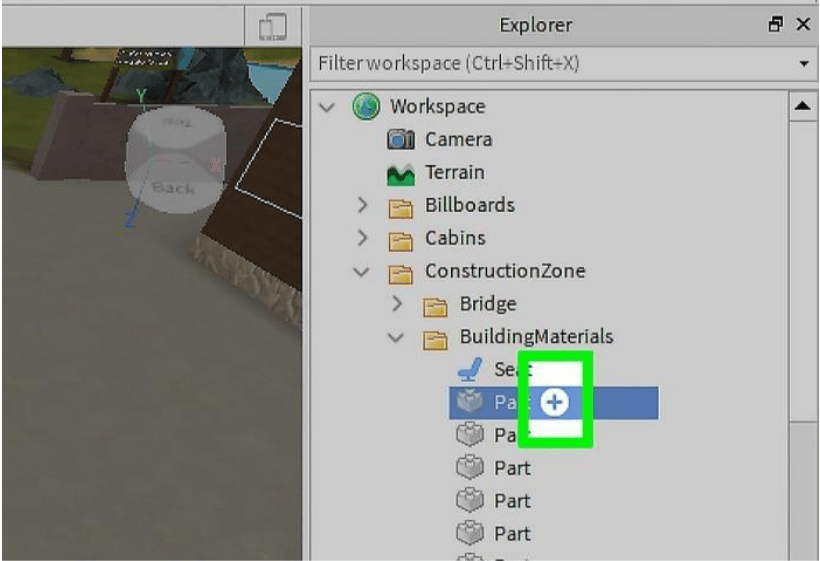
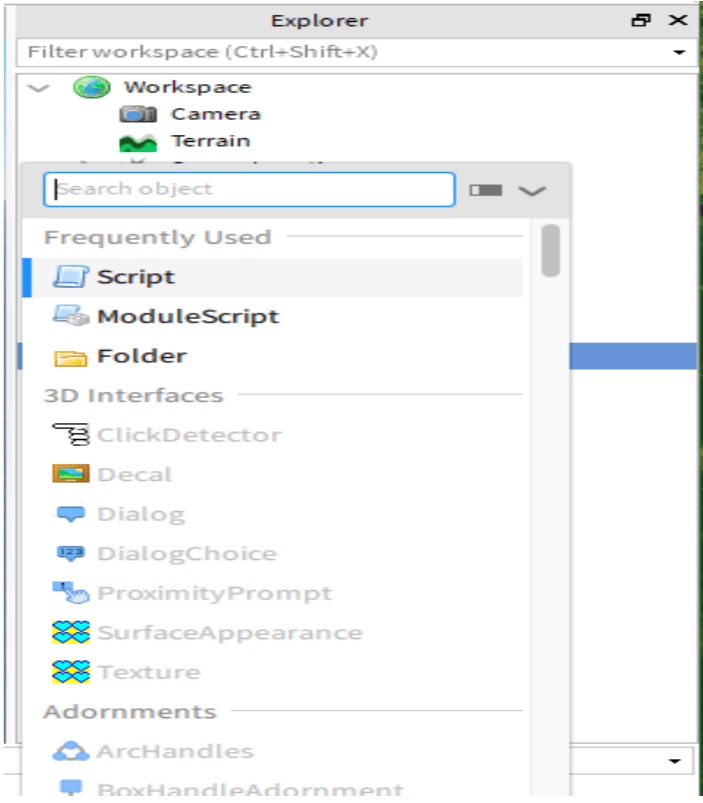
- Click + to add a script to the part. When you hover your mouse over an object, a plus sign (+) appears and when you click it, a list of objects you want to or can be added to that particular portion appears.

- Click on the Script from the options. It opens a blank script in the center of the screen.
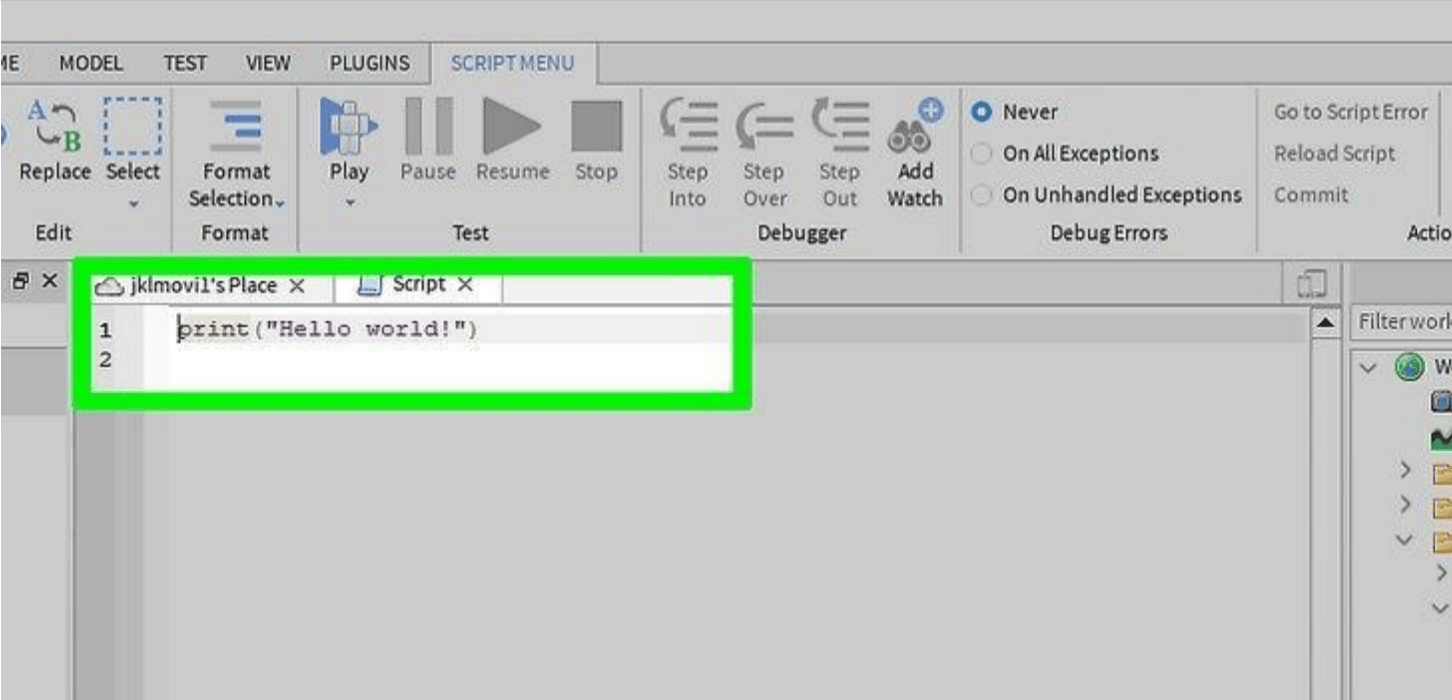
Plugin Tab
This displays all the Plugin tool panels at the top of the page in the Roblox studio.
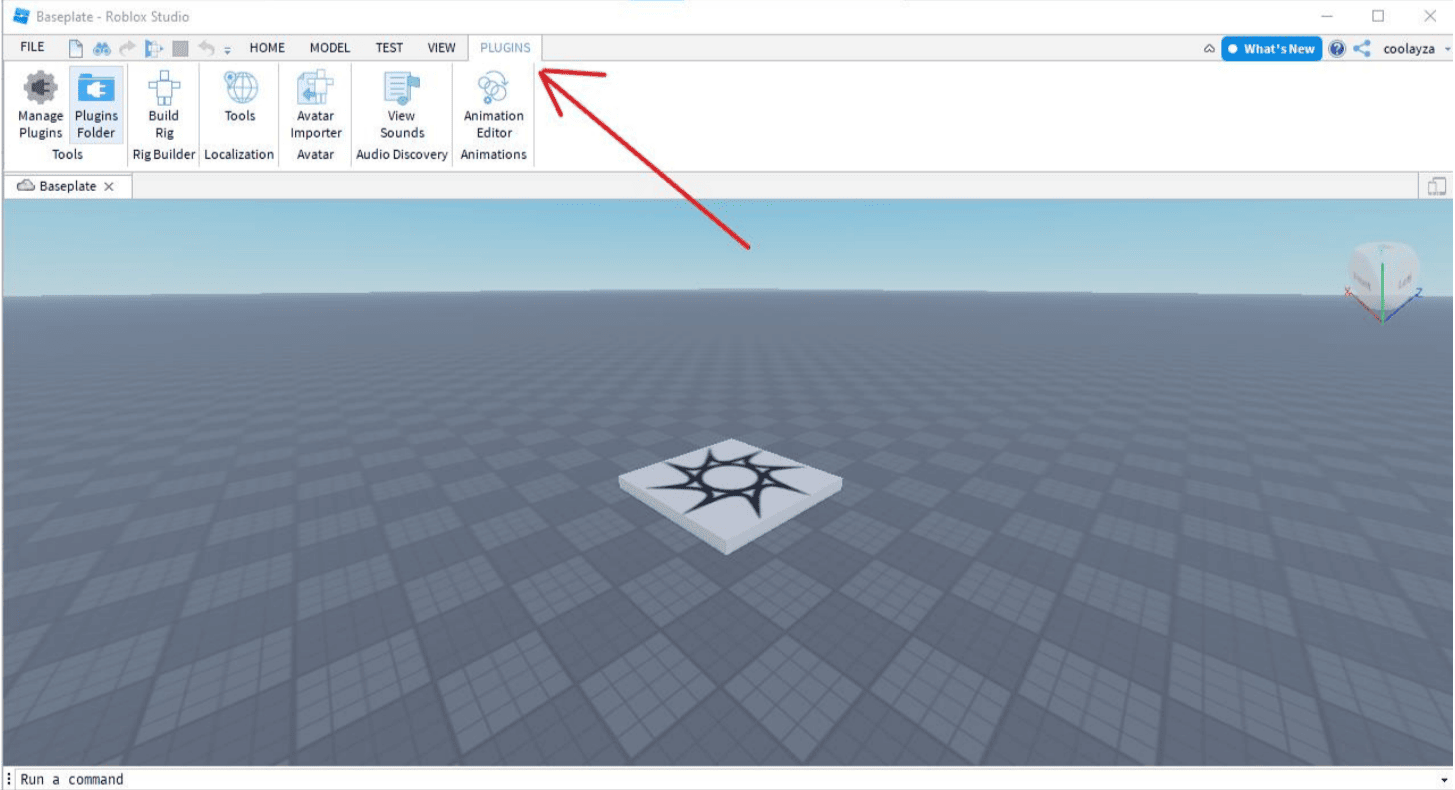
- The plugin’s first option is Tools. Manage plugins and Plugins Folder are two of the tools available. The plugins folder is used to open the local plugins folder, and the manage plugins command is used to manage the installed plugins.

- Rig builder is a tool for creating or adding rigs around animations.
- We can use tools in Localization to hide or expose the localization.
- The avatar importer in Avatar is used to import the avatar from a .fbx file.
- View Sounds is part of Audio Discovery, and it’s used to find out what audio assets are in here, as well as who owns them.
- The Animation Editor is used to generate, preview, and publish animation clips in Animations.
KHow Does Roblox Benefit kids?
Roblox encourages kids to develop their creative thinking skills by encouraging them to not only play the game but develop them at the same time. Roblox features a built-in editor Roblox Studio which includes several features mentioned above. With the help of the Roblox Studio, kids get access to an opportunity for unlimited creativity and learning.
It can be used for a variety of educational purposes. It uses the Lua programming language to assist kids in learning to code, level design, arithmetic, and variables, and it even helps with economics thanks to Roblox’s in-game currency Robux.
Apart from this, Roblox is popular among people of all ages since it is simple to use and has a 3D environment. If we get bored with one game, we can switch to another category. Every person has distinct hobbies and interests and depending on their interests, they can play any game, thanks to a plethora of options in Roblox.
Create your First Game in Roblox- Step by Step Guide
Here we will be making a simple game in Roblox perfect for beginners – Falling Object from the Sky. Let’s get started with it!
Step 1: Open the Roblox studio and click on New and choose any template of your choice.
Step 2: Once the screen opens click on Part and choose the desired part of any object.

Step 3: Change the material, color, size, and position, but make sure the part remains in the original spot.
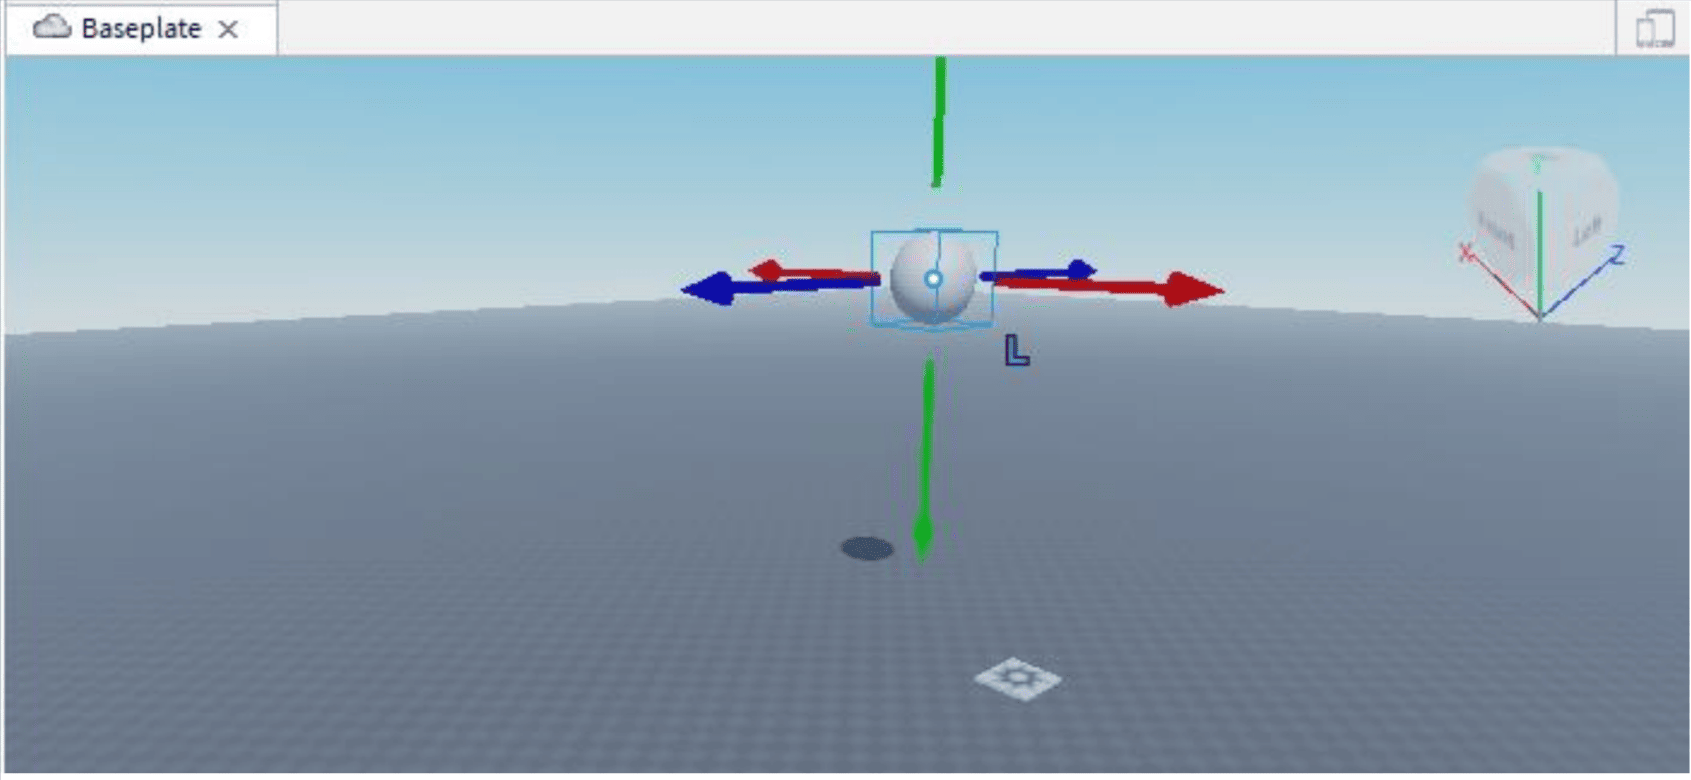
Step 4: Now go to the ServerScriptService and click on the + button. When playing without taking any action, the script written on the ServerScriptService runs by default.
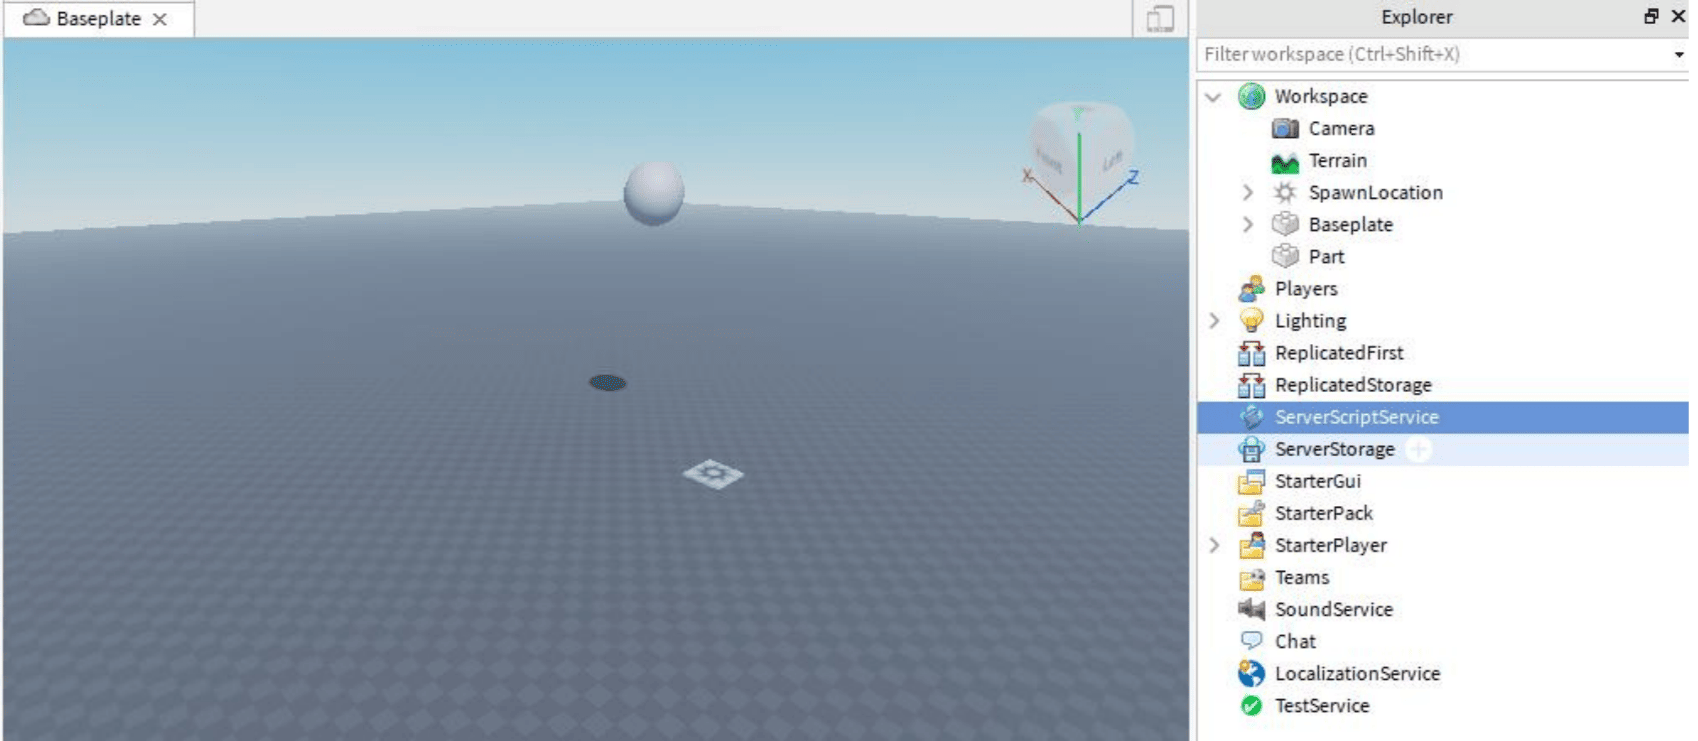
Step 5: Select the script, so that we can write the program in it.
Step 6: Understanding the Scripting Basics
1. The for loop is a loop that repeats an action a certain number of times, and its syntax is as follows:
for initialization, maximum value, increment do

statement(s)
end
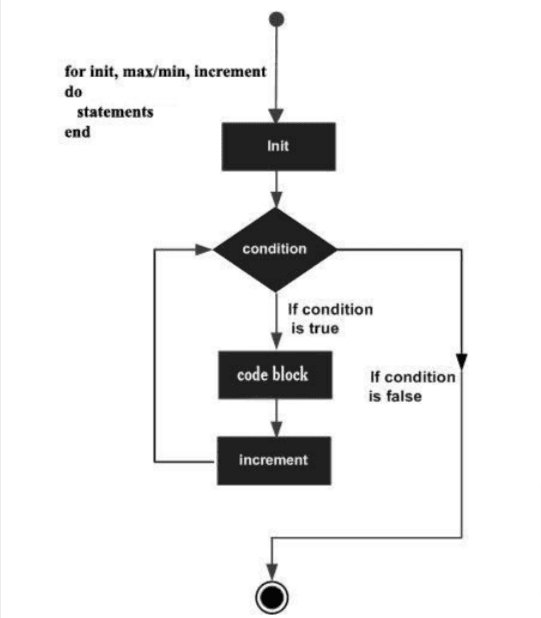
- The initialize executes first, and only once. It allows you to declare and initialize variables.
- The maximum/minimum value indicates how long the loop will run. It creates an internal condition to check or compare the initial value to the maximum/minimum value.
- After executing once, the loop the flow of the control jumps back up to the increment/decrement statement and it updates variables, only if it is true, the loop executes and after the condition becomes false, the for loop terminates or ends.
2. The wait () function is used to delay the code of execution of the next code for a certain amount of time. The syntax is as follows:
wait (millisecond)
3. The Vector has two types. Vector2 and vector3.
- Vector2 is the representation of 2D vectors, the points, and positions. It has two-axis; X-axis & Y-axis.
- Vector3 is the representation of 3D vectors and points. It is used to represent positions and has 3 axis X, Y, & Z-axis.
4. Anchor: If you keep the objects in the air, gravity will cause them to fall to the ground by default. Click the Anchored property in the Home/Model tabs to place an object in the air without falling or to lock an object in place and prevent it from moving, even if there are heavy collisions or other extreme pressures. In the script, the same team will be at work. If it’s true, the object will not fall. It falls to the ground if it is false.
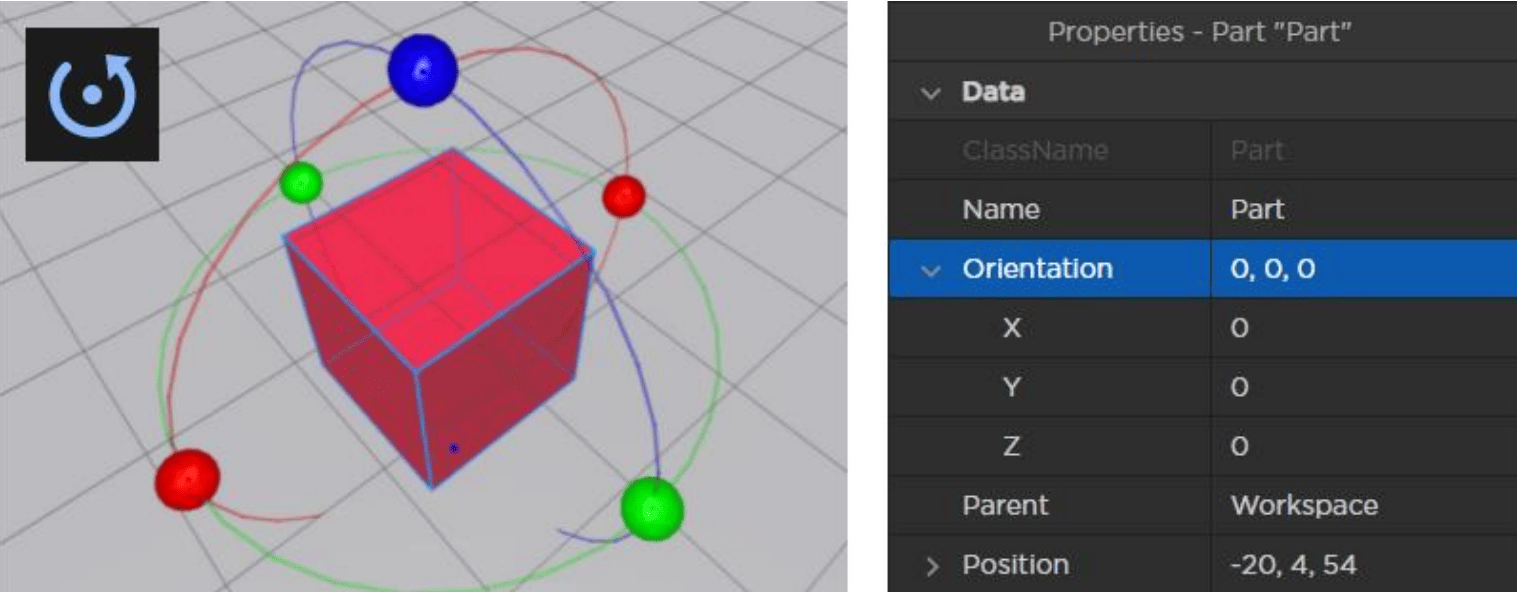
5. The Position property contains three parameters: X, Y, and Z, and it is dependent on the object’s center position. The Move tool, which may be found in the Home or Model tabs, can also be used to change it.
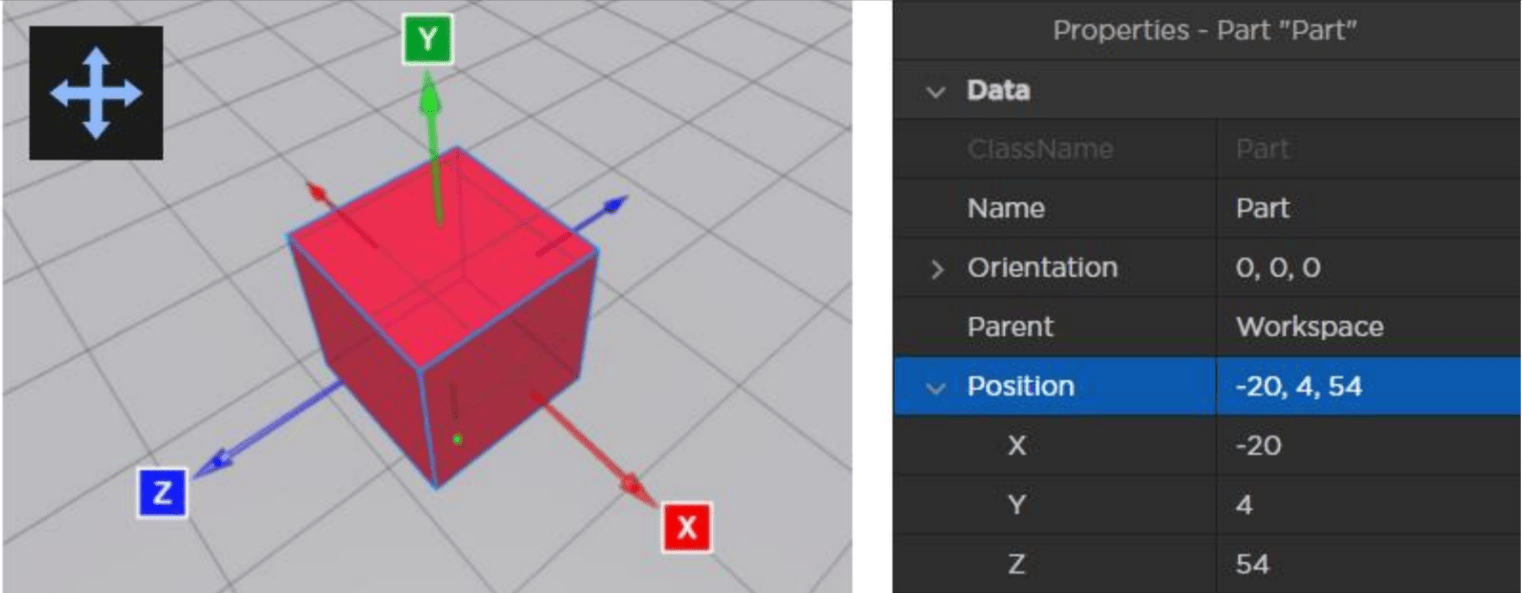
6. Orientation refers to an object’s rotation, and it has three attributes or parameters, similar to Position but in degrees. Like Position, we use the Move tool located in the Home or Model tabs to change the orientation.
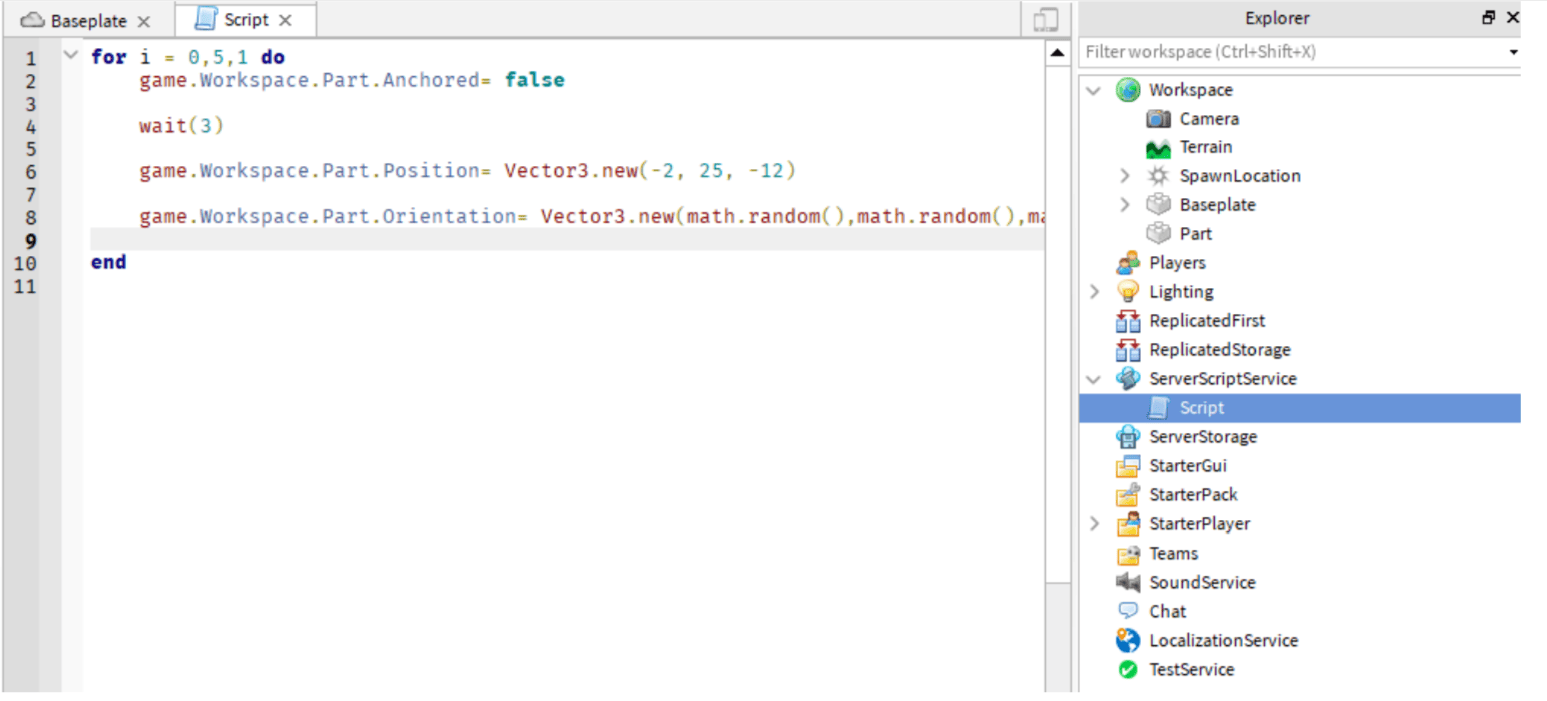
Step 7: Now write the program as shown in the image below.
Step 8: Click on play to see the action i.e. test the game.
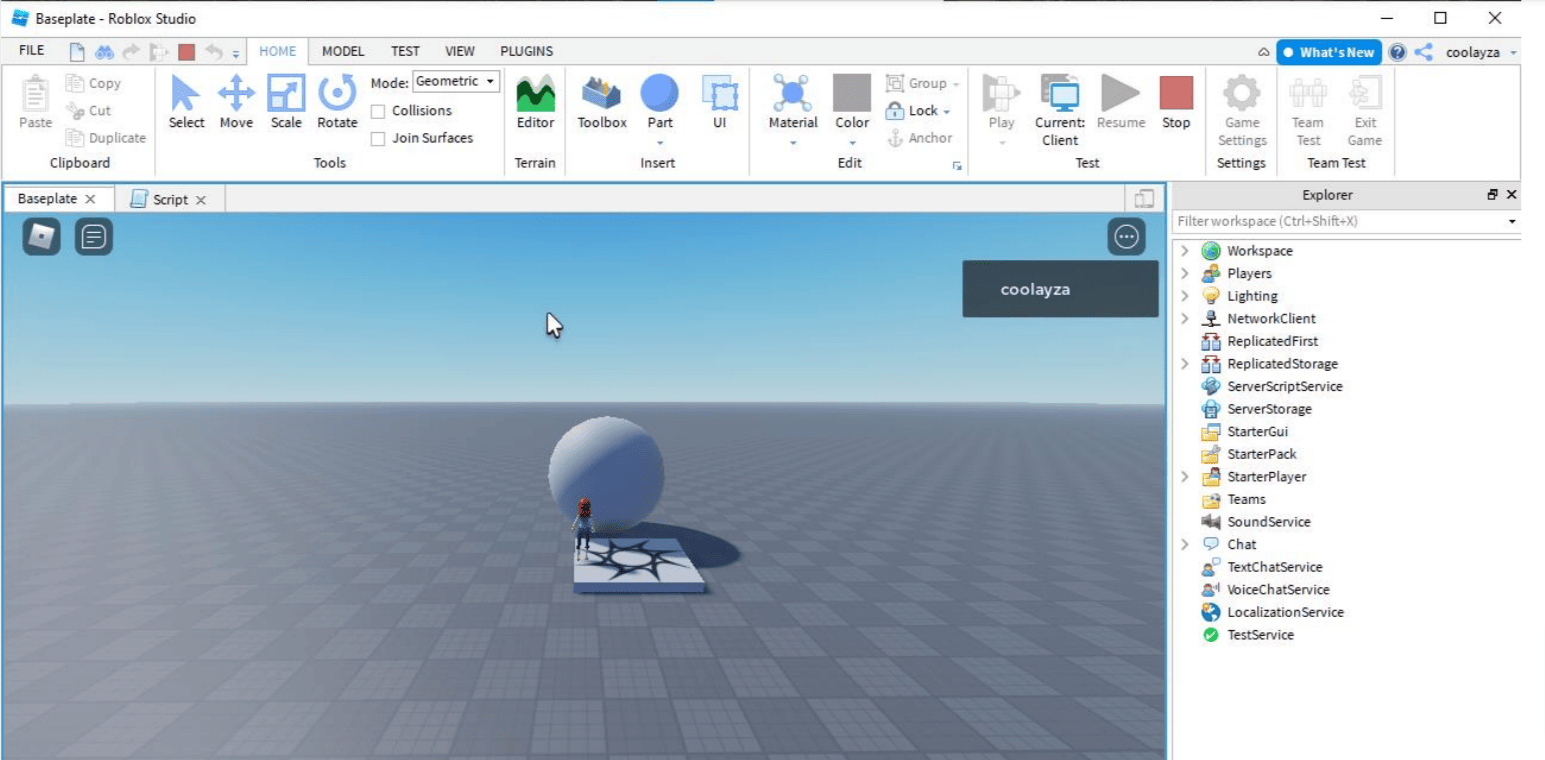
We can see that the part/object is falling 5 times from the designated point before stopping.
Step 9: Save the game
Click on File.
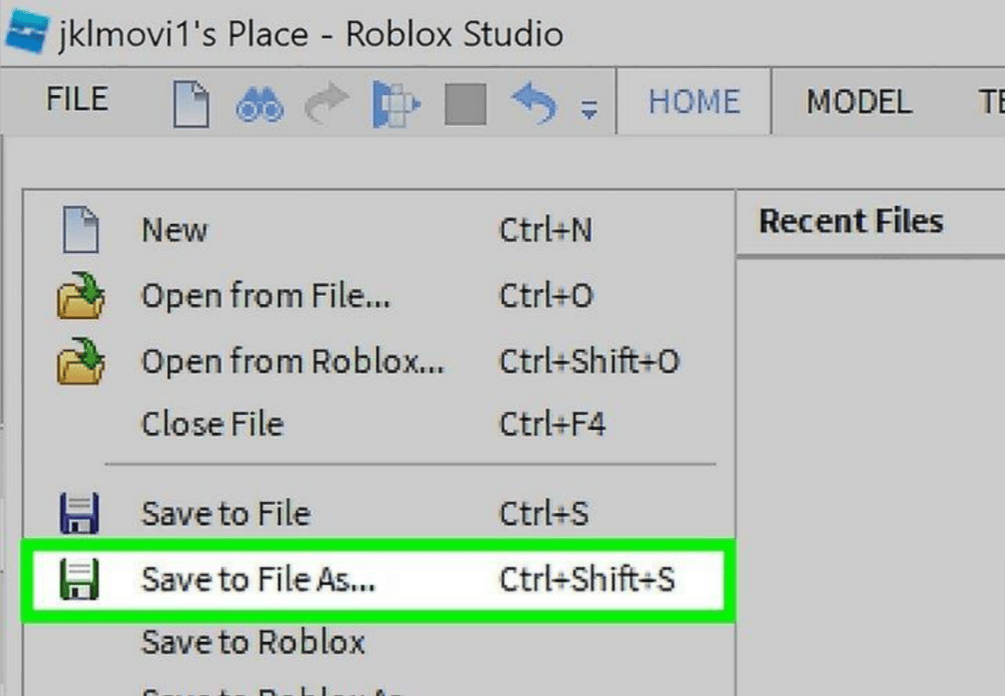
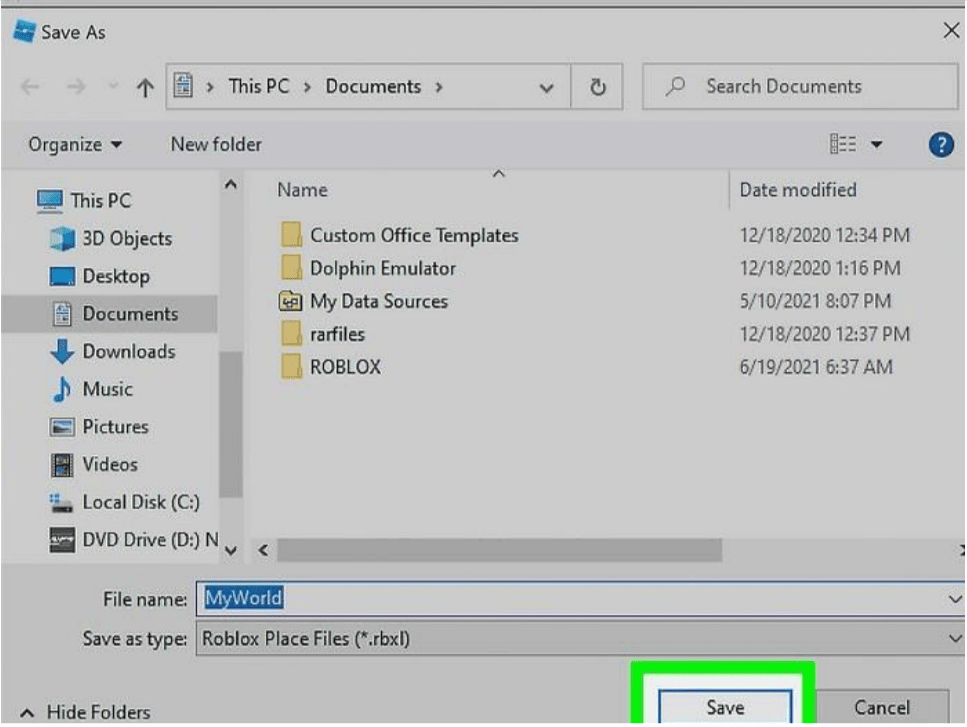
- Click on Save to File As. This will open a Save menu, where you can save your game as a Roblox file to your computer.
- You can also click Save to Roblox to save the game to the Roblox server.
Step 10: Edit/Update the game
If you want to upgrade a game that we have previously saved, we use the following steps:
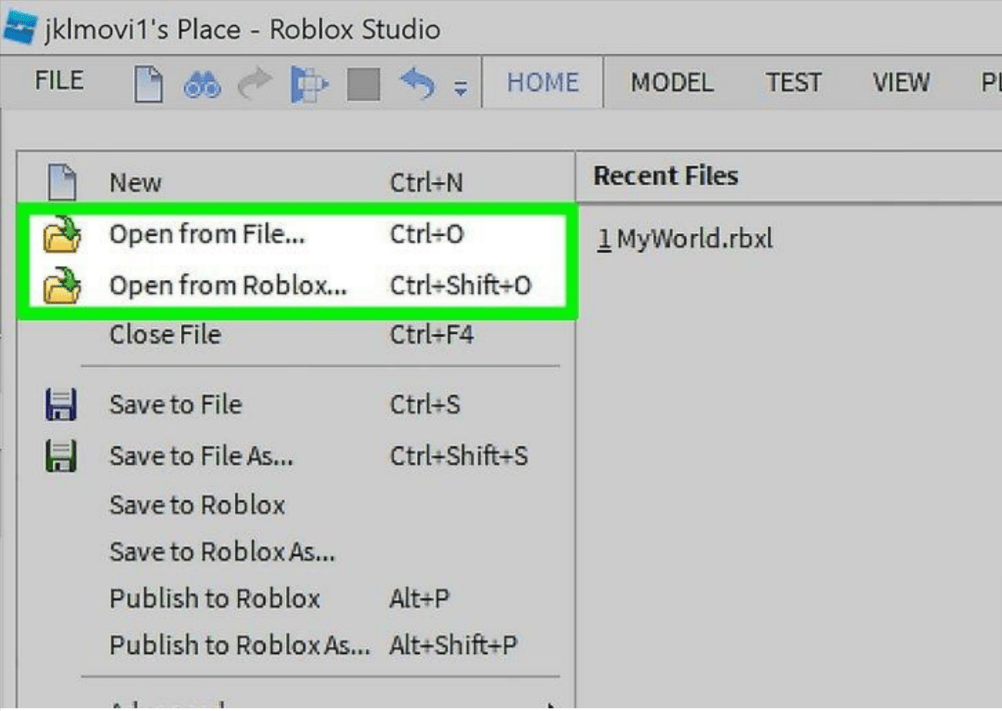
- Click on File.
- Click Open from File if you have a file on your computer or Open from Roblox if you have stored it in the Roblox server.
- Click on the selected Roblox game or a particular file (.rbxl) and click the Open button.
- Once it opens, you can begin the editing process.
Step 11: Publish the game
Once we’ve finished editing a game and it’s ready for people to play, we use the methods below to publish it to Roblox:
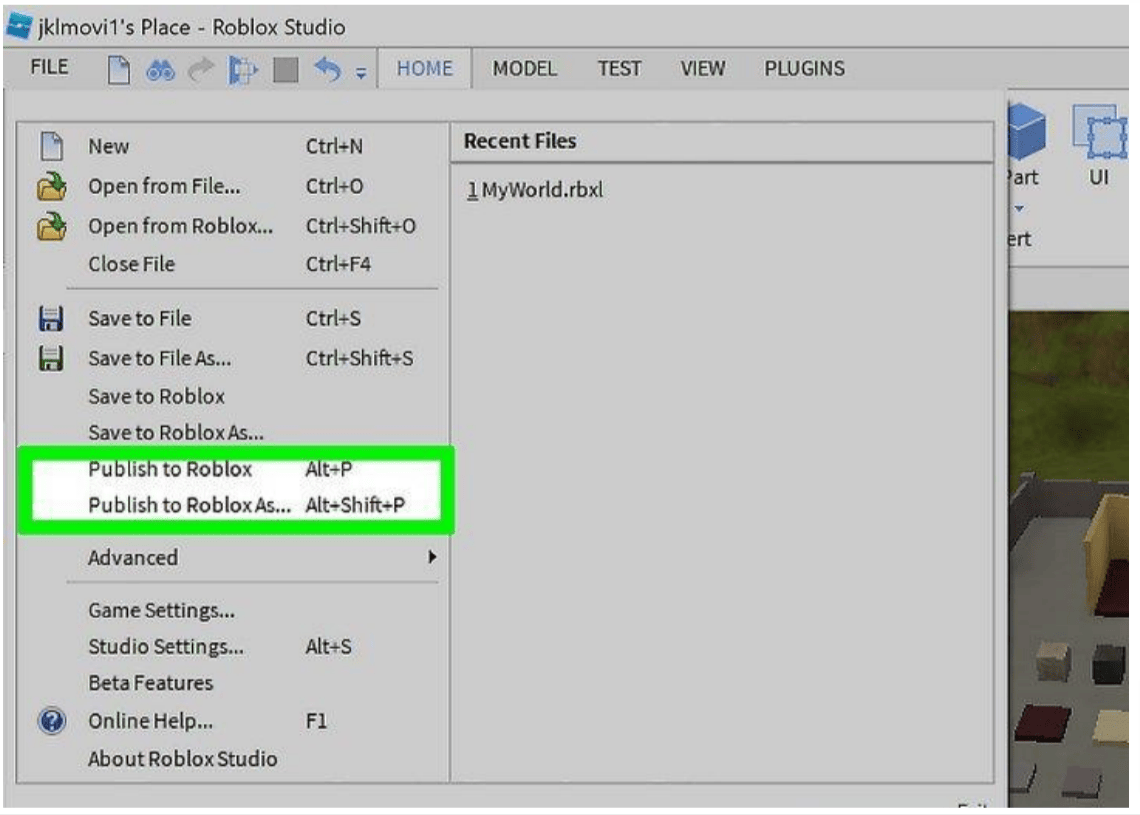
- Click on File.
- Click on Publish to Roblox As from the given options.
- Click on an existing game to replace it or click on Create a new game.
- Enter the name of the Roblox game (whatever you want to name it).
- Enter a description of the game.
- Select a creator from the drop-down menu options.
- Click the checkbox saying that your game is compatible.
- Click Create.
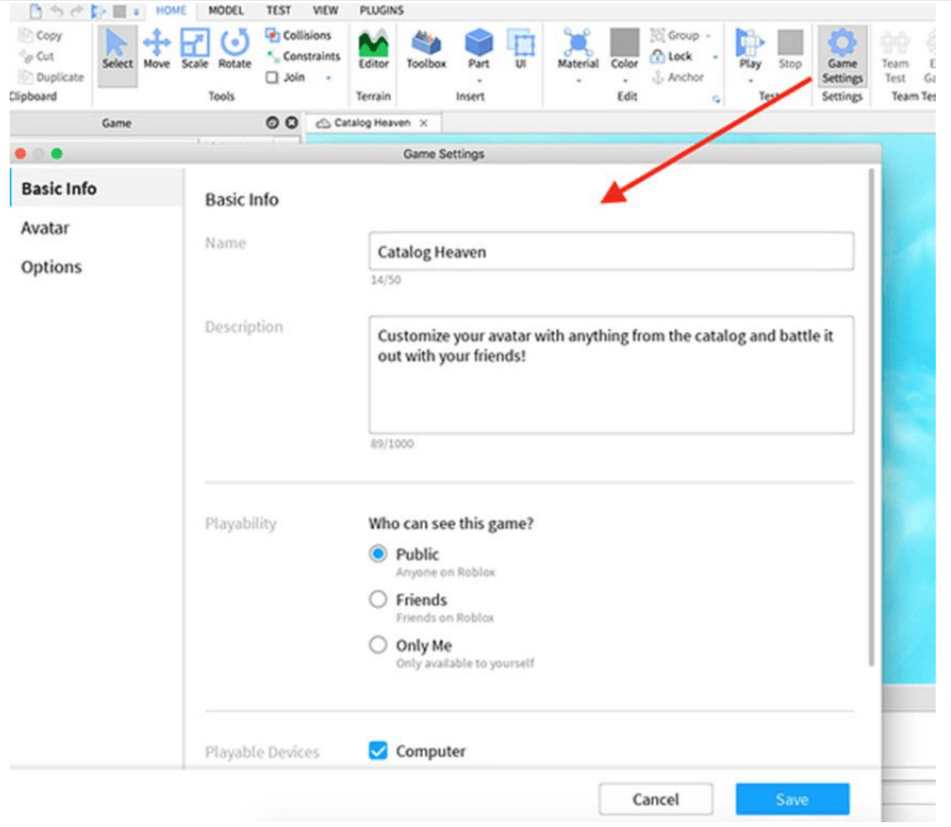
- Now go to the Game Setting and make it Public with permission.
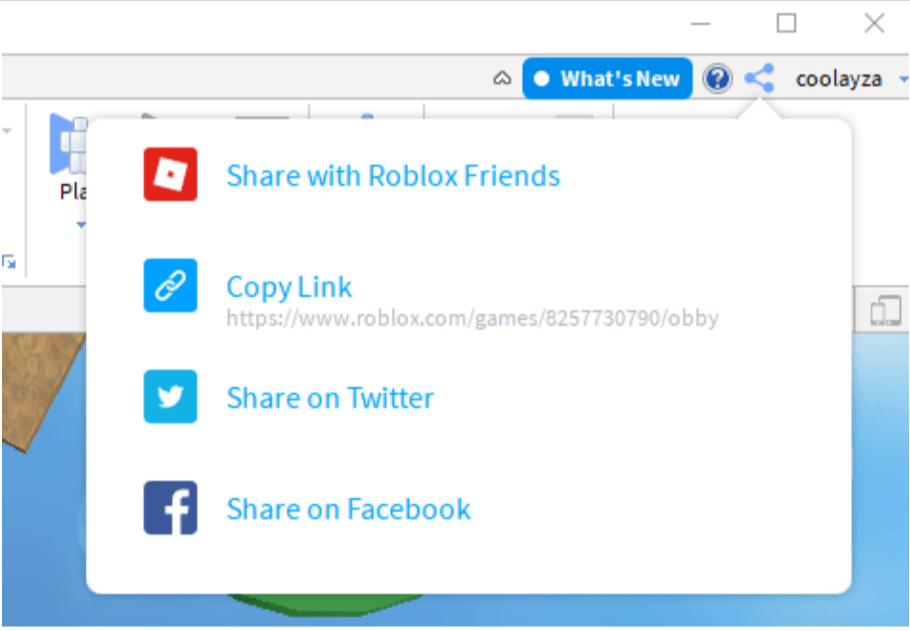
- Now you can click on share and copy the link and share it all.

Meet the Author
Ayesha M
I am a Computer Science Engineer and currently a coding educator. Aside from coding, I also enjoy writing and taking on new challenges. I hope with BrightChamps, I can help children become leaders not only in technology but also in life.
Get a Talent Discovery Certificate after trial class
100% Risk-Free. No Credit Card Required


