

📅 Published: December 1, 2022 🔄 Updated: January 7, 2024
Consider Minecraft’s darkest biome. The surroundings are filled with the noise of a dangerous crowd. Then you hear the sound of boiling lava, which is present at every turn. Is it frightening? What we’re discussing here isn’t simply one of Minecraft’s biomes. In Minecraft, there is a new dimension called the Nether, and there is no water or food in this realm. But it is a concern for another day. Today, we’ll look at how to build a nether portal in Minecraft so that you may teleport into this reality. There are other ways to make it, but we’ll focus on the easiest one for beginners. This method should work on both the Java and Bedrock editions of Minecraft movie. But just because it’s simple doesn’t mean it has to be quick. So, without further ado, let’s learn how to create a Nether gateway in Minecraft.
Table of contents
- In Minecraft, what is a Nether Portal?
- What Is a Nether Portal’s Purpose?
- What are the dimensions of the Minecraft Nether Portal?
- Materials needed for a Minecraft Nether Portal
- Making a Diamond Pickaxe with a Bucket
- How to Locate or Create Obsidian in Minecraft
- Where can I get flint and steel in Minecraft?
- How to Make a Minecraft Nether Portal
- How to Use a Minecraft Nether Portal
- Conclusion
- Frequently Asked Questions(FAQs)
In Minecraft, what is a Nether Portal?
A nether portal is a rectangle-shaped construction built of obsidian pieces. It’s the only way for us to go to the nether realm of Minecraft survival. It’s a terrifying and hazardous area in the game with its own enemies, biomes, and treasure. Players can travel there to gather resources, fight monsters, or obtain materials to build tools and structures.
The Nether portal is one of Minecraft’s two primary portals. The second is an end portal that transports us to the end dimension. However, due to the End portal’s unique criteria, you must first enter the Nether. As a result, one of the major buildings you must learn to create in Minecraft dungeon is a Nether gateway.
What Is a Nether Portal’s Purpose?
When we activate a Nether portal, we connect our overworld realm to the Nether dimension. It simply operates by opening another Nether portal in the Nether dimension. You may build many portals in a short area (up to 128 blocks), and they will all connect to the same spawn point in the other dimension. It applies to both the nether and the overworld.
However, bear in mind that in most versions of the game, the Nether realm is 1/8 the size of the overworld. So, in this dimension, walking one block is comparable to going eight blocks in the overworld. Many Minecraft players take advantage of this ability to travel faster. However, as you might expect, it entails the construction of a large number of ether gateways. So, let us keep learning about it.
What are the dimensions of the Minecraft Nether Portal?
A Nether portal might be as little as 4 x 5 blocks in size. It must be at least 5 blocks tall and 4 blocks wide in order to work. Meanwhile, in all recent versions of Minecraft, the average largest Nether gateway is about 23 blocks high and 23 blocks wide. However, you may make many portals edge-to-edge to create the illusion of a massive Nether gateway (shown below).
Materials needed for a Minecraft Nether Portal
Making and activating a Nether portal takes only two components. The following blocks are required to construct a Nether portal in Minecraft:
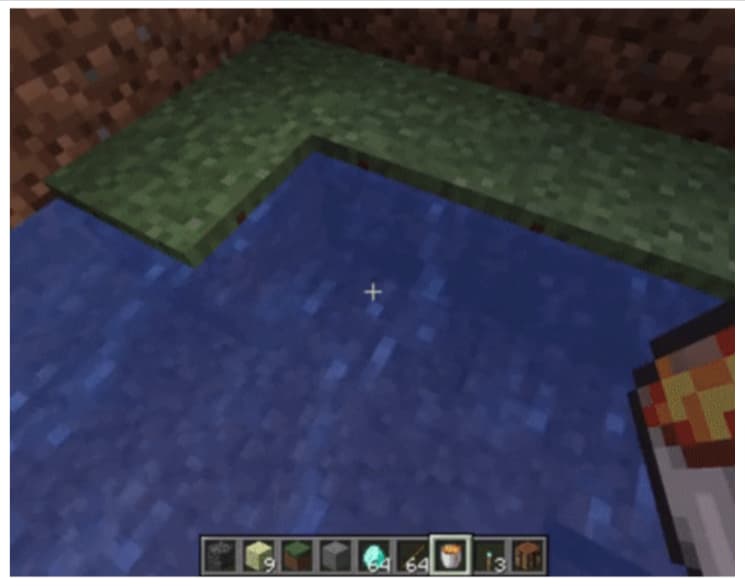
- 10 Obsidian Blocks: One of the most difficult blocks in the game, obsidian is difficult to find naturally. These can only be created when lava and water source blocks clash. The main block from which lava or water begins to expand is the source block. If the blocks aren’t sourced, water and lava will only produce cobblestones.
- Steel and flint: This instrument is built of flint and iron, as the name implies. It’s a basic tool for setting fire to any block. It’s also beneficial for combating mobs. This instruction will assist us in setting fire within the gateway to activate the Nether portal.
How to Get Materials for a Minecraft Nether Portal
Obsidian blocks are the primary component required to construct a nether portal. They aren’t as difficult to find if you mine deep enough in the game. The fact that you can only acquire obsidian with a diamond pickaxe and a bucket is what is holding you back. Let’s first find out how to make them.
Making a Diamond Pickaxe with a Bucket
- Diamonds, if you choose to mine them, are not easy to come by. To enhance your chances, you must dig deep to the bedrock level. Also, bear in mind that you’ll need an iron pickaxe or better to mine the diamonds you find. The second option is to trade with locals or find chests that infrequently spawn with diamonds.

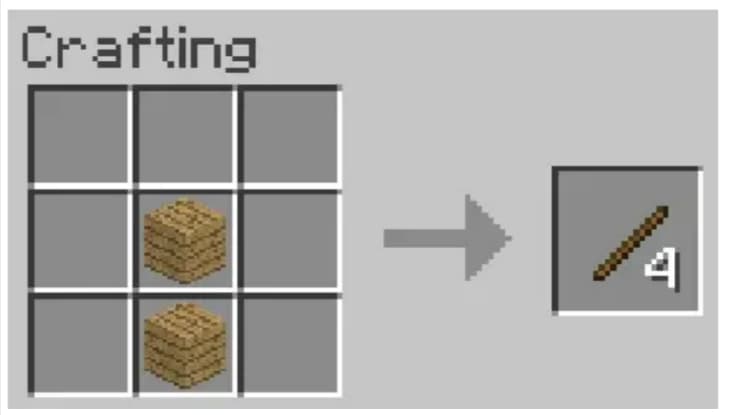
- After you’ve gathered enough diamonds, you’ll need some sticks to make a diamond pickaxe. Place any two blocks of wooden planks vertically in the center column to make sticks. You may accomplish this by clicking your inventory button, which is often the “E” key on a PC. Then you’ll find a crafting area where you may utilize the following recipe.
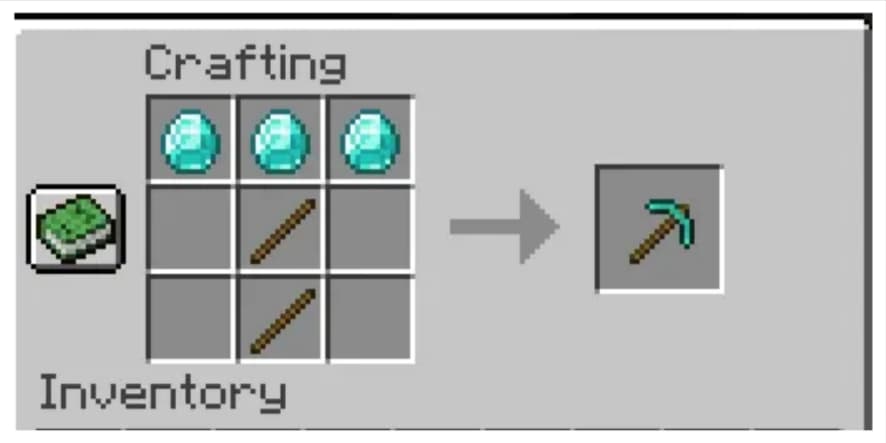
- Next, you may make a diamond pickaxe out of two sticks and three diamonds. For this activity, create a crafting table in Minecraft and right-click on it. Place the three diamonds in the crafting area’s top row. Then, in both bottom rows, arrange the sticks in the center cells. You will now possess a diamond pickaxe. Pick it up and add it to your inventory by clicking.
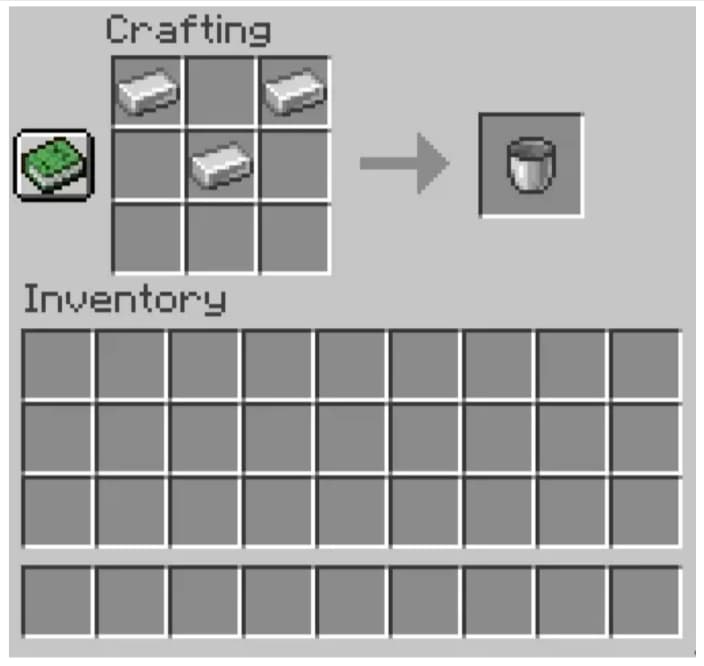
- We now require the obsidian blocks. You can mine these blocks in the subterranean world, but we have a better solution. First, you must construct an iron bucket out of three iron blocks. Use the following recipe on your Minecraft crafting table:
How to Locate or Create Obsidian in Minecraft
- Once our tools are complete, we’ll need a lava source and a water supply. The easiest way to begin is to look for a source with a lot of lava. On the ground, you may find a lava pond or perhaps a lavafall. Alternatively, you can begin digging deep in order to uncover lava flowing underground or in caverns. Once you’ve located the lava source, locating water nearby becomes much easier.
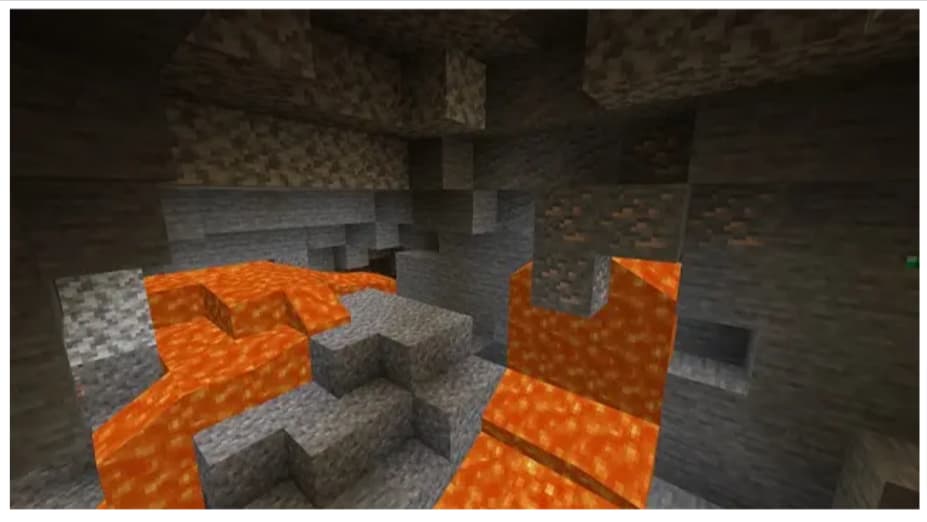
- Then, while holding the bucket, right-click on the lava to collect it and transport it to your water source. To save time, do this with numerous buckets. When you reach the water source, right-click on it to drop lava into it. This will generate an obsidian block, which you can mine with your diamond pickaxe. Here’s a video of us doing it in Minecraft creative mode.
Keep in mind that your Nether gateway will require 10 blocks of obsidian. If water and lava sources collide, you may find naturally occurring obsidian blocks.
Where can I get flint and steel in Minecraft?
We now have everything we need to construct a Nethergateway. But, before we learn how to construct a Nether portal in Minecraft, there is something else we need to do. That’s Flint and Steel for you. Minecraft is a tool for making fire. It’s also the tool we’ll use to activate a Nether gateway.
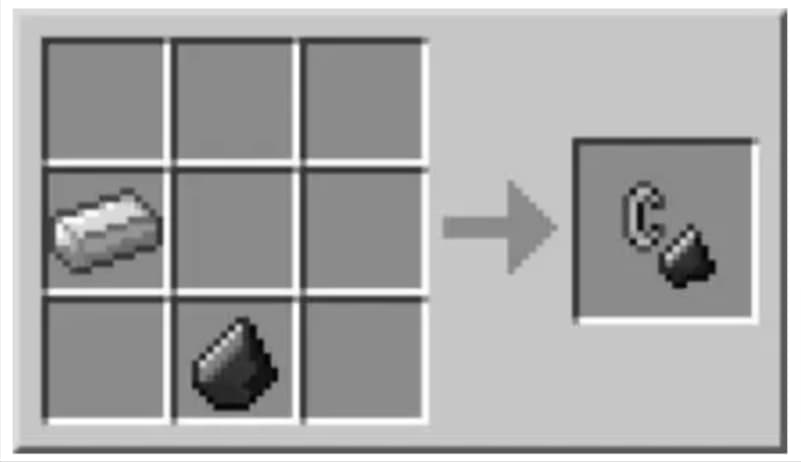
- The simplest aspect of this equipment is locating the steel. To conceal the tool’s steel, you’ll need a single block of iron. Flint is an uncommon resource that can only be obtained through mining gravel blocks. Every gravel block you mine has a 10% chance of containing flint. The good news is that you only need one flint to get by.
- Once you have a piece of flint and a piece of iron, mix them according to the instructions below. To obtain Flint and Steel in Minecraft, simply position them diagonally in the crafting area as shown below.
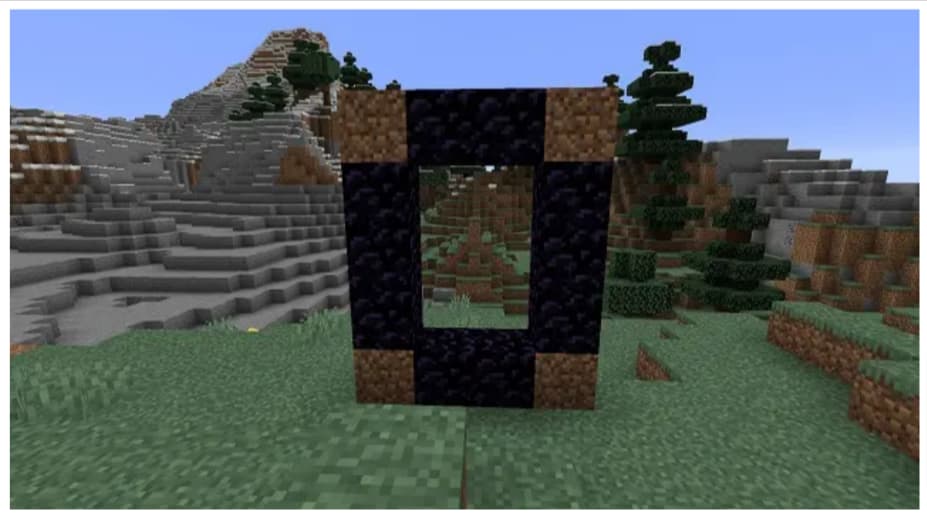
How to Make a Minecraft Nether Portal
You now need 10 obsidian blocks and a chunk of Flint and Steel in your inventory. You will also need four random blocks to complete the construction. These may be any blocks, but we recommend choosing soil because it is the simplest to locate in Minecraft.
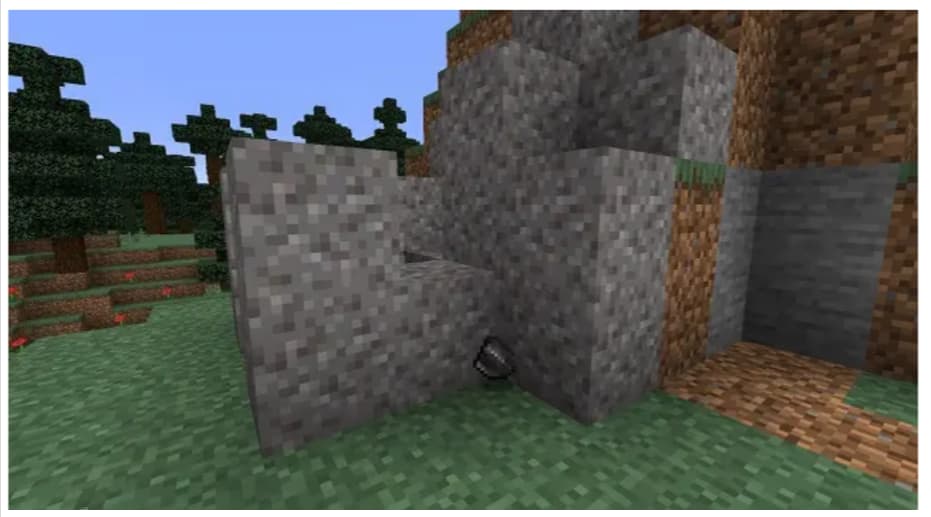
- Locate an open area and arrange two obsidian blocks adjacent to each other. You may place them by staring at the ground and using your mouse’s right-click or secondary action button. Then, as seen in the screenshot, lay earth or any other blocks on both sides of the obsidian blocks.

- Now, add two obsidian blocks on top of each of the soil blocks from the previous step. It is optional to shatter the soil blocks after putting them in obsidian blocks for aesthetic purposes. Then, on either side of the vertical obsidian block pillars, lay soil blocks. This is how your structure should look:
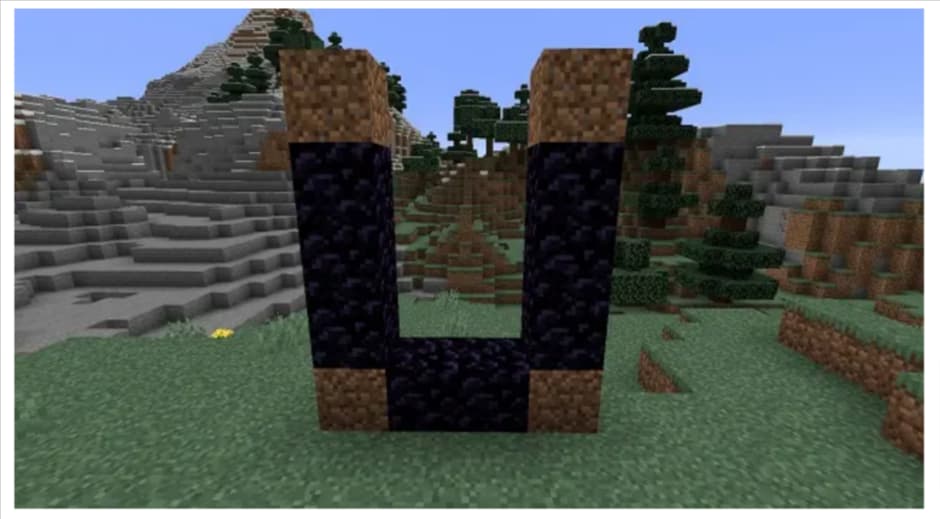
- Now, lay two more obsidian blocks between the top two soil blocks. It should give the Minecraft Nether portal building the appearance of a hollow, rectangular window.
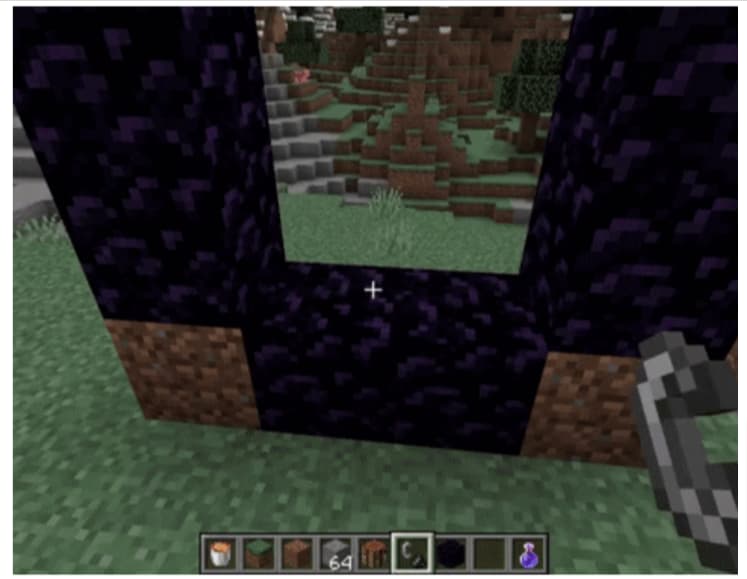
How to Use a Minecraft Nether Portal
Your Nether gateway is now complete and ready for you to use. Equip the flint and steel and right-click on any of the inner edges of the obsidian construction to do so. This will activate the Nether portal, and a purple liquid-like shimmering material will appear in the center of the rectangular gateway. Step inside it to be whisked to the Nether Dimension in a matter of seconds.
A fire charge can also be used to trigger the Nether portal. However, they can only be found in uncommon chests in the overworld. Some players attempt to start a fire in the portal with lava and a flammable block, but this is not a reliable choice for most. For newbies, going with the tried-and-true flint and steel approach may be the best option.
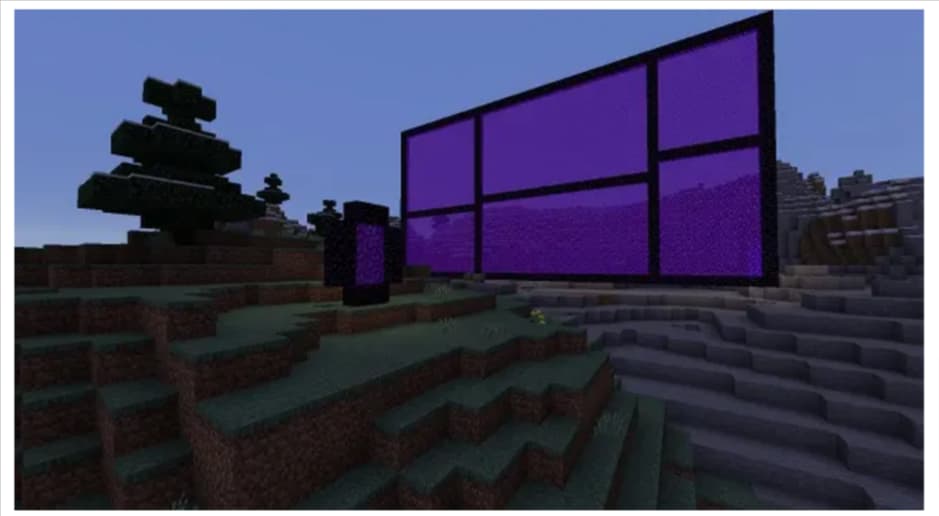
The Nether portal itself is a simple version that we constructed. You can use your imagination to customize it while retaining the fundamental framework and at least 10 obsidian blocks. Some individuals want to make it bigger, while others like to adorn it. You may join groups and find unique gateway designs by connecting to the top Minecraft Discord servers. The following screenshot shows an example of a one-of-a-kind design portal:
Conclusion
This is all you need to know to build your nether portal in Minecraft. Install Forge to gain modifications in Minecraft if you want to take your creativity to the next level. On the other hand, entering the perilous domain of the Nether will be thrilling in and of itself. Keep your weapons and food ready since mobs are common and food is limited in the Nether realm. If you’re just starting out with Minecraft, a performance bump may go a long way. You may install Optifine in Minecraft to improve visuals and gaming speed. Begin by gathering obsidian and then use your newly acquired knowledge to construct a Nether gateway.
Surf through Brightchamps’ blog page to get much more interesting content!
To get your hands on more such articles, educational content, and free resources on coding classes for kids, online robotics classes for kids, game development, etc., check out the BrightCHAMPS Page now!
Frequently Asked Questions(FAQs)
Nether portals can only be triggered in the Overworld or the Nether; they do not work in the End or customized realities. The fire must be the last block in the building to activate the portal—a fire on an incomplete frame does not result in the portal activating with the installation of the last obsidian block.
Even if you don’t regularly use these gates, you should create portals at 64 Netherblock intervals. (This is the optimal distance, although if the coordinates are correct, they can be erected as close as 16 Overworld blocks apart.)
Portal: The exact arrangement of obsidian blocks used to build the building used to travel to the nether.
End portal: the precise configuration of 12 End Portal Frame pieces that comprise the construction used to travel to the end
Escape portal: A bedrock-framed exit portal from the end.