

As one of the popular games since its release, Minecraft may look fun and simple. But don’t be mistaken, because this Sandbox game is actually pretty intensive.
Therefore if there’s a delay during your Minecraft playing and/or your computer is crashing on full force, it could be because your installed RAM is insufficient for playing the game.
https://brightchamps.com/blog/guides/minecraft-coding-for-kids/You have two options for dealing with this type of issue: downgrade your game or upgrade your allocated RAM in your Minecraft game. Unsurprisingly the latter option is much more popular among Minecraft players.
So, if you want to know how to allocate more RAM to Minecraft, keep reading because we’ll go over this in greater detail.
Table of contents
What Is RAM Allocation, and Why Does It Matter in Playing Minecraft?
Random Access Memory (RAM) is the main memory in a computer that focused on the current used programs and data.
Whereas according to Techopedia, RAM or Memory allocation is the process of putting aside a fragmented or an entire portion of computer memory for the execution of programs and processes.
By allocating more RAM to Minecraft, it will increase the game performance thus, ensuring your Minecraft gaming experience is a smooth sailing journey without any lagging, limitation, or constant crashes that frustrates you.
Things to Note Before You allocate More RAM to Minecraft
Before proceeding to the method of how to allocate more RAM to Minecraft, you need to note down a few things below:
- You need to keep in mind that the RAM allocation method will only work for Minecraft: Java Edition.
[This is because Minecraft: Bedrock Edition will automatically allocate RAM according to your game requirements and there’s no built-in option to control or change RAM allocation. ]
- You need to know how much your installed RAM in your computer is before allocating them to Minecraft.
[Because it’s definitely out of question to tell your device to allocate 10GB towards Minecraft when in total you only have 8GB installed on your computer.]
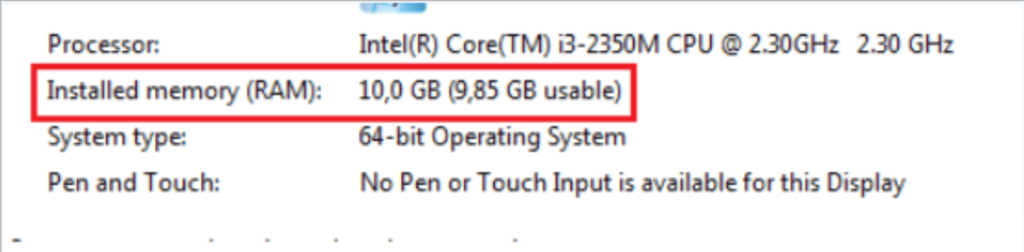
You can check the total amount of RAM that you have from the About section in your Settings window or just simply right-click on This PC from the windows explorer and click on Properties.
- It is not recommended to allocate more than two-thirds of your overall RAM to Minecraft, as this may cause some issues and slow down your overall computer performance.
How to Allocate More RAM to Minecraft
There are two main methods to allocate more RAM to Minecraft: through the Minecraft launcher and the Minecraft server.
However, there is more than 1 launcher in Minecraft as mentioned below:
- Default Launcher
- AT Launcher
- Void Launcher
- Feed The Beast (FTB) Launcher
- Technic Launcher
- Twitch Launcher
So in total currently there are 7 methods to allocate RAM to Minecraft, including the Minecraft server method.
Method 1: Allocate More RAM in Minecraft Server
You need to follow the steps below to allocate more RAM to Minecraft:
Step 1: Open the Minecraft server directory.
You can search for “Minecraft_server” on your PC to find its location.
Step 2: Allocate more RAM by creating a new document
Create a new text document (notepad) in the server directory. Paste the following code to the new text document.
java -Xmx####M -Xms####M -exe Minecraft_Server.exe -o true PAUSE
Replace #### with the RAM value that you want to allocate.
Note: Please keep in mind that the value must be in MB (Megabytes). As 1GB = 1024MB, you must multiply the number of GB (Gigabytes) you want to allocate by 1024MB.
Step 3: Save the file and rename it “.bat” instead of “.txt.”
Step 4: The new launcher for your Minecraft server will be the file you create. When you run the new file to start Minecraft, it will automatically allocate the specified amount of RAM.
Method 2: Allocate More RAM using Default Launcher
If you are using the default launcher to play Minecraft, then you can follow the steps below:
Step 1: Run the default Minecraft launcher and choose the version you want to play.
Step 2: From the top, go to the Installations tab.
Step 3: Move your mouse over the release version you want to play, there will be three white dots appearing on the right side.
Step 4:Click on three white dots and choose the Edit option from the drop-down menu.
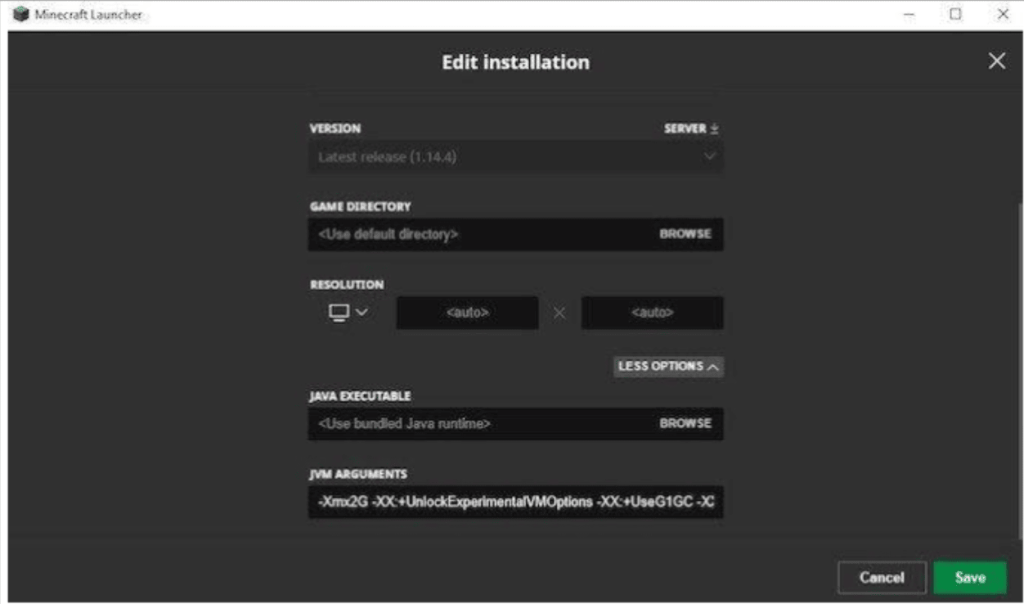
Step 5: There will be a pop-up window with game information. Select More Options and then scroll down to JVM Arguments.
Step 6: In the JVM Arguments field, change the code:
-Xmx1G
into:
-Xmx#G
The # sign is the amount of RAM you’d like to allocate to Minecraft (in GB). For example: if you want to allocate 2GB to your Minecraft, simply rewrite the code into –Xmx2G.
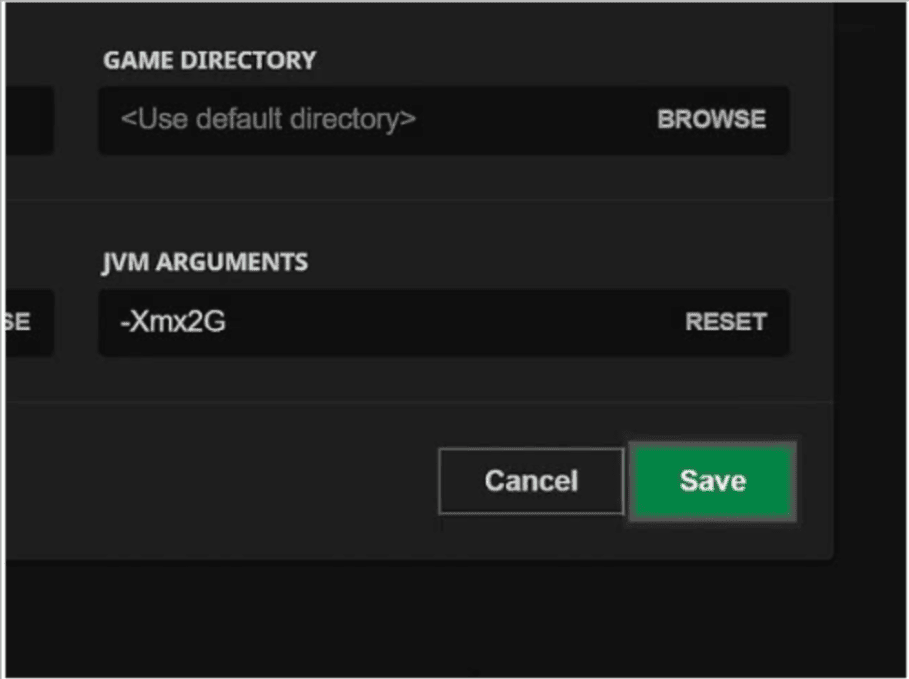
Step 7: Click the Save button.
Note: Do not modify any other codes as they might corrupt your game.
Method 3: Allocate More RAM using ATLauncher
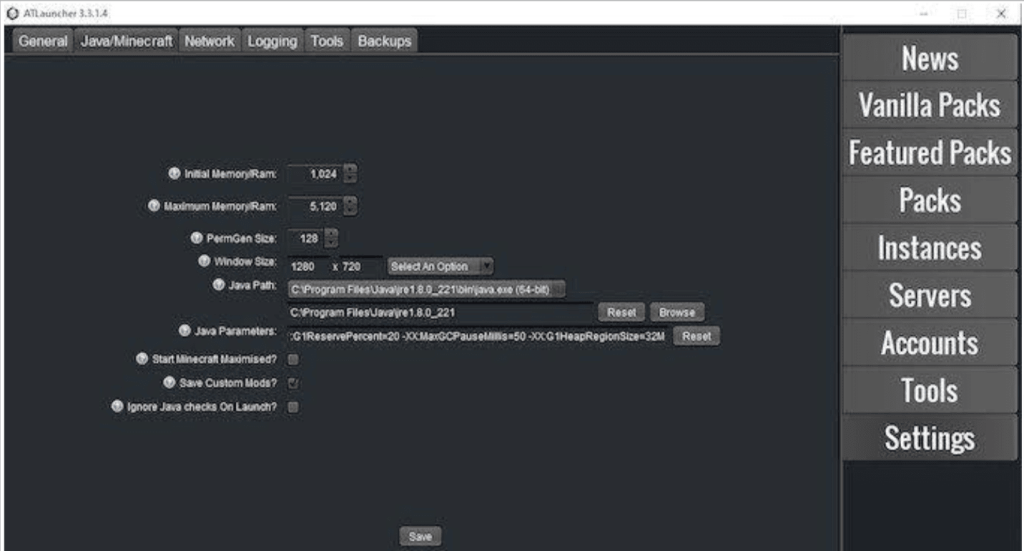
ATLauncher is another famous and widely used launcher for Minecraft. Below are the steps to allocate more RAM to Minecraft using this launcher:
Step 1: Run the launcher on your system.
Step 2: Click on Settings from the menu given on the right side.
Step 3: Click on the Java/Minecraft tab.
Step 4: Click on the maximum memory tab and enter the amount of RAM you want to allocate.
Step 5: Click the Save button and close the settings window.
Method 4: Allocate More RAM using Void Launcher
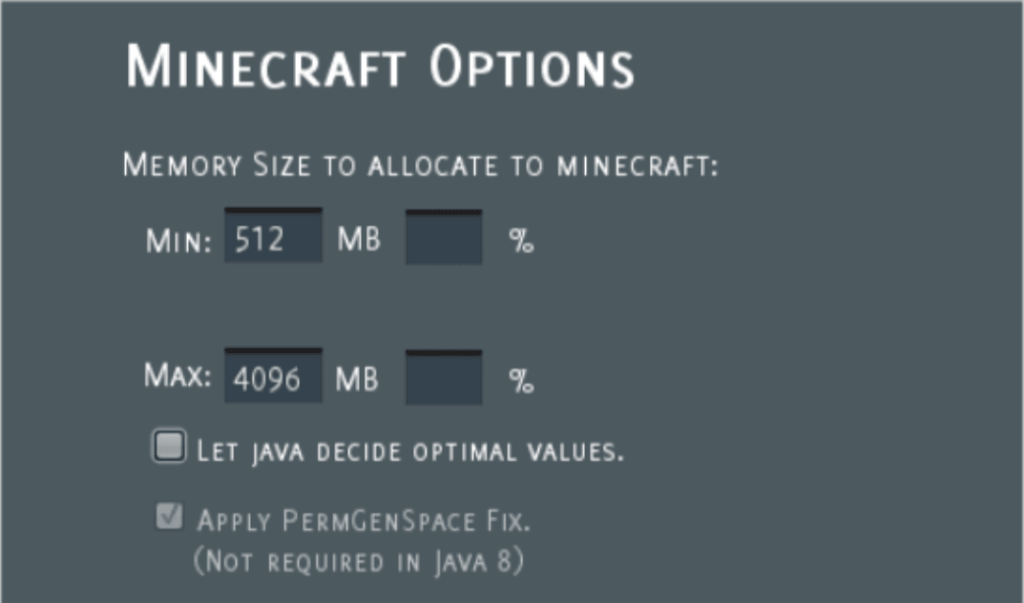
While using Void Launcher, you can follow the steps below to allocate more RAM to Minecraft:
Step 1: Run the Void Launcher on your PC.
Step 2: Click the Settings icon in the top right corner.
Step 3: Choose the Minecraft tab and click on Options.
Step 4: Fills the Max column with your desired maximum amount of RAM to be allocated to Minecraft.
Step 5: Save the setting, re-launch the browser, and start playing.
Method 5: Allocate More RAM using FTB Launcher

It can be said that perhaps FTB Launcher is the simplest method compared to the others.
Step 1: Launch the FTB Launcher and open the settings tab.
Step 2: Navigate to maximum RAM sub-option. Use the slider to set your RAM allocation for Minecraft.
Method 6: Allocate More RAM using Technic Launcher
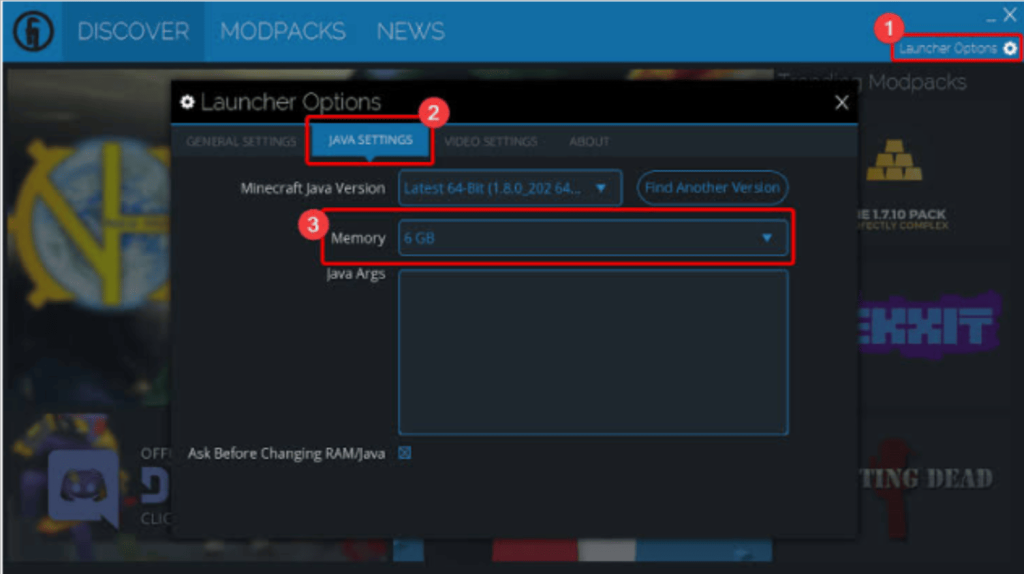
Aside from the ATLauncher mentioned above, another popular launcher is Technic Launcher, and if you use this Launcher, you should be fairly familiar with the user interface.
To allocate more RAM to Minecraft, follow the steps below:
Step 1: Run the Technic launcher on your device and navigate to the Settings menu at the top right corner.
Step 2: Click the Java Settings tab.
Step 3: Adjust the memory as you wish in the dropdown menu.
Step 4: Save the changes.
Step 5: Restart the launcher and enjoy your lag-free Minecraft.
Method 7. Allocate More RAM using Twitch Launcher
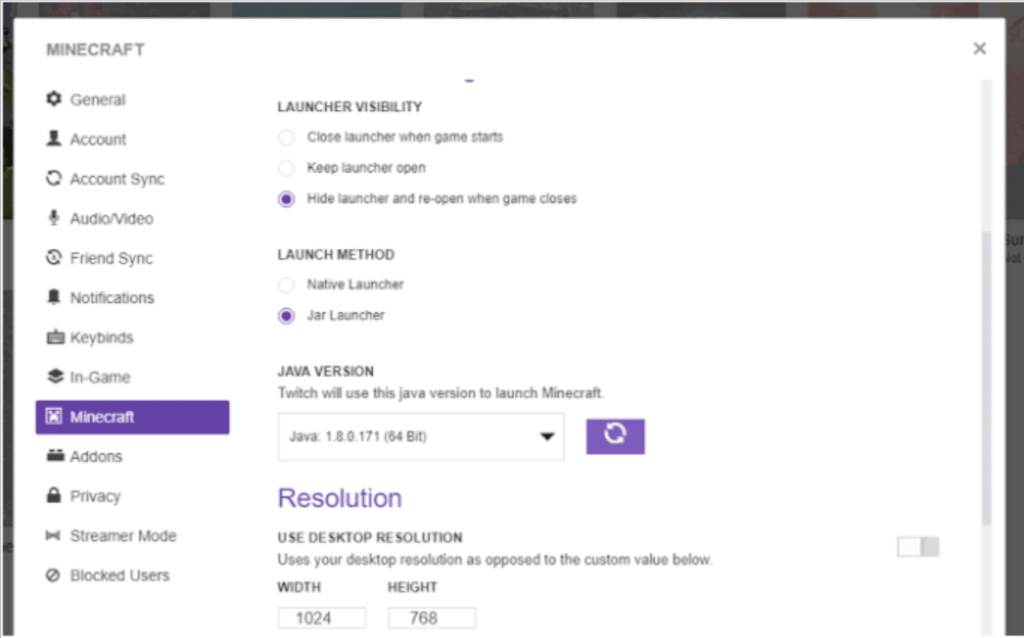
As a Minecraft lover, you must be quite familiar with this launcher. To allocate RAM to Minecraft using Twitch Launcher is still fairly easy since this launcher uses sliders rather than coding elements to adjust the RAM:
Step 1: Launch the Twitch launcher on your computer and click the three lines in the upper right corner.
Step 2: Go to Files and then click on Settings (marked by the gear icon).
Step 3: Click the Minecraft tab and scroll down a bit.
Step 4: Under the Java Settings section, you will see the Allocated Memory option.
Step 5: Adjust the slider to increase or decrease the amount of allocated RAM. 6. Your adjustment will be saved automatically. Just wait for a few seconds before you go back and run your Minecraft.
Conclusion
There’s no doubt that a lag-free gaming experience is one of the fun factors of playing Minecraft. By allocating more RAM to Minecraft, you will get a smooth sailing journey whenever you play this game.
As stated above, there are several methods for allocating more RAM to Minecraft, and you can select whatever method works best for you.
However, you must have the Java Edition of Minecraft.
After you make your pick, simply follow the steps outlined above and have fun with your game.
Learn more about Minecraft and game development through Minecraft at BrightChamps with its specially designed curriculum, which makes learning game development and coding simple for students in Grades 1-12.
Robotics programming for kids often involves hands-on projects where they can build and program their robots, fostering creativity and critical thinking.
BrightChamps also teaches a variety of other programs that assist children in developing a foundation in computer programming through activities, interactive lessons, and other means. Also, don’t forget to check out the exciting world of coding websites for kids, empowering young minds to create, innovate, and shape the future through the language of technology!