Wondering how to create a simple yet satisfying card-matching game on Scratch? We have got an easy step-by-step guide for you!
In this article, we will help you learn how to plan for projects of intermediate difficulty and code them on Scratch.
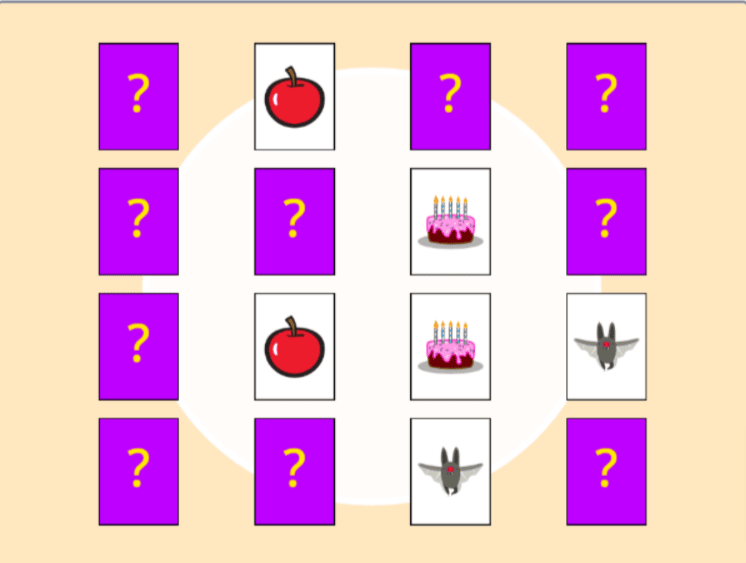
Concentration and Match Pair are two common names for the card matching game. It is a card game where you can flip two cards each turn to see if they match. The game is played with an even number of cards facing down.
It is quite popular because of how easy it is to get into and it offers the player a test of memory. People of all ages can play this game. Additionally, it is pretty simple to create this scratch game using block based coding.
Table of contents
- Frequently Asked Questions
How to plan for such a project
A concentration game has several phases, including shuffling, placing the cards face down, and playing until you find all the matching cards.
To recreate this Scratch game, follow the same steps and break the project into smaller chunks.
You can begin by preparing for the project by gathering the necessary sprites and backgrounds.
Then you can create an algorithm to shuffle the cards into various positions. Following that, you can add game logic to the game.
Finally, you can add the finishing touches to the game to make it that much more special!
Making concentration using block-based coding
Block-based coding has made it really easy and fun for beginners of every age to get into coding. It is especially engaging for kids because they get visual feedback of the coding running in real-time.
Through block-based coding, the process of creating the concentration game can be easily understood. It will be a concentration game with 16 cards.
So let’s go through the entire process of creating the scratch game
Step 1: Getting started
Choosing a background
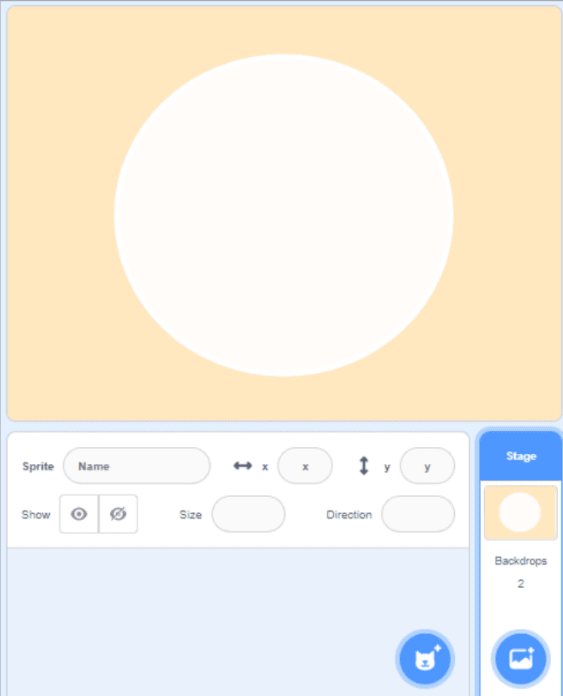
The first thing to do when you are getting started with a scratch project is to add a backdrop. You should choose a plain background to avoid the player from getting distracted. It will also increase the visibility of the cards later on.
Choosing Sprites
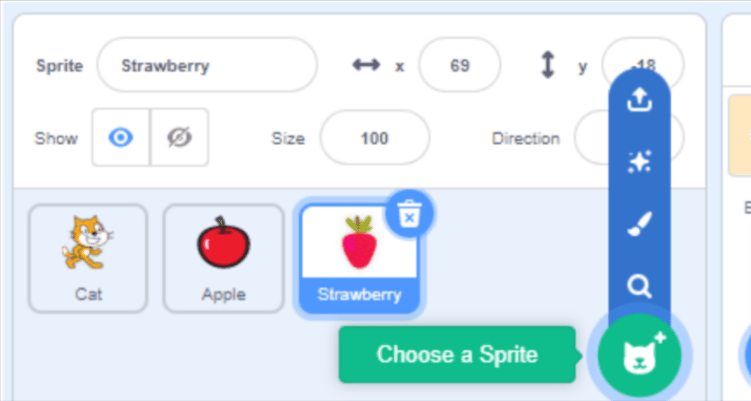
You can choose 8 distinct sprites for this project. You want to choose different sprites so that they can be easily distinguished.
Editing costumes for the Sprites
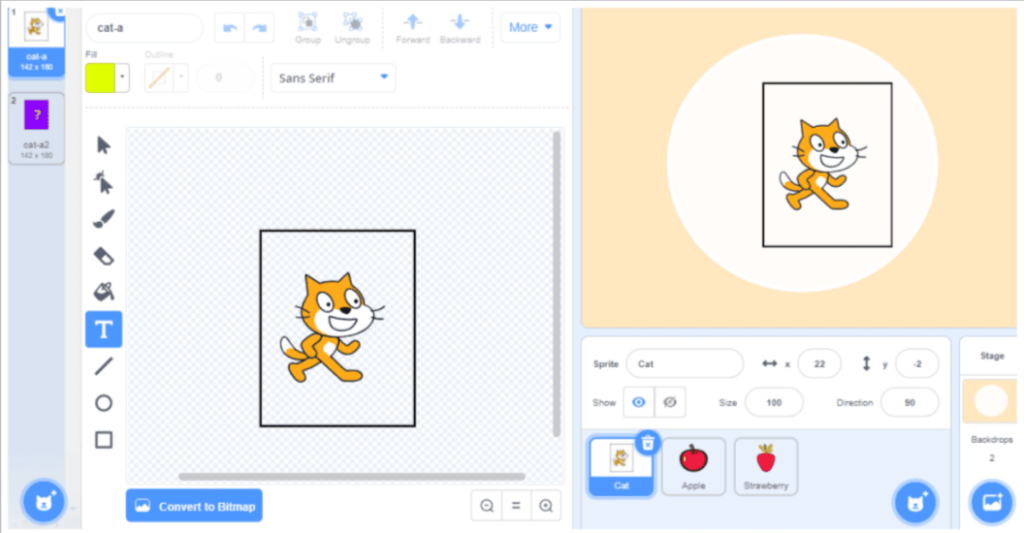
Because this is a card game, you must turn the sprites into cards. We can accomplish this by going to costumes and drawing a rectangle around the existing sprite.
Then, using white paint, fill in the rectangle. Then, select the sprite and bring it to the front layer by clicking the forward button.
Now duplicate the costume and fill the rectangle with a different color. This will be the back of the card.
Adjusting the size
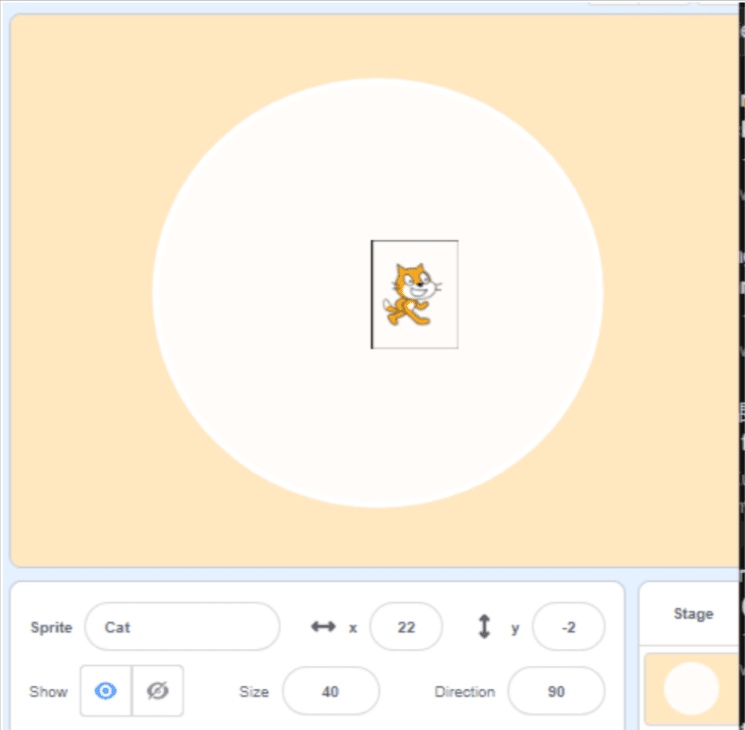
Now you must adjust the size parameter for each sprite until they are all the same size.
Make them small enough, so that 4 cards can fit the stage vertically and horizontally.
Step 2: Coding for Card Shuffles
For beginners, this may appear to be a daunting task. But once you apply a logical way of thinking, you can figure this out. You’ll create a card grid in which the cards will be shuffled.
Creating an empty sprite
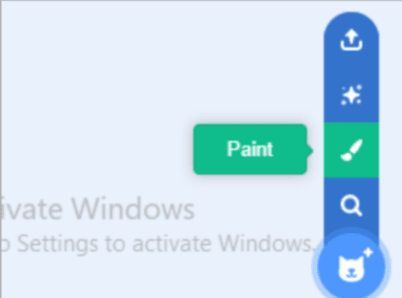
We will create an empty sprite first by hovering over the Choose a sprite button and clicking on the paint options. We are doing this so that we can avoid clutter in one sprite and we can easily manage the shuffling from one place.
Creating variables
Variables are important coding concepts, and we will use them to store the starting point of the card grid you are attempting to create.
You will name them startX, which will store the starting position on the X-axis, and start Y, which will do the same on the Y-axis.
You must also create a variable called a pick, which will contain the card number so that we can select the correct cards for the correct positions.

Creating lists
Lists are one of the more underutilized blocks in scratch. It is a very useful data structure. We will create Three lists here for all sprites.
Two of them, posX and posY will be used to store the various positions on the stage that we want the card to appear on.
The last one will be a picklist, which will allow you to keep track of which card has been chosen for which position.

Code for shuffling on the empty sprite
You will first select the starting position for the first card to appear. We’ve chosen the top left card position in this case. Set the X and Y position values for the variables startX and startY, respectively.
Then, using a repeat loop, populate both position lists with the values.
The value of startX will be stored in the posX list in this loop. To find the next X position on stage for the next card, we will add a number to startX.
And, in order to avoid going out of bounds, you must reset startX if its value is greater than maxX.
You must do the same for the posY list, and you must use the pick variable to store 1,2,3,… in the picklist, which will eventually be used to identify each card.
If we repeat this loop 16 times, we will have our 16 positions stored in separate position lists and the card numbers in the picklist.
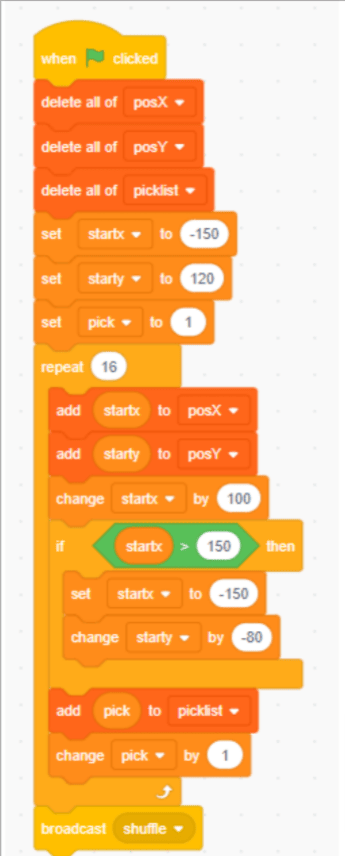
Shuffle code for the empty sprite
After the loop ends, we will broadcast ‘shuffle’. This will trigger the shuffling process. We add a separate script on the empty sprite with the when I receive ‘shuffle’ block.
Here, you will create another variable called random pick. This will be used to pick a random number between 1 to the number of times in the picklist and you will get the number assigned to the pick variable from the picklist. And at the end of this, we broadcast ’place’.
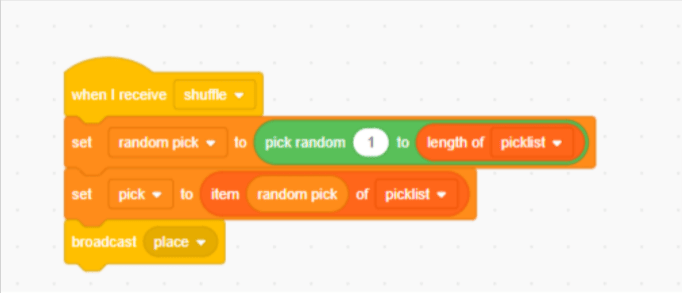
Shuffle code for the first card
The ‘place’ message broadcasted from the empty sprite will be received here. And the first thing we do is to check whether the number in the pick variable is equal to 1.
You will change this number for the other cards. Now we create another variable called Random Position.
This will be used to choose a random number between 1 and the length of the posX list. Now, choosing the Random Position variable as the index number, we will assign this sprites X and Y position as the value from the posX and posY list respectively.
This will set the position of the first card. After that we delete the used posX, posY, and picklist values, ensuring that we can’t select the repeating value ever.
At the end of this, we broadcast ‘shuffle’ again, so this keeps happening till all the cards are placed.
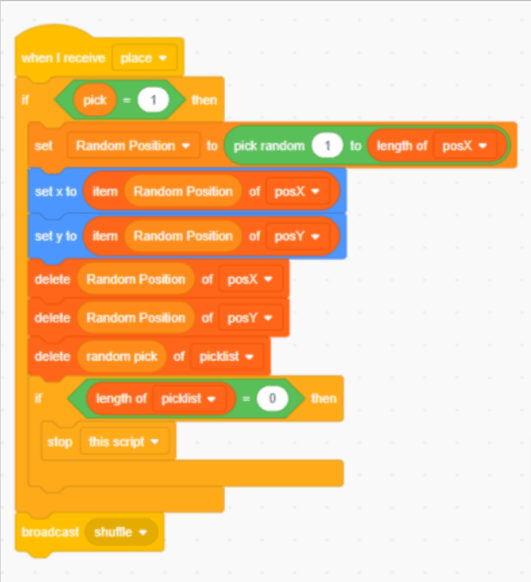
Step 3: Applying Game Logic
After shuffling the cards, you’re ready to apply the logic that determines whether a pair of cards match, and the best part is that we can do it on just one sprite and simply duplicate it!
Creating a flip function
Because we will be flipping a lot according to the game, we should make it into a function so that we can reuse it without having to repeat ourselves.
We can go to My Block and make a Flip Block.
Flipping the card here means switching from one costume to the next, and to make it more interesting, we’ll add some fisheye and color-changing effects while we’re at it.
All of this together creates a nice and cool effect.
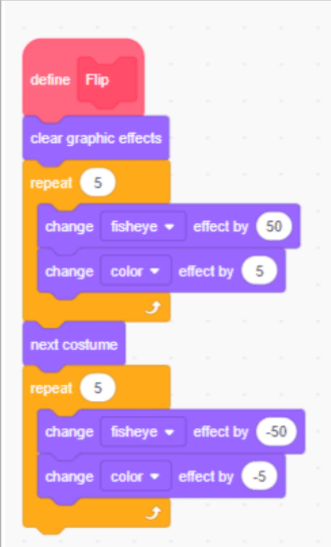
Creating local variables
To check the various conditions in the game, we should start by creating some local variables.
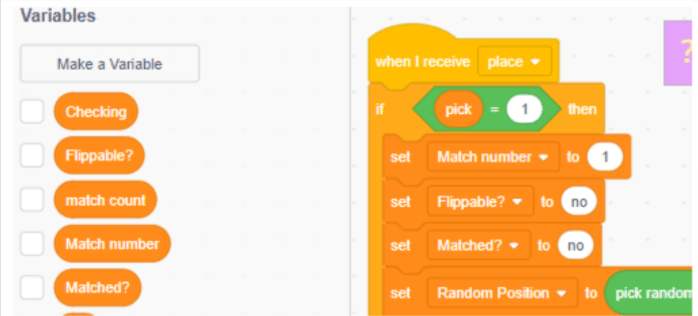
You can create 3 variables called Flippable?, Matched? And Match number selecting For this sprite only option.
We will use the boolean variables Flippable? and Matched? to determine whether the card can be flipped and whether it has already been matched.
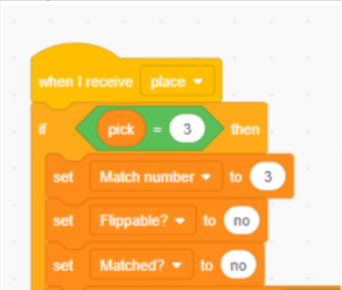
The match number will contain a one-of-a-kind number assigned to this card and the matching copy of this card. We’ll assign their values at the beginning of the already existing when I receive ‘place’ script as you can see below in the image.
Game Logic
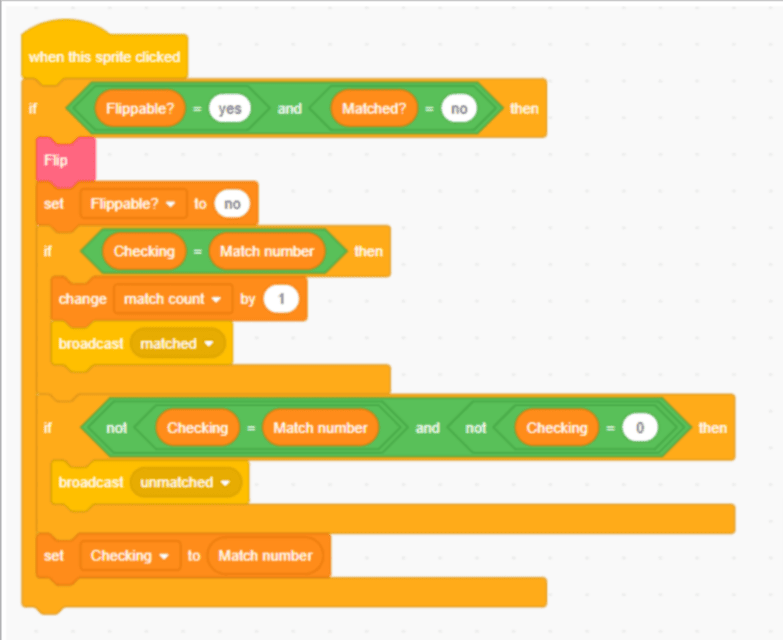
Now it is time to implement the card-matching game logic. We will use it when this sprite clicks and immediately check whether the card can be flipped or not.
There are a few reasons for this. We don’t want to flip a revealed card if we have matched the pair.
We also don’t want to immediately flip the card if it was flipped to reveal it.
So, if the Flippable? the variable is set to ‘yes’ and Matched? is set to ‘no’. Only then can we flip it.
- We will use the Flip block we made earlier inside the if conditional. Followed by setting the Flippable? Variable as ‘no’.
- Now we will make a variable for all sprites called Checking, which will temporarily hold the Match number value of the recently revealed card.
- We will also create another variable for all sprites called match count that will track how many cards have already been matched.
- Then we will check whether this number equals the match number of the currently flipped card. If it matches, we will change the match count by 1 and broadcast a message called matched. If it is not matching, we will just broadcast unmatched.
- Lastly, if this card has just been revealed, we will set the Checking variable’s value as the match number of the current card.
Case Unmatched
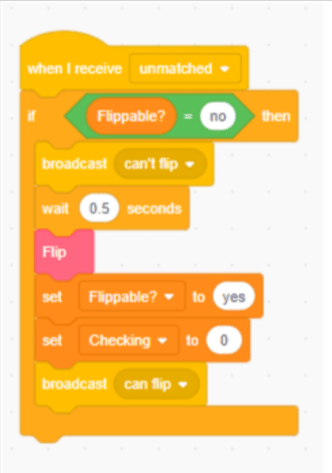
If the cards don’t match, we will create another script starting with when I receive unmatched.
Under this, we’ll check whether Flippable? is currently set to ‘no’, otherwise, we will do nothing.
We are using Flippable? Variable as a gatekeeper here because if it is set to no, it already has been revealed.
- We will broadcast ‘don’t flip’ inside the if block for the other cards because we don’t want them to be flipped.
- After that, we want to show the card to the player for a brief moment before flipping the card back over.
- So we add a wait 0.5 seconds block and then use our Flip block.
After doing all this, we will set Flippable? to ‘yes’ and Checking to 0 and broadcast ‘can flip’ to enable flipping for the rest of the unrevealed cards.
Flip if you can
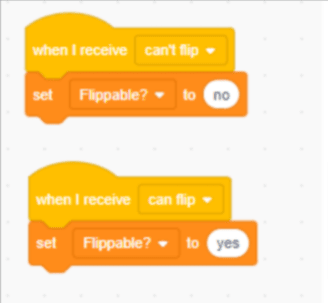
So, now we’ll write two separate scripts, one for when I get ‘can’t flip’ and one for when I get ‘can flip.’ We’ll make Flippable? to ‘no’ for can’t flip and ‘yes’ for can flip
Case Matched
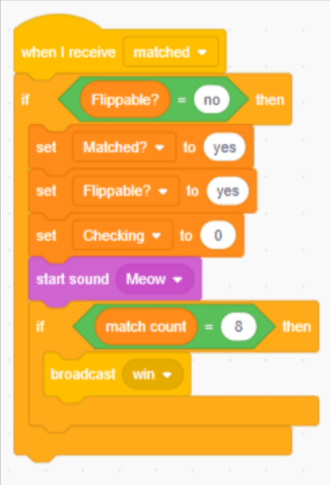
In the case that the revealed cards match, we will create another script starting with when I receive ‘matched’.
Similar to what we did in the unmatched case, we will start by checking whether the variable Flippable? is set to ‘no’ for the same reason.
Inside it, we’ll set Matched? to ‘yes’, Flippable? to ‘yes’ and Checking to 0.
And we’ll play a victorious sound! Under this, we will check whether the match count is equal to 8. If it is, then we will broadcast ‘win’.
And with this, our game logic is complete.
Step 4: Finishing Up
Now all that is left is to add scripts to other cards and set up a title screen and an end screen. We will also set up the flow of the game.
Creating new Sprites
We will be creating 3 new sprites. It will consist of the title text, the start button, and the winning text.
You’ll need to use the text tool to make these.
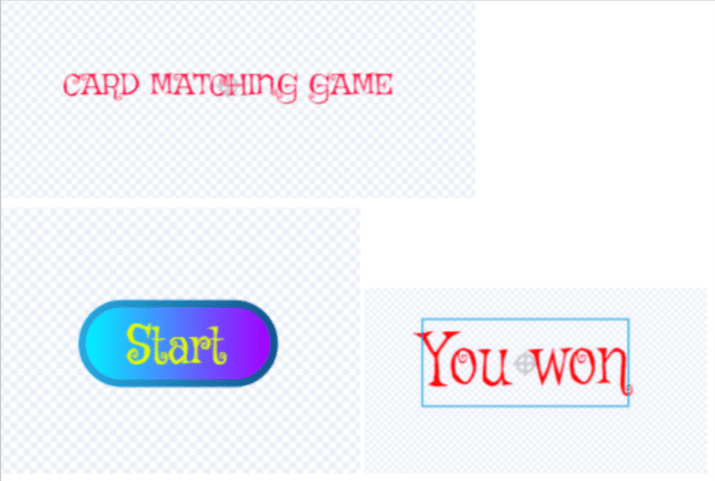
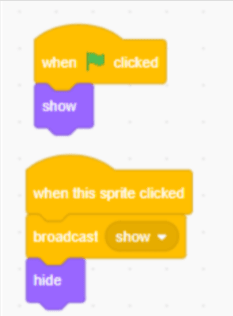
This is very simple; show it at the beginning of the game, and then broadcast ‘show’ and hide it when this sprite is clicked.
Coding for Title Text
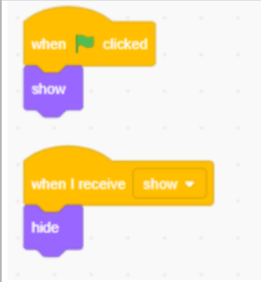
This is similar to the start button, you need to show it at the start of the game, and under when I receive ‘show’, you need to hide it.
Coding for Win Text
Over here, you have to hide it at the start, and then you have to show it when you receive the ‘win’ message
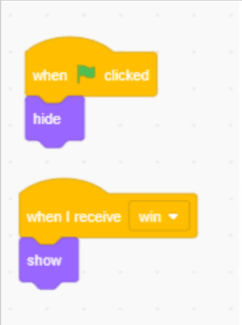
Additional coding for the empty sprite.
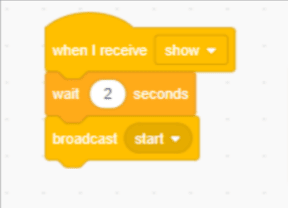
When we click on the start button, we want to show it for 2 seconds, and then we will start the game. So we will use the code down below.
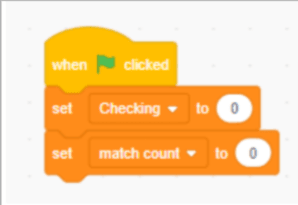
Also, we want to set the value of the checking and the match count variables at the start of the game.
So we will also add this here.
Additional coding for the cards
The cards will remain hidden at the start of the game and cannot be flipped.
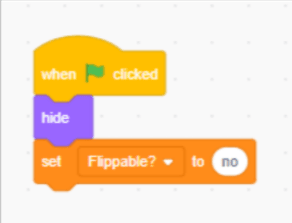
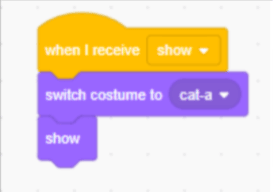
When the cards receive the broadcasted message ‘show,’ we will switch them to the first costume for a brief moment to show the cards face up.
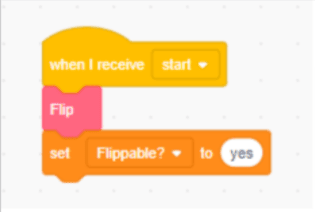
When the cards receive ‘start’, they are ready to be played. So we flip them with the function we wrote and set Flippable? to yes.
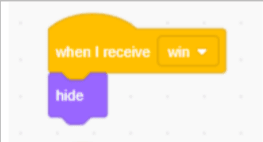
Lastly, when we receive ‘win’, we’ll hide the cards.
Adding the script to other cards
Put the first card’s code in the backpack and add it to all the other sprites. You need to modify it when I receive the ‘place’ script.
You must change the condition in the first if conditional, for example, pick = 2, pick = 3, and so on, as well as the Match number for each.
Duplicate the cards
We have only 8 cards prepared so far. We simply need to duplicate each card and then continue to look for unique pick numbers, such as pick = 9, pick = 10, and so on, while keeping the Match number the same this time.
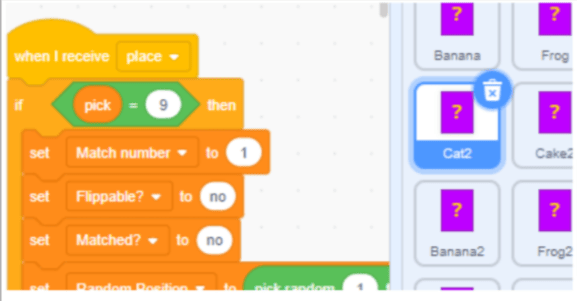
With this our wonderful game of concentration or match the cards is ready to play.
Conclusion
What we have made here is just the base scratch game and there is a lot of room to introduce new ideas.
You can add a timer and track how long it took a player to complete 1 game. You can introduce levels and more cards.
There are many possibilities, so experiment a bunch and make it your creation. There are lot of best coding games for kids, which boost up their learning.
Learn Scratch at BrightChamps with its specially designed curriculum that makes learning programming easy for students in Grade 1-12. BrightChamps also teaches a variety of other programs that help kids build a foundation in computer programming through activities, interactive lessons, and other means.
Frequently Asked Questions
Ques1. Is making a scratch game difficult?
Ans: No. its quite simple to create a Scratch Game.
Ques 2. What age should a child begin studying scratch-based coding?
Ans. Children as young as 6 can start learning the fun and interesting coding, Scratch.

