Welcome to the world of Roblox, where imagination and creativity are endless! Roblox is an online game platform that allows users to create and play games designed by other users. One of the most exciting features of Roblox is its Animation Editor, which allows players to create custom animations for their characters.
Whether you’re a seasoned Roblox developer or a newcomer looking to spice up your game, the Animation Editor is a powerful tool that can help you bring your characters to life. In this blog, we’ll take you through a step-by-step guide on how to create an animation in the Roblox Animation Editor.
By the end of this guide, you’ll have the knowledge and skills you need to create your custom animations in Roblox. So, let’s get started and unlock your creativity!
Let’s talk more about the Animation Editor!
Table of contents
How to Create an Animation in Roblox Animation Editor
Roblox Studio includes a powerful Animation Editor that allows you to create and publish custom animations and templates.
The Roblox animation editor works with both stock human characters and non-human models. However, this is only possible if all moving parts are linked to Motor6D objects.
Assuming your model is compatible, proceed with the following steps to begin creating an animation:
Step 1: In the Plugins tab, click the Animation Editor button.

Step 2: Select the rig for which you want to define animations.
Step 3: If prompted, enter a new name for the animation and click Create in the dialog.
Step 4: The editor window will appear, displaying a tracklist as well as the animation timeline.
Now that you’ve made an animation let’s add some movement!
Creating Poses
To animate a rig, define poses by moving/rotating specific parts such as the head, right hand, left foot, etc.
When the animation is finished, the rig will move from pose to pose smoothly.
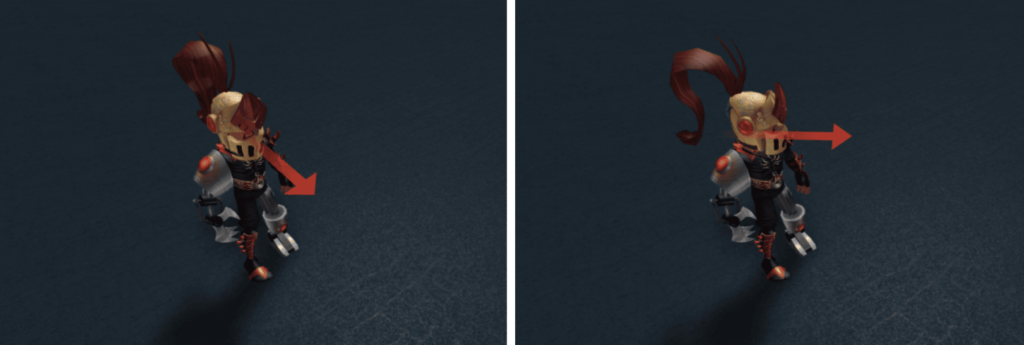
Consider a simple animation in which a human character turns his or her head 45 degrees to the left.
This animation includes two poses: the initial (forward) position of the head and the turned position of the head (looking left).
To create a new pose, follow the steps given below:
To make a new pose, follow the steps below:
Step 1: Drag the scrubber bar to the time/frame position where you want to set the pose, such as 0:15.
Step 2: Hover your mouse over the rig and click to select a part.
Step 3: Rotate and/or move the component to the desired orientation. When you do this, a track is created, and a new keyframe is added to the timeline, as indicated by the diamond symbol.
Step 4: Keep moving or rotating the parts until you achieve the desired pose. When you change a specific part, a keyframe is created for that part at the time/frame you specify.
Step 5: When you’re ready to see the animation in action, click the small Play button in the upper-left corner of the editor window. Spacebar can also be used to play/pause animations.

Save and Export
When you’re happy with the animation, save it as a KeyframeSequence object or export it to Roblox for use in your games.
Saving to Project
To save an animation as a KeyframeSequence:
- Click the three dots button in the editor window’s upper-left corner.
- To save the animation as a child of the AnimSaves object, choose Save or Save As from the context menu (itself a child of the rig).
Exporting to Roblox
To use animation in an actual game, export it to Roblox and note the assigned asset ID.
- In the upper-left corner of the editor window, click the three dots button
- From the context menu, choose Export
- Choose whether to make a new animation or replace an existing one
- Once the upload is complete, click the “copy” button in the export window to copy the animation’s asset ID
Conclusion
Congratulations, you’ve reached the end of our step-by-step guide on how to create an animation in Roblox Animation Editor! By now, you should have a good understanding of how to create poses, save, and export to Roblox!
Remember, creating animations in Roblox takes time and practice, so don’t get discouraged if your first attempts don’t turn out exactly how you envisioned. Keep experimenting and tweaking until you achieve the desired result.
Whether you’re creating custom animations for your own game or just for fun, the Animation Editor is a fantastic tool to unleash your creativity and bring your characters to life.
We hope that this guide has been helpful to you and has inspired you to continue exploring the possibilities of Roblox. So go ahead, get creative, and have fun creating your unique animations!
Learn to create fun games in Roblox at BrightChamps with its specially designed curriculum, which makes learning game development and coding for kids simple for students in Grades 1-12. BrightChamps also teaches a variety of other programs that assist children in developing a foundation in computer programming through activities, interactive lessons, and other means. To get your hands on more such articles, educational content, and free resources on coding for kids, robotics courses for kids, game development, etc., check out the BrightCHAMPS Blog Page now!
Frequently Asked Questions (FAQs)
No, you don’t need any programming knowledge to use the Animation Editor. It’s a user-friendly tool that allows you to create animations using a visual interface.
Yes, you can import external animations into Roblox using the Roblox Studio. However, please note that you’ll need to make sure that the animations are compatible with the Roblox format.
Yes, you can create animations for non-human characters such as animals, robots, and even objects in Roblox. The Animation Editor allows you to customize animations for any character or object in your game.

 We are an army of educators and passionate learners from BrightChamps family, committed to providing free learning resources to kids, parents & students.
