

Minecraft offers various ways for its players to use their creativity while building a rooftop. As the creative elements of this game are limitless, new players wish to create something new every time.
Instead of going with the basic structure composed of dirt blocks, they wish to create something out of the box while building the roof. Learning how to build a roof can assist players in becoming more acquainted with the world of Minecraft as they explore its limitless possibilities.
Some gamers may only require a roof to keep the hordes away, while other players could be looking for a way to complete their dream house design. This post will highlight the greatest Minecraft roof designs for beginners, regardless of who may find them useful.
Before diving into the blog, You can check out the video.
Table of contents
Common Minecraft Roof Designs
- Flat Roofs
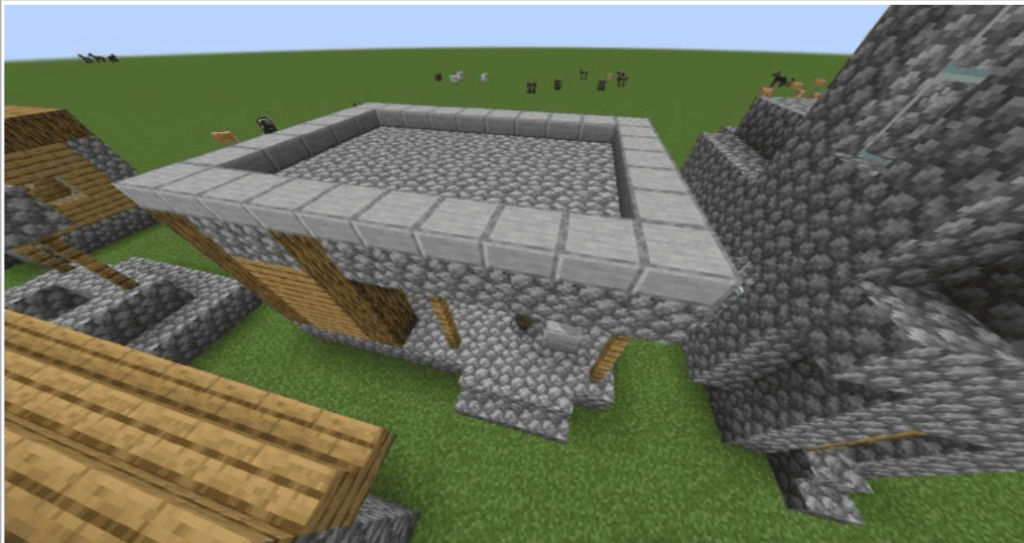
A pre-Village and Pillage Update plans the village’s blacksmith’s structure. This roof type is also known as a parapet roof since it is surrounded by a parapet (a low protective wall).
Constructing a flat roof is simple, but making a flat roof that seems authentic is more difficult. Take a page from the local blacksmith’s book and add a border; that little extra effort considerably improves the appearance of this modest Minecraft building.
For a roof border, always attempt to employ a variety of block kinds. Use slabs, as shown, or reverse stairs to form a gutter, or add a border of blank signs around the structure, or a parapet, to make the roof area safe to use. The only thing you should not do is utilize the same materials as the rest of the structure.
These roofs have one flaw: If they are not lighted up or covered in slabs, buttons, or pressure plates, they are an ideal area for monsters to spawn at night.
- Terrace
The roof surface may be paved to serve as an outdoor living space if a home’s architectural design allows easy access to a flat roof area. Terraces can vary in size from large to small, covered to open, or both.
The balcony might look similar to some terrace designs, but it is not part of a roof. The balcony may or may not have a roof covering it; as a general rule, the space beneath a balcony is also outdoors, but the area under a terrace is usually indoors.
- The Roof of a Shed
A shed or roof has the same slope. On inhabited buildings, this pattern is rarely used as the main roof, but it could be present on some of them. It is more likely to be found on low-cost, simple, or functional buildings like sheds, animal houses, outhouses, and storage barns if it is the sole roof of a building.
- Roof with a Gable
A gable roof, often called a pitched or peaked roof, is shaped like an inverted “V.” This roof style is common in the early villages created by the terrain generator in Minecraft and is appropriate for simple buildings. The image depicts a 610-meter-tall building.
A decent interior area of 48 meters is provided by the exceptionally thick walls seen in Minecraft. This is sufficient for one or two rooms. This size building fits quite well with the rest of the hamlet.
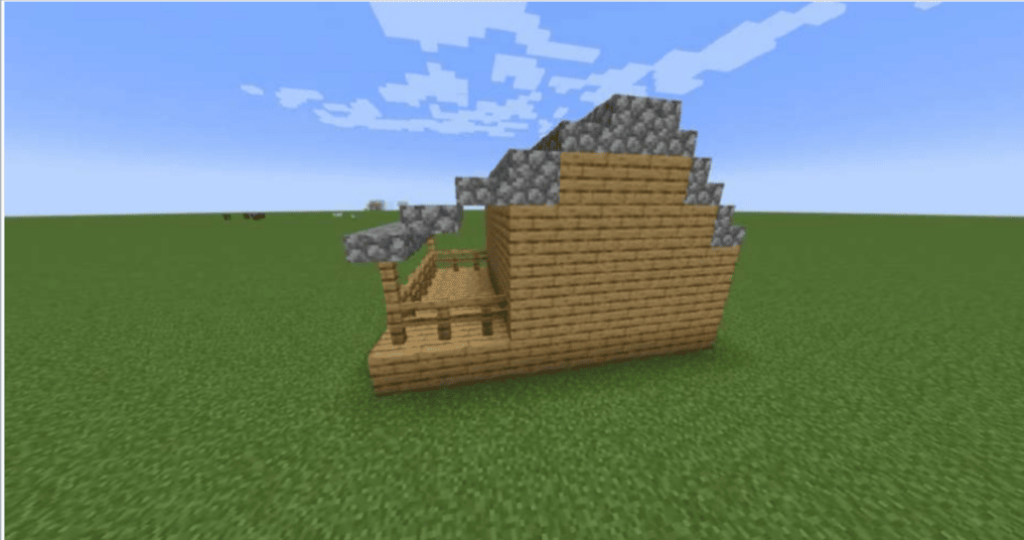
- The Roof of the Saltbox
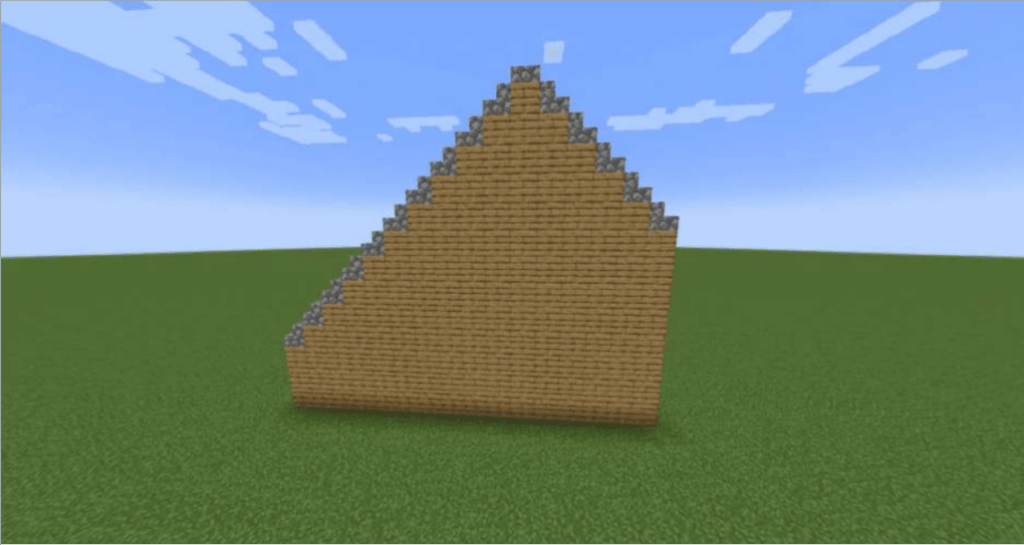
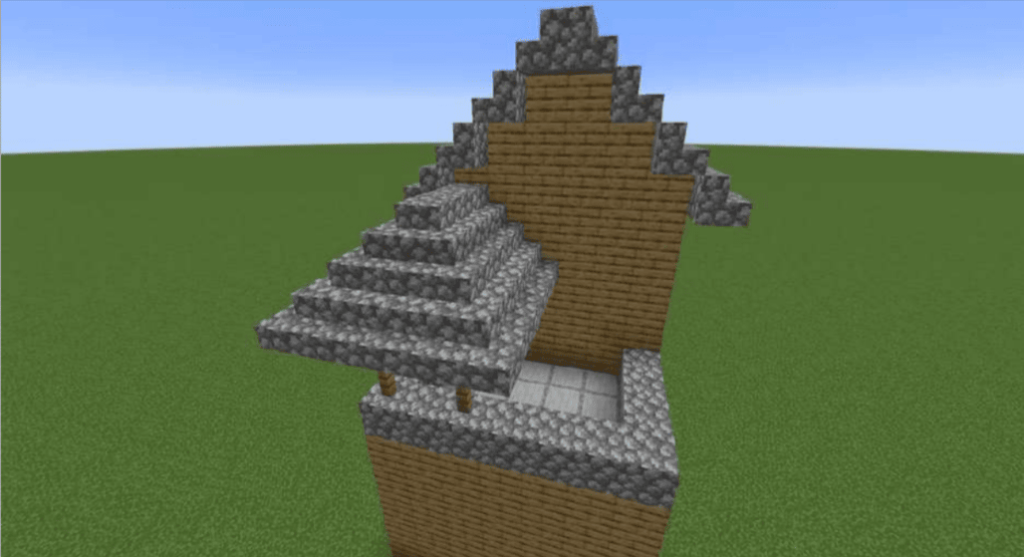
A saltbox roof is a gable roof with one slope that is significantly longer than the other. Buildings with this roof style frequently have two stories in front and one in back; adding a lean-to-rear roof to an existing structure in this way is a straightforward method to extend a building.
A saltbox roof’s front and back slopes may have the same pitch, although as the second image indicates, this is not usually the case.
- Window with Clerestory
A window that is too high to be seen out of yet still lets light into a building is called a clerestory window. As a result, “clerestory roof” is a catch-all term for any roof with clerestory windows. A half-monitor roof is another name for this style of roof.
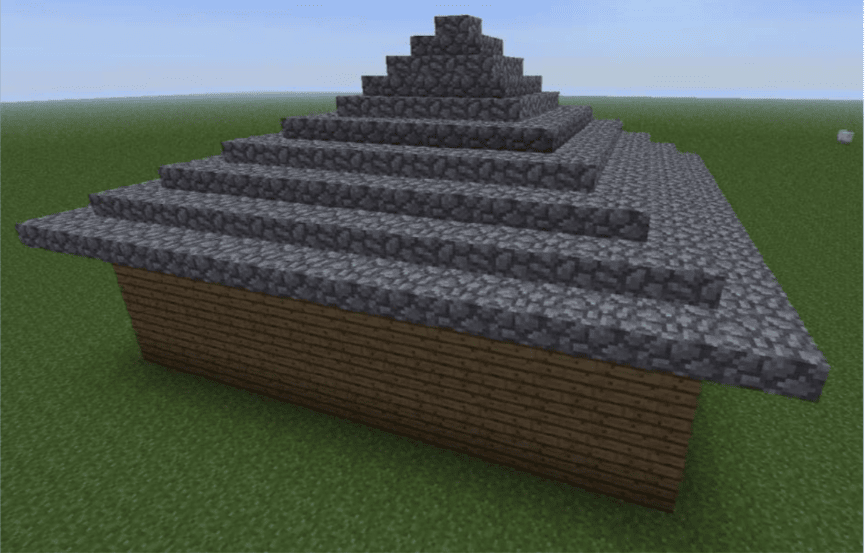
- Slanted Roof
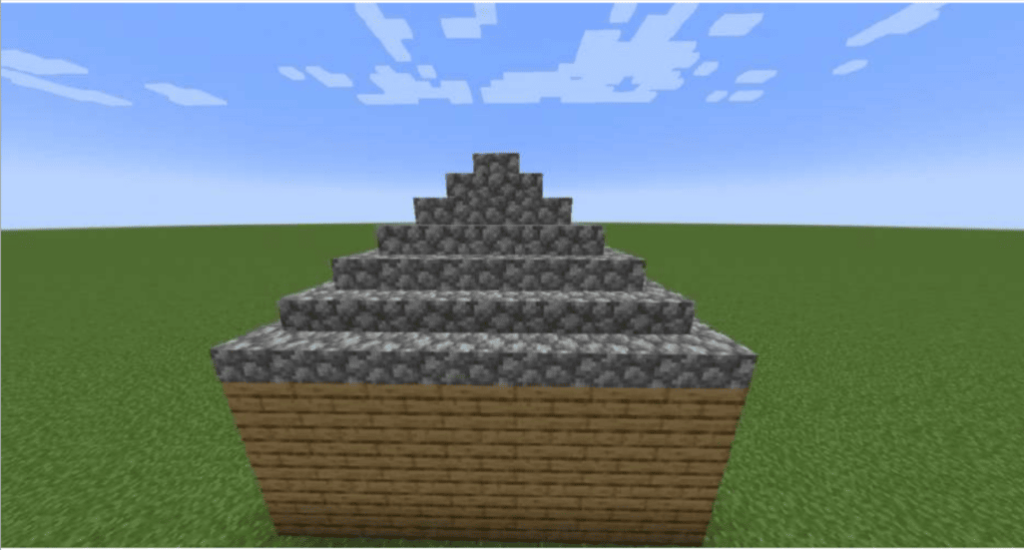
A hipped roof (also known as a hip roof) slopes in both directions. A hipped roof provides significantly less roof volume (for an attic) and generates a characteristic pyramid-shaped roof when placed on a square building.
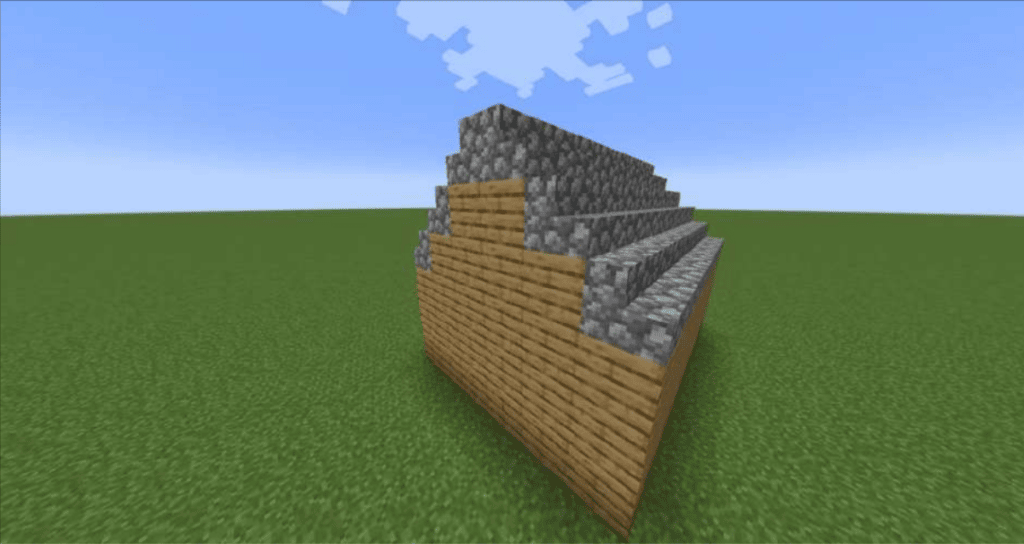
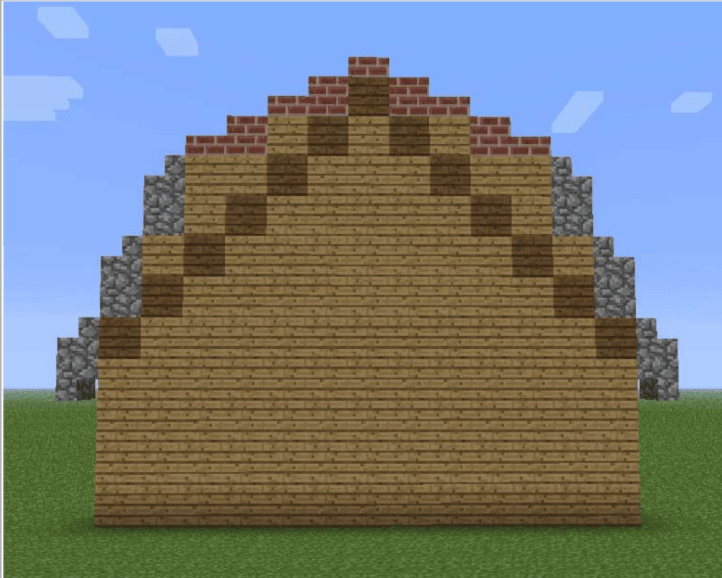
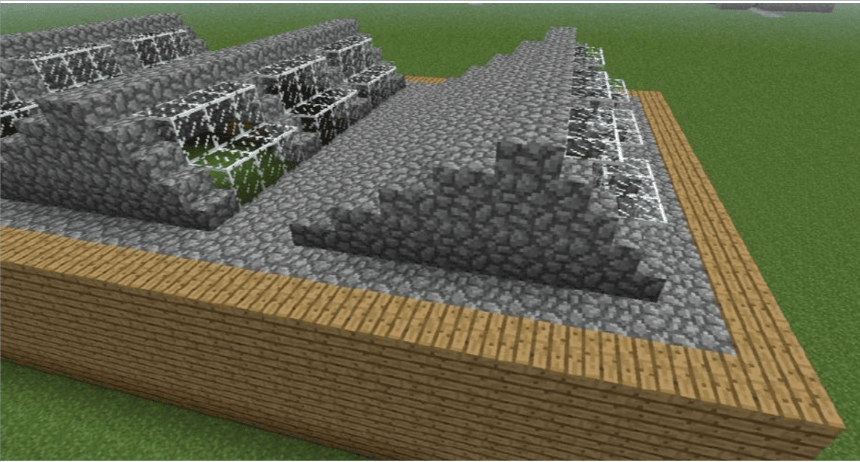
- Half-Hipped Roof

Another method for combining roof types is to utilize a gable roof for part of the height of a roof and then convert it to a hipped roof for the rest. Depending on which section is used, this results in two different roof types: the half-hipped roof and the Dutch gable or gable roof.
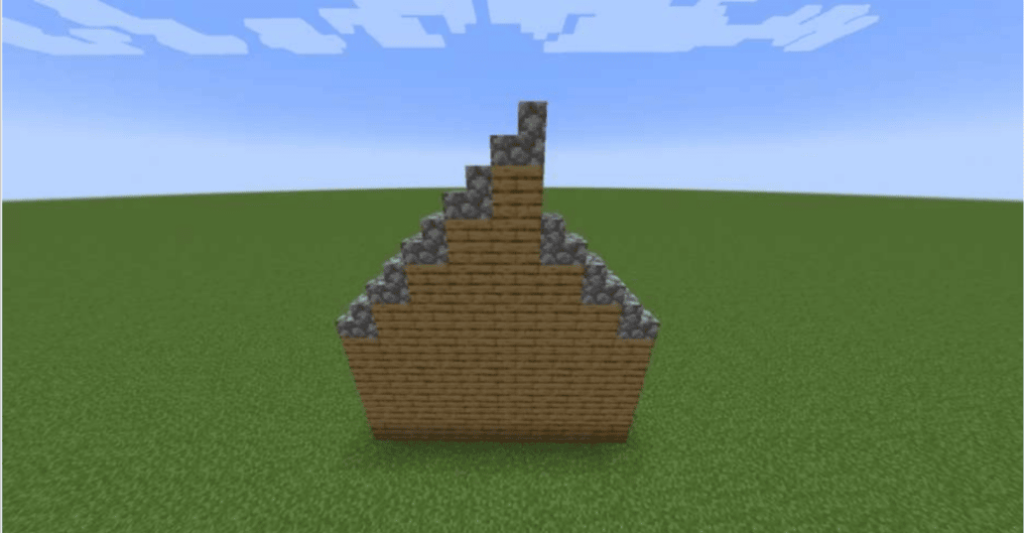
You can switch style on a half-hipped roof at any time, resulting in a largely gable roof with a very little hipped portion, or a mostly hipped roof. This picture of a half-hipped roof displays three rows of a gable roof and 212 rows of a hipped roof above it (including the layer of slabs at the roof peak).
These buildings are far larger than the NPC village buildings, but if they were any smaller, it would be impossible to distinguish between their varied roof types.
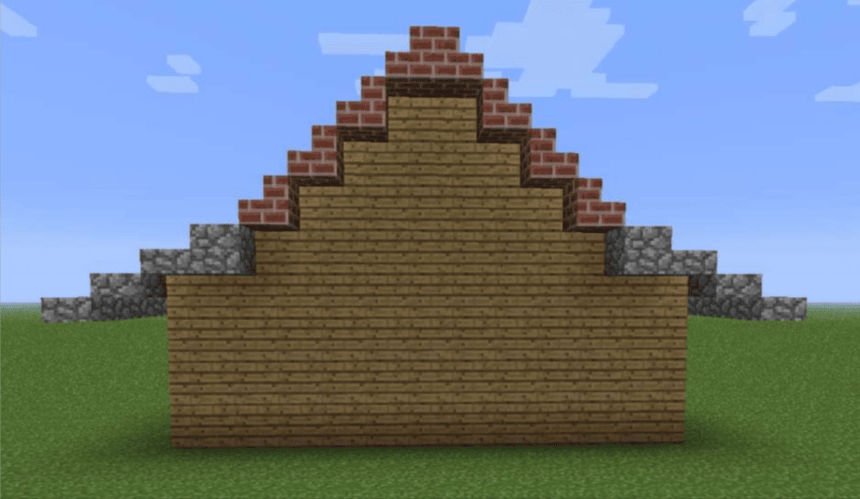
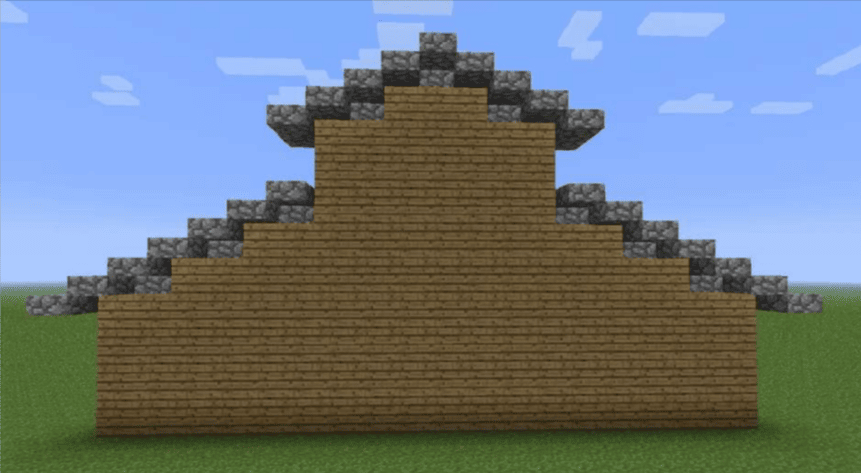
- Dutch Gable Roof
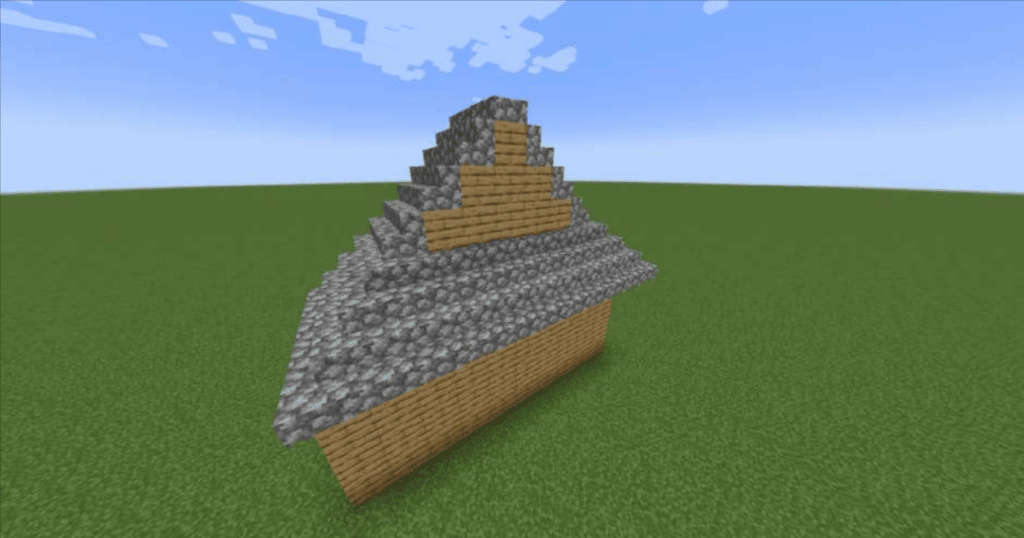
A Dutch-gable roof is a hipped roof with a little gable at the top. It is typical to have a small window in the gable section, but for clarity, we have utilized wooden boards in this illustration.
It should be noted that although the term “Dutch Gable” is commonly used to describe this roof type in the United States, it is occasionally mistaken for the Flemish gable design described in the roof decoration instruction.
- Skillion Roof
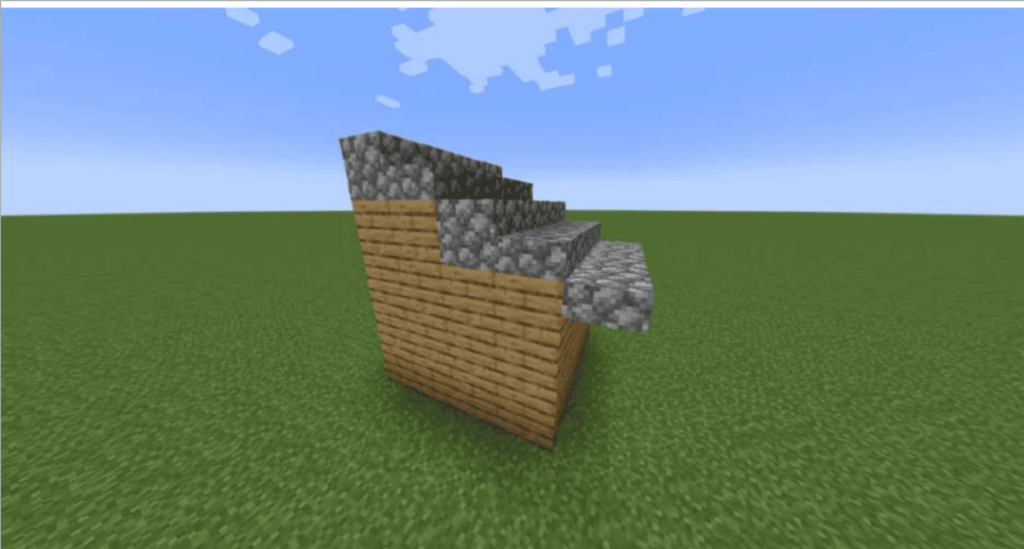
A skillion roof is a roof that slopes in just one way. It can either continue the slope of an existing roof or be a distinct structure. A skillion roof is also known as a shed roof or lean-to roof.
The roof may extend over the porch without dropping to the ground due to a skillion roof with a 1 in 1 pitch on the right and a 2 in 1 pitch on the left.
- Gambrel Roof
The two or three separate roof pitches on a gambrel roof are steep at the bottom and shallow or flat at the top. The usable capacity underneath the roof has increased as a result. One or more curved portions may be included in some gambrel roofs. If a roof is partially curved and partly straight, the lowest areas are normally given curves first.
On standard Minecraft scales, it would be tough to model these roofs. Gambrel roofs are also known as kerb roofs, curb roofs, and Dutch Colonial roofs.
- Gull Wing Roof
A Gull wing roof or Gullwing roof has a small pitch lower down and a sharp pitch higher up. Large overhangs are a common feature of these roof designs, which help to shade the building.
- Mansard Roof
A gambrel roof is comparable to a mansard roof. It features two or three different roof pitches. The majority of the roof is steep, but it always includes a shallow or flat piece higher up, and it has slopes in both the North-South and East-West directions, like a hipped roof.
Curved roof sections are used on the bottom portions of some mansard roofs. As a result, the useable volume under the roof is significantly expanded. A mansard roof can cover multiple levels in very large buildings.
Some mansard roofs are like bonnet roofs in that they have a shallow lower pitch that continues beyond the curtain walls. A mansard roof is distinguished by its squarish shape and larger volume of roof area as compared to a gable roof and other simpler forms.
Also, because the major purpose of a mansard roof is to make the roof volume usable, it will have dormers to give illumination.
Buildings in Minecraft must be rather large before mansard roofs begin to seem decent, especially since extended parapets are popular. The structure on the left is approximately 1620 meters tall. That would be 2024 m with a parapet and a 1m walkway all the way around.
- Bell-Cast
Two distinct roof pitches are present on a bell-cast roof. However, the bottom pitch is shallow and the upper pitch is steep. A bonnet roof is another name for it. Some bonnet roofs may be partially or completely curved, although this is difficult to render at standard Minecraft sizes.
- Saw-Tooth Roof
A saw-tooth roof features ridges with multiple pitches on both sides. The steeper slopes are glazed and turned away from the equator to protect workers and equipment from direct sunlight. This sort of roof is typical in deep-plan buildings and industries.
A Northlight roof is another name for it. The windows must all face North or South, and you must be consistent no matter which direction you choose for a “true” saw-tooth roof in Minecraft.
- Monitor Roof
A monitor is an elevated structure with a roof that runs parallel to the main roof that runs along the ridge of a double-pitched roof. On the long sides of monitors, louvers or clerestory windows are typically utilized to help light or air the building.
Full-length monitors are seldom seen in residential constructions and are more frequently found in larger buildings like barns, warehouses, and factories. A monitor, on the other hand, does not have to run the entire length of a roof.
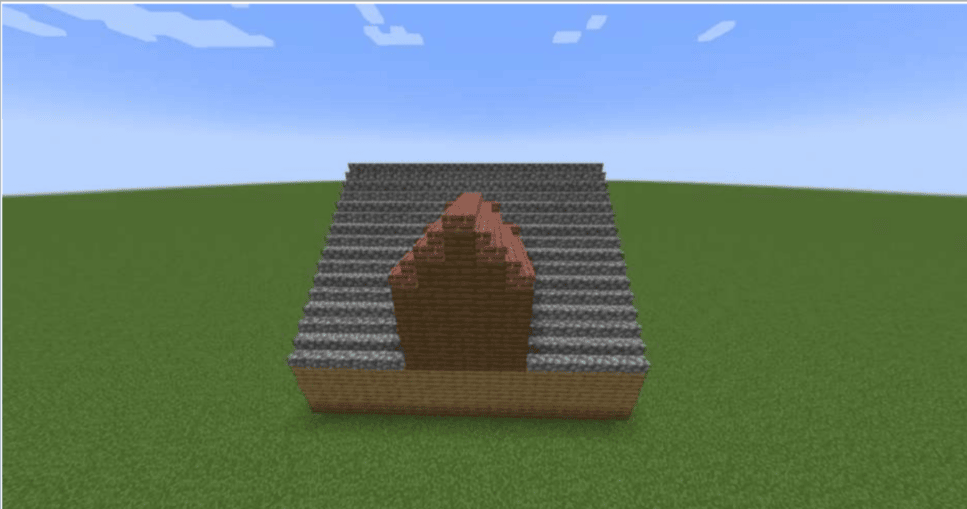
- Helm Roof
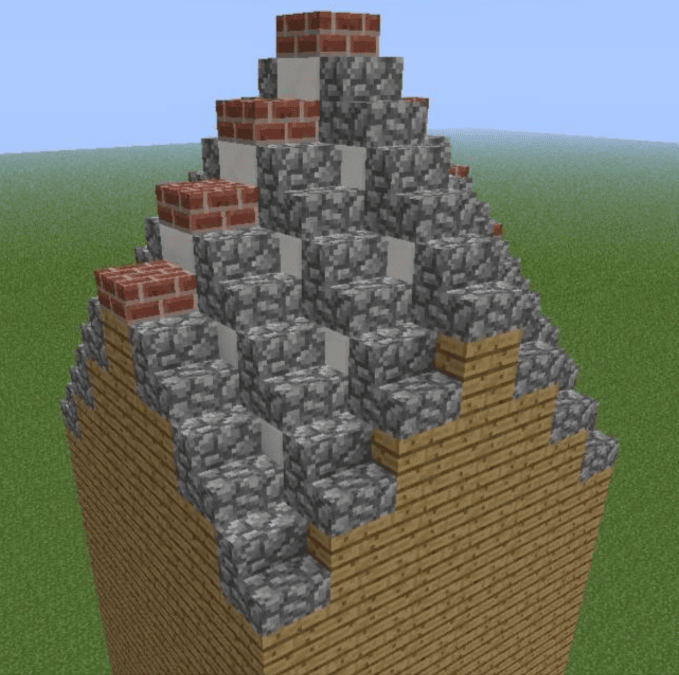
A square roof with four gable ends is known as a Rhenish helm. It is frequently used on towers. The building in this picture is 77 meters high. To close gaps in the roof, slabs are usually required beneath the main roof blocks.
The lower slabs are made of red brick, while the top slabs are made of quartz. Square towers of various widths work best with this design. Also, the stair blocks should be oriented in just two directions: north-south or east-west.
It is difficult to make a nice-looking helm roof with stair blocks facing in all four directions. Ordinary blocks are sufficient for symmetry in both directions.
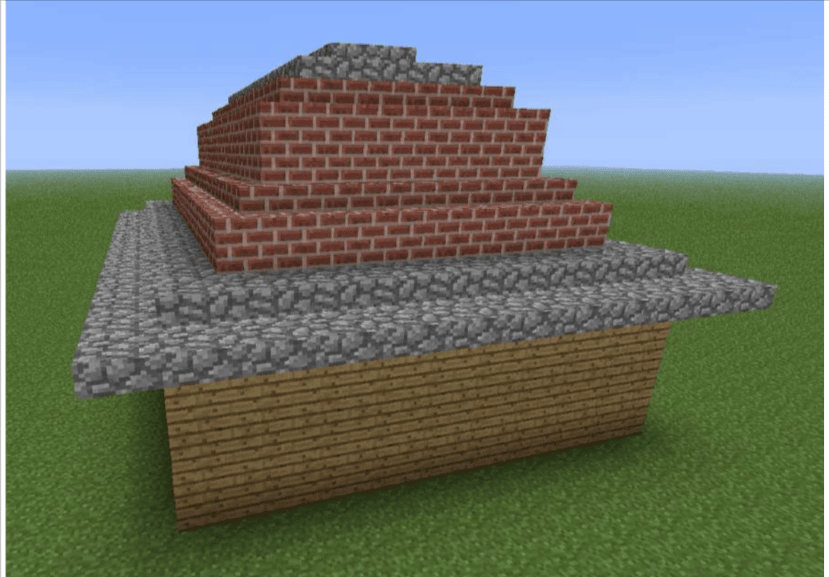
- Butterfly Roof
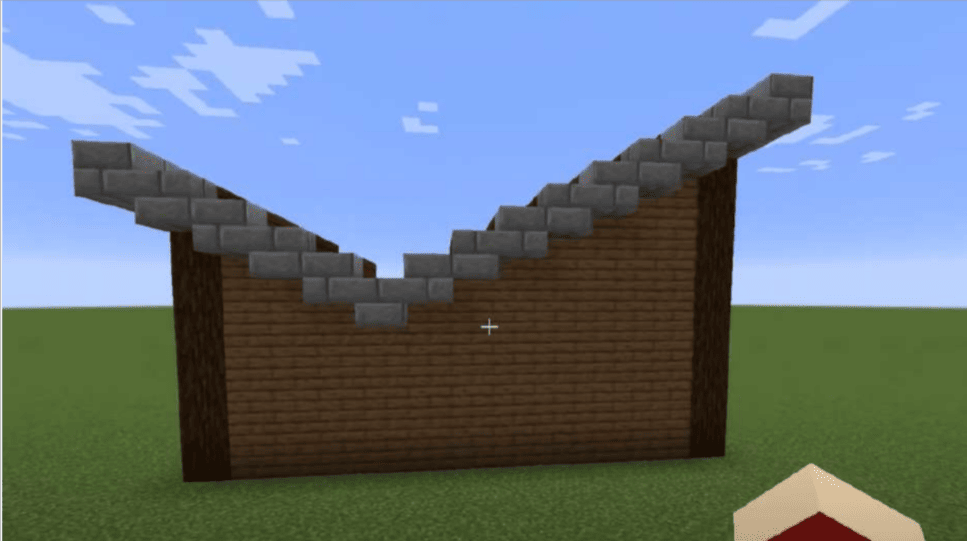
A butterfly roof is an eye-catching V-shaped roof that may be seen on certain modern buildings. The roof is typically extended beyond the boundaries of the structure to provide additional shade.
This design is common in central London and was also used in several Georgian and early Victorian terraced homes. This roof form is typically seen on the rear of a London home, behind either a normal gable roof or a facade. The gutters in the center frequently leak.
The main roof in this image is made of red brick, and the dark wood trim separates it from the surrounding houses.
These were some of the best Minecraft roof ideas for you to get inspired.
Additional Minecraft Roof Materials
- The Green Roof
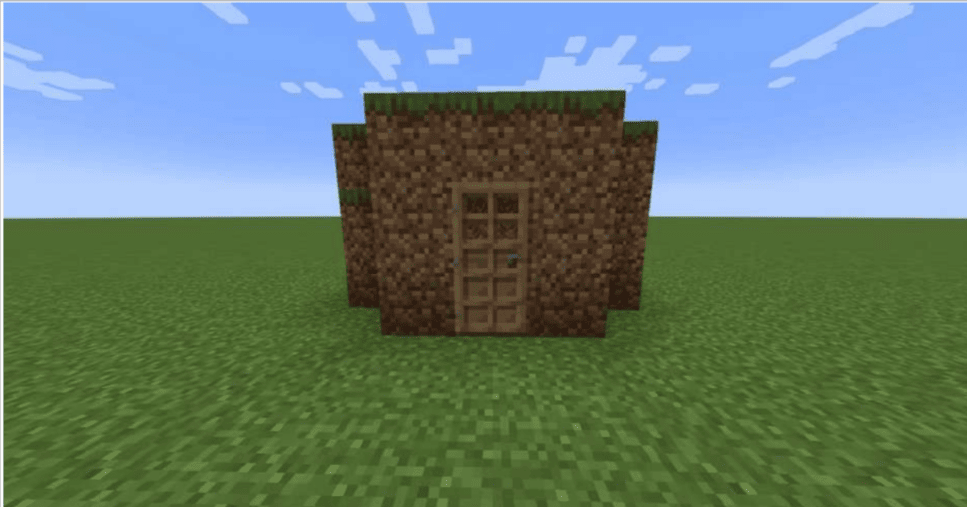
Green roofs were more widespread millennia before, but have recently gained popularity owing to their environmental benefits (such as stormwater mitigation, wildlife habitat provision, and urban heat-island reduction).
Numerous well-known incidents from Seattle might be used in an urban Minecraft scenario.
- Thatched Roof
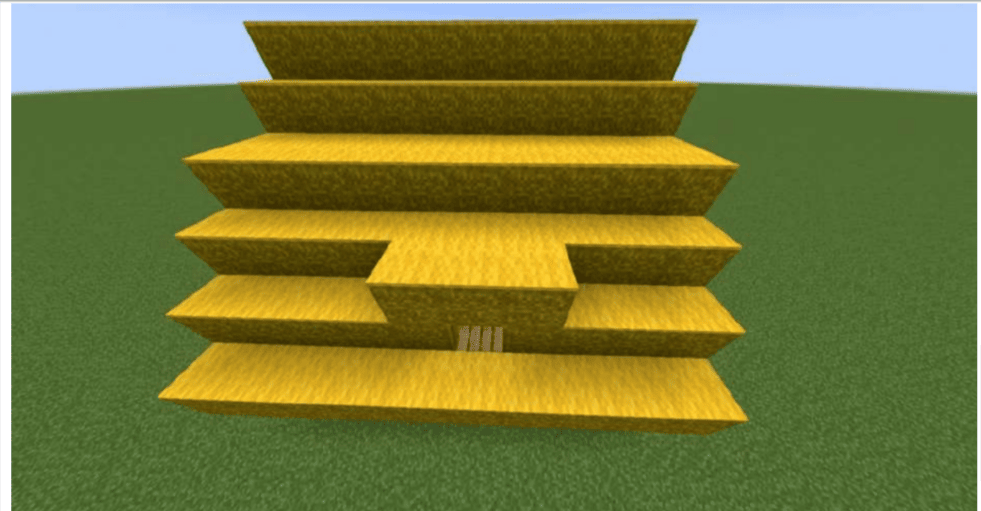
Thatching is another old roofing technique that uses straw, reeds, sedges, rushes, or heather. While a thatched roof can integrate most of the design elements featured on this page, including dormers, the main roof is often composed of a single unbroken layer to prevent water from soaking through.
Roof variations such as cross-gabling or monitors are uncommon on thatched structures. Dormers on a thatched roof are always wall dormers; however, there may be the odd deeply inset eyelid dormer, as shown in the photo.
When thatching a roof, slant the straw so that water runs off as soon as possible. In Minecraft, a covering of yellow carpets can improve the aesthetic of a roof.
As the older thatch wears out, some thatching procedures simply overlay fresh materials on top of the old. Such roofs can grow to be over two meters thick over time.
Dormers
A dormer is a building structural feature that protrudes from the sloping plane of the roof. (Consider the monitor, which crosses a roof ridge.)
Dormers increase roof space by raising headroom and allowing for the insertion of dormer windows. Dormers have their own ‘mini-roofs’ above them, which can have virtually as many different roof types as the structures themselves, including curving roofs.
- Wall Dormer
In the case of a wall dormer, the wall under the dormer is extended upward and given its roof section. Almost any type of dormer may be used to create wall dormers.
- The Blind Dormer
A unique type of dormer is the blind or false dormer. This is a fake dormer that can only be seen from the outside of the building. Its purpose is to give the building’s roof some interest or to make it look larger and more balanced. Any other dormer design may resemble a blind dormer.
How to Build a Roof in Minecraft
Choosing the Proper Roof Scale
Therefore, you must choose the size of the roof before beginning your Minecraft project. For occupied structures, like your own cozy house, it is advised to build a roof that is one to two storeys tall. If you believe a roof section does not need to be taller than that, you can build it as a two-story structure or use a mansard roof design with numerous storey.
Do you believe the roof’s height should be adjusted? Change its slope or incorporate a roof-level walkway. Wouldn’t you like to add some additional extra rooms when you have adequate volume beneath your roof for another story?’ For example, suppose you had a 20m wide structure with a single 45° gable roof.
As a result, you would have a roof made up of 10-11 blocks. If you have 4-5 blocks of storey, your recommended roof height is 2212 stories. To increase the volume of your roof, you might either add another storey or divide it into two or three smaller sections. You may gain 5-7 blocks of height!
However, by adding a one-block-high parapet and a one-block-wide walkway around the roof of your structure, you may lower the apparent height by around seven blocks. You may then construct a structure to keep the terrible mobs at bay!
How to Select the Best Minecraft Roof Large Building
A simple roof design will make a structure larger than around 1515 blocks look like a barn. If you want to build a big structure, you must build lots of roofs in one place to cover the whole thing. The presence of a single gable roof above a structure with several rooms may seem odd. In the case of large constructions, joining roofs may be useful.
How to Assemble Minecraft Roof Sections
While simple V-roofs look well on a small structure, it certainly takes more work to design a larger building with several roof parts. For different sections of a huge construction, you will need to build many roofs, and then join them all together.
Village buildings might serve as inspiration, but remember to round out the curves on your roof. This action could also need some practice. If you have never constructed a roof before, start with these simple steps.
Beginning with the portion with the tallest roof, begin laying blocks as though you were attempting to create the whole structure’s roof without any connections to other roof sections. Build the second-highest roof using the same design, but make a lovely joint where it connects with the tallest roof.
Roof connections can be made per block if desired, or they can be done one diagonally at a time. If the roofs that are linked have peculiar fittings, merging should take place block by block. This will make determining how complicated block patterns join along ascending diagonal lines easier. Continue to construct the roof pieces from highest to lowest.
When you come across these, be sure to combine them with previous roof components. When this phase is completed, just return to the lower sections where you left off. When all the roof pieces are finished, make sure to eliminate any unnecessary blocks.
If you are within the building, this phase will be much easier. When two roofs unite, they meet along a V-shaped line, and the roof blocks along the V inside should be removed at the final stage of your structure’s development. Once you have figured out how to accomplish this, it will be much easier and faster to avoid putting any extra unnecessary blocks at the beginning.
However, if you are constructing a complicated roof structure in Minecraft, you may create the roof first and then eliminate the unnecessary blocks from the inside of your design.
You can also take a look at what is coding for kids.
Conclusion
Minecraft allows you to be quite creative while designing your own house. What more could you do with this wonderful game than mine your ores, gather your resources, forge your weapons and armour, and even build your roof?
BrightChamps provides financial education for kids, equipping them with essential money management knowledge for a successful future.
Frequently Asked Questions (FAQs)
The texture of the oxidized copper is vivid green. In Minecraft, they may be used with dark blocks such as dark wood, deep slate, and Blackstone to create magnificent roofs.
The height limit in Minecraft 1.18 has been increased to 319, and the lower limit has been reduced to -64. This update raises the world’s overall height by 128 blocks. Players may now construct 64 blocks higher into the sky and explore 64 blocks deeper into the ground.